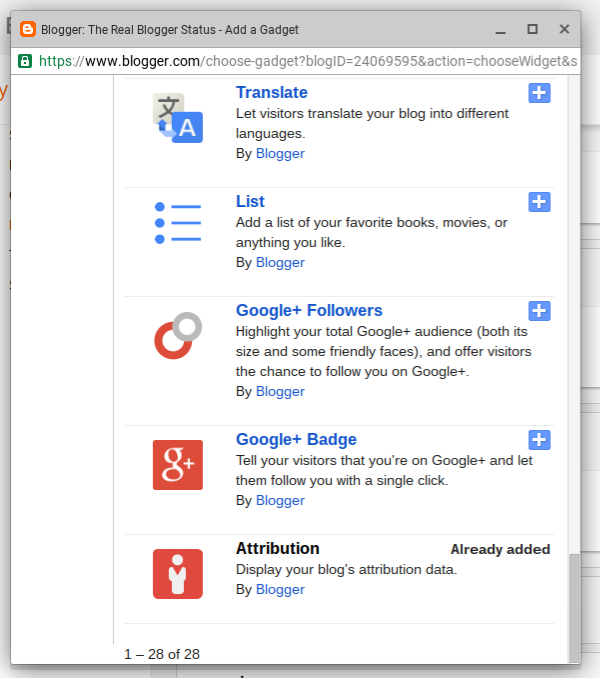
One of the most useful features of Blogger is the ability to add many different accessories, to a blog.
There are accessories, for every blog - and for every owner preference. The "Add a Gadget" wizard, in the Blogger dashboard, is the best procedure for adding accessories, to customise a blog reliably.
Using "Add a Gadget" is a simple process. It will be most useful, in the long term, if used cautiously, however.
Adding a gadget is not difficult.
Start from the Blogger dashboard Layout page.
Click on any link to "Add a Gadget", to that template section.
This link, for instance, will add a gadget to the right sidebar.
Choose any of dozens of interesting and useful accessories.
Be knowledgeable, when adding accessories.
Similar to the process of adding an HTML gadget, there are a few mistakes that you can avoid, when adding a gadget in general.
- Some sections of the Layout page may not allow gadgets to be added.
- When you find an interesting gadget, be selective!
- Some Blogger provided gadgets are found under "More Gadgets".
- Don't use "Add your own" - unless you know what you're doing!
- Add a new gadget, when adding important features.
- A gadget, as added, will be displayed on every page of the blog.
Some sections of the Layout page may not allow gadgets to be added.
Each template section can be subject to gadget limits, and to locking. This will prevent addition, removal, and / or re positioning of gadgets.
If you're unable to add, remove, or reposition a gadget, you may have to edit the template - and change the section settings.
When you find an interesting gadget, be selective!
"Add Gadget" lists gadgets produced by third party developers, as well as by Blogger Engineering. Some non Blogger produced gadgets won't benefit your blog, in the long term.
Look for "By Blogger", for the best choices.
Not all third party gadgets are intentionally malicious - but the most reliable gadgets will be explicitly labeled "By Blogger".
Some Blogger provided gadgets are found under "More Gadgets".
The "Basics" tab in "Add a Gadget" contains mostly gadgets "By Blogger" - and most gadgets "By Blogger" are found in "Basics". Some gadgets "By Blogger" are in "More Gadgets" - and you may have to search that list, carefully, to find what you need.
Don't use "Add your own" - unless you know what you're doing!
There are 3 tabs, in "Add a Gadget".
- Basics.
- More Gadgets.
- Add your own.
The latter, "Add your own", can lead to frustration.
If you are not familiar with coding XML gadgets (and probably do not need this advice), don't bother with "Add your own". Stick with "Basics" and "More Gadgets".
Add a new gadget, when adding important features.
You can install HTML code using the Template Editor - or you can add an HTML snippet into an existing HTML gadget - if you wish. I highly recommend that you add a new HTML gadget, for each important accessory, though.
A gadget, as added, will be displayed on every page of the blog.
By default, a gadget, once added, will be visible on every template page. You can, with some care and effort, make specific gadgets display selectively.
Enjoy adding accessories, properly.
So enjoy accessorising your blog - just accessorise carefully.
You can add any number of useful accessories, to a #Blogger blog, using the "Add a Gadget" wizard in the dashboard Layout page. The best choices are explicitly labeled "By Blogger".
Some blog owners decide to include music, to accessorise their blogs - and the first thing they ask for is instructions.
Please give me step by step instructions, to add music.
They don't consider that adding music, for any blog, will be their personal choice - and a music player will be personal too.
The choice of music player needs to be based on the music library provided.
You will probably want your music choice to match the blog content.
Some one who wants to provide classical music won't want to add a music player, published by a disco / techno website. Similarly, if you want to decorate your blog with country music, you will not be pleased by a player provided with a jazz website.
Each music website will provide their own player, to accompany their music library - and their own installation instructions, to install their player. You will probably be provided HTML / JavaScript code, by the website - so you will want to add an HTML / JavaScript gadget.
Position the player so it is convenient and visible, to your readers.
You will want the player controls to be visible - so you should position the new gadget, in a convenient and visible location, on the blog.
The one suggestion, that is consistently provided, is that you should choose a player that lets your readers choose whether to listen to the music. Please, don't use any player that only provides "autoplay".
The choice of music will be yours - and some readers will choose to view your blog. But some will choose to not listen to your music - and unless you want to limit reader population to those who can listen as they view, you will want to make the music optional.
Some #Blogger blog owners want to decorate their blogs with music - and they request detailed instructions for adding a music player. Music players are individual to the website providing the music - and the smart blog owner will choose the website, for one offering an appropriate music library.
Some blog owners are accustomed to editing their Blogger profiles, from time to time.
Publishing a blog that presents oneself to ones readers, openly, is important to some blog owners. The Blogger profile becomes a blog component that is edited, periodically, to keep the blog reader friendly.
The Blogger profile editor produces content which is displayed in the "About Me" gadget, for single owner blogs. Multiple owner blogs, complementarily, display "About Us" - which provides a different display.
Google+ profiles are edited using the Google+ desktop - and Google+ desktop content does not display in "About Me", in Blogger.
"About Me" displays Blogger Profile content. Once you upgrade to a Google+ profile, you won't have access to the Blogger Profile Editor - and you'll have no way to edit Blogger Profile content.
If the blog has been upgraded, you won't be able to edit your Blogger profile.
If you can edit your Google+ profile, sufficiently, you'll be good. If not, you can work around the problem.
Just create your own custom "About Me" gadget, using a Blogger HTML or Text gadget. You can do this in under an hour.

Add an "HTML / JavaScript" gadget. That's how you start.
Use the Layout "Add a Gadget" page, add an "HTML" or "Text" gadget, and fill the gadget content with your profile. With a little work, you can make a gadget with as much detail as any Google+ page or profile.
- Desktop banner background / icon.
- Photos.
- Text.
- Video.
- Whatever interests you - and your readers.
With a little work and imagination, you can have a blog that looks like part of your Google+ desktop.
Owners of #Blogger blogs that use Google+ profiles want to edit their "About Me" gadgets - but find no way to do that. With a Google+ profile edited using the Google+ desktop, no "About Me" displayed content is produced.
Fortunately, it's not difficult to produce a custom "About Me" gadget.
https://productforums.google.com/forum/#!category-topic/blogger/Ifg3aW2yMrg
Many popular accessories start with raw HTML / JavaScript code, from different third party services.
One of the advantages of publishing a Blogger blog is the abundance of available accessories. With Blogger being in the top 3 of Internet publishing platforms, every third party service wants customers who publish using Blogger.
There are plenty of abusive or malicious accessories, that should not be installed, even when offered - and there are ways to best install the accessories, that can be safely installed.
Most accessories, from third party services, will be provided as HTML / JavaScript.
To add HTML / JavaScript code, to a blog, you can use any of several techniques - though using a new HTML / JavaScript gadget is the smartest choice. Adding an HTML gadget, to a Blogger blog, is not difficult.
Add an HTML / JavaScript gadget, using "Add a Gadget" in Layout.
- Start from the "Layout" dashboard menu page.
- Click "Add a Gadget".
- Click the "+" button, for "HTML/JavaScript".
- Paste the code, given to you, into the "Content" box.
- Click "Show HTML/JavaScript", if the option is provided.
- Click "Save".
- Position the new gadget anywhere in the Layout display.
- Click on "Save arrangement".
Start from the dashboard Layout page, and select any convenient link to "Add a Gadget". Select "HTML/JavaScript" from the "Basics" tab, in the "Add a Gadget" wizard.
Select "HTML/JavaScript" in "Basics".
Paste the code, that you have to add, into the "Content" window, in the "Configure HTML/JavaScript" wizard. And if you wish, give your new gadget a Title.
Paste the code that you have, into "Content" - with the wizard in HTML mode ("Rich Text" displayed).
And select "Show HTML/JavaScript", if provided for this template - then click on "Save". Finally, click on "Save arrangement".
Avoid several well known mistakes, when adding gadgets.
There are mistakes, that you can avoid - if you know what to do.
- Be selective, when adding third party code.
- Add a gadget, using "Basics".
- Edit an HTML gadget, with "Rich Text" displayed as the caption (for HTML) - or with "Edit html" displayed as the caption (for Rich Text).
- With a dynamic template, attach or embed the content in a static page.
- With a mobile display, enable the gadget, if you want it to be viewed.
- With templates that have a disappearing sidebar, position the gadget in the footer.
- If "Show HTML/JavaScript" is provided for this template, select that option.
Be selective, when adding third party code.
It's your blog - and you are allowed to install any accessories and tweaks that interest you. For long term stability and success, though, you should try to only install code from reliable sources.
Your readers will be happier, with your blog using reliable accessories.
Add a gadget, using "Basics".
You'll start with an "Add a Gadget" link, on the dashboard Layout page - and the "Add a Gadget" wizard.
The "Add a Gadget" wizard has the "Basics" tab, with the "HTML / JavaScript" gadget in the list - and it has the "Add your own" tab. You should find the "HTML / JavaScript" gadget, in "Basics".
Edit an HTML gadget, with "Rich Text" / "Edit html" displayed as the caption.
The "HTML" / "Text" gadgets, intriguingly have the "Edit Html" / "Rich Text" tabs.
If you want to add / edit HTML or JavaScript, the caption should read "Rich Text".

The HTML gadget, in HTML mode.
Conversely, if you want to add / edit text, the caption should read "Edit html".
It's your choice. The "HTML / JavaScript" and "Text" gadgets are the same - just the captions ("Edit html" and "Rich Text") differ.
With a dynamic template, attach or embed the content in a static page.
Adding gadgets to dynamic templates is not a straightforward process. Gadgets have to be written specifically to support dynamic templates - and the HTML gadget is not written for this.
If you want an HTML gadget to work in a dynamic template, you'll need to attach or embed the gadget, in a static page.
With a mobile display, enable the gadget, if you want it to be viewed.
By default, the "HTML / JavaScript" gadget does not display, on a mobile browser. You will have to use the Template Editor, and enable the gadget to display, in mobile mode.
With templates that have a disappearing sidebar, position the gadget in the footer.
Some Responsive class templates have a sidebar that is hidden by default. To see the sidebar, you click on the "hamburger" icon in the header.
If you want your new gadget to work with the blog loaded - even without the sidebar showing - you need the gadget in a visible section. The footer is a better choice, in this case.
If "Show HTML/JavaScript" is provided for this template, select that option.
If the option to "Show HTML/JavaScript" is provided in the "Configure HTML/JavaScript" wizard, be sure to select that - if you want the gadget to operate, with the blog loaded. If the gadget should not be visible to the reader, but it needs to operate, you still must enable this option.
It's your blog.
There are ways to make an HTML gadget work, while ignoring the above advice. Long term success will be much more likely, though, with attention to the details.
One of the most common accessories, added to a #Blogger blog, starts with an HTML / JavaScript gadget. This is a very versatile gadget - and it's not difficult to install. There are several common sense details, however.
To encourage email subscriptions, and other social connections, some blog owners provide gadget toolbars, with useful links.
Some blog owners would like to position their gadgets in fixed screen positions.
I want to have a subscribe button hover at the top of the page, while people read my blog.
This blog has a hovering AddThis toolbar, which provides selected social sharing options. And, it has a hovering "Top of Page" button.
Adding a custom subscription gadget, in a fixed screen location, is not complicated.
AddThis has a large library of social sharing gadgets, with their icons - but they don't have any email subscription selections. But you can add an icon based "subscribe" button, "hovering" at the top of the page.
An occasional request suggests using a popup window, containing a subscription form. We don't recommend using a popup window - but a subscription form, on a FeedBurner hosted page, will provide the same function.
- Add FeedBurner "Subscribe by Email".
- Add a "Subscribe by Email" FeedBurner hosted form, and a link.
- Add a suitable icon, containing the FeedBurner subscription link.
- Try It.
See below "See the code asssembled.", for the detailed procedure.
Add FeedBurner "Subscribe by Email".
Using the dashboard Layout page, and "Add a Gadget", add a "Subscribe by Email" gadget. This creates a blog posts FeedBurner hosted feed.
FeedBurner provides the "Subscribe by Email" gadget, with the choice to display either an on screen form - or a simple link to a FeedBurner hosted form page.
Add a "Subscribe by Email" FeedBurner hosted form, and a link.
Once a "Subscribe by Email" gadget has been added, get the gadget link from the FeedBurner dashboard, at Publicize - "Email Subscriptions" - "Subscription Management" - "Preview Subscription Link…".
Start from the dashboard, at Publicize - "Email Subscriptions" - "Subscription Management".
The "Preview Subscription Link…" window contains the code, that we need.
Add a suitable icon, containing the FeedBurner subscription link.
Choose an attractive icon to contain the FeedBurner supplied link. Add an HTML gadget using "Add a Gadget", containing the icon with the link to the FeedBurner form - and displayed in a fixed location.
Try It.
I added a button, and a new subscription, to my test blog, "Chucks Tech World".
See the icon, in the top right margin?
See how the new icon floats?
See how it floats from the top - and from the right?
See the code, assembled.
A floating subscription button is simply an "HTML / Javascript" gadget, containing button code, linking to a FeedBurner subscription form. I position my gadget, in the footer, out of sight. The code "top:40px;right:60px;" positions the button to display relative to the top right corner - regardless of where the HTML gadget is positioned.
- Upload a suitable icon.
- Add the FeedBurner Subscription link code.
- Add the button code.
Start with an icon, uploaded:
<a href="https://blogger.googleusercontent.com/img/b/R29vZ2xl/AVvXsEii2fCZTJEcS0rg0NliF0abn3LvuRvBFczagaR3aJo66JQ2X2VzNScrxHothiYOgP83ZrrLHN7fFcFeA5ihXLTdIHu8oO7kaxaILeNXcICvNkVNwj2pVG86bXn2qyvJd13-luA-hoijps09/s1600/Subscribe+Icon.png" imageanchor="1" ><img border="0" src="https://blogger.googleusercontent.com/img/b/R29vZ2xl/AVvXsEii2fCZTJEcS0rg0NliF0abn3LvuRvBFczagaR3aJo66JQ2X2VzNScrxHothiYOgP83ZrrLHN7fFcFeA5ihXLTdIHu8oO7kaxaILeNXcICvNkVNwj2pVG86bXn2qyvJd13-luA-hoijps09/s320/Subscribe+Icon.png" /></a>
Here's the FeedBurner Subscription Link:
<a href="https://feedburner.google.com/fb/a/mailverify?uri=ChucksTechWorld&loc=en_US">Subscribe to Chucks Tech World by Email</a>
Here's the Floating Top Of Page Button:
<a style="display:scroll;position:fixed;bottom:20px;right:60px;" href="#" title="Top"><img border="0" height="60" width="60" src="https://blogger.googleusercontent.com/img/b/R29vZ2xl/AVvXsEh2eOcCRS3N1_JwNrk6zva82CQybo8TWCvgMs6lUtZhyl_6XrkbjWP8Ayf2eQLtg3KEaUMruYNMT3uHK7llf3gltPNd6PMaMEjSWXuTpPzCX-fAebzTg5xQTb9kdRRiRhVVm347DAyfZzdk/s320/Up+Arrow+4.jpg" /></a>
And put them all together:
<a style="display:scroll;position:fixed;top:40px;right:60px;" href="https://feedburner.google.com/fb/a/mailverify?uri=ChucksTechWorld&loc=en_US" title="Subscribe by Email" target="_blank"><img border="0" height="60" width="60" src="https://blogger.googleusercontent.com/img/b/R29vZ2xl/AVvXsEii2fCZTJEcS0rg0NliF0abn3LvuRvBFczagaR3aJo66JQ2X2VzNScrxHothiYOgP83ZrrLHN7fFcFeA5ihXLTdIHu8oO7kaxaILeNXcICvNkVNwj2pVG86bXn2qyvJd13-luA-hoijps09/s320/Subscribe+Icon.png" /></a>
And that's it.
I now have a hovering subscription icon, in this blog. Given a collection of icons, carefully arranged, you can have a hovering toolbar - to maybe complement a social media button toolbar.
Some #Blogger blog owners would like a hovering button or toolbar, to provide an email subscription form. This is an accessory that is not difficult to add.
We see occasional concern about providing email subscriptions, from blog owners in Blogger Help Forum: Get Help with an Issue.
How do I provide email subscriptions for my blog? Follow by Email does not work!
The blog in question is using a dynamic template - and it appears that the blog owner is out of luck.
The "Subscribe by Email" gadget does not work, with dynamic templates.
Add "Subscription Links" to a blog with a dynamic template.
For email subscriptions, and a blog with a dynamic template, you use the "Subscription Links" gadget. Here is my blog, Chucks Musings.
Use "Subscription Links" with a blog that has a dynamic template.
When you add "Follow by Email" to a blog with a non dynamic template, it sets up the "Email Subscriptions" service, in FeedBurner. "Subscription Links" is a collection of various subscription services - and won't activate "Email Subscriptions".
You may need to activate "Email Subscriptions".
You will probably need to activate the "Email Subscriptions" service, to use "Subscription Links" instead of "Follow by Email".
To use "Subscribe by Email" as a selection in "Subscription Links", be sure that the "Email Subscriptions" service is activated, from the FeedBurner dashboard.
Alternately, add "Subscribe by Email" in a linklist gadget.
Sometimes, you may not want to use "Subscription Links". So, just add the "Subscription Link Code", in a linklist gadget.
Here, we have a new sidebar accessory.
And when you click on the link, you get the familiar FeedBurner "Email Subscription Request" verification form.
So, either add "Subscription Links" - or make a custom LinkList accessory. One, or the other, will give you "Subscribe by Email", in a dynamic template.
Owners of #Blogger blogs, wishing to provide email subscriptions, find that "Follow by Email" won't work with a dynamic template. Fortunately, "Subscription Links" will provide email subscription - though the necessary FeedBurner service has to be activated.
https://productforums.google.com/forum/#!category-topic/blogger/lsAVQuj_FOw
Some blog owners can't get their new FaceBook gadgets to work, on their blogs.
We see the occasional report, in Blogger Help Forum: Get Help with an Issue.
The blog won't accept the code that Facebook Developer generated for me.
Adding HTML gadgets - and HTML gadgets using FaceBook code - can be frustrating. But, it's possible.
Adding a FaceBook gadget, to your blog, is not difficult - but success is found, in the details.
- Add the gadget as a new HTML gadget.
- Add the FaceBook SDK code, to the first FaceBook gadget.
Add the gadget as a new HTML gadget.
Blog maintenance is far easier, with a FaceBook gadget - or any other HTML / JavaScript based accessory - added as content, in a new HTML gadget - far smarter than using Template Editor.
Add the FaceBook SDK code, to the first FaceBook gadget.
FaceBook instructs us to add SDK code to each page which will display a FaceBook gadget - but advises that we should only add the SDK code once / page.
Gadget code, as provided by FaceBook Developers:
<div class="fb-comments" data-href="http://ourladyofoutrage.blogspot.com/" data-numposts="5">
</div>
Gadget code, as added to a new HTML gadget:
<div id="fb-root">
</div>
<script>(function(d, s, id) {
var js, fjs = d.getElementsByTagName(s)[0];
if (d.getElementById(id)) return;
js = d.createElement(s); js.id = id;
js.src = "//connect.facebook.net/en_US/sdk.js#xfbml=1&version=v2.5&appId=528167400699401";
fjs.parentNode.insertBefore(js, fjs);
}(document, 'script', 'facebook-jssdk'));</script>
<div class="fb-comments" data-href="http://ourladyofoutrage.blogspot.com/" data-numposts="5">
</div>
A new FaceBook gadget, being added.
Just pay attention to the details, for best results.
Some #Blogger blog owners try to add accessories provided by FaceBook Developers, without success. They don't realise the importance of the details involved.
We see various questions about getting advice and non standard accessories / code, from blogs and websites advertised outside Blogger / Google control - generally in Blogger Help Forum: Get Help with an Issue.Why can't I see my blog? Every time I click on "View blog", I get a face full of ads!
andWhere can I get accessories, gadgets, and templates for my blog??
andHow do I know what accessories, gadgets, and templates are safe, for my blog?
andWhy did Blogger lock my blog, as a malware host?
All of these folks are discussing the same issue - blog content security. Some are asking properly, before they cause their problems - but others are not.
We have several known bad actors, right now - who have been putting out various blog accessories which, initially, work fine.
After thousands of victims have installed some accessories on their blogs, the owners and readers observe that the blogs are suddenly redirecting to advertising pages, or throwing popup ads on top of blog content. The latency period, for some blogs which are the first to install a new hacker provided gadget, may be as long as 6 months to a year.
By the time any malicious gadgets are discovered, identified, and removed, the victims have to deal with unhappy readers, who don't enjoy seeing a screen full of ads, instead of their favourite blog to read.
Search engine reputation is also affected by this problem. In some cases, the malicious gadgets may be detected by Blogger - and the host blog (ie, your blog) is locked, as a suspected malware host. Even if Blogger does not detect a problem, services outside Blogger will trash your blog.
Thoughtful blog owners will ask how they can get good, reliable, and safe blog accessories. I would start, by ranking the possibilities.- Blogger "Add a Gadget", with gadgets labeled "By Blogger".
- Websites provided by well known Internet services.
- Blogger "Add a Gadget", with gadgets not labeled "By Blogger".
- Non Blogger websites provided by developers.
- Non Blogger websites provided by hackers and spammers.
1. Blogger "Add a Gadget", and gadgets labeled "By Blogger".
The most reliable and safe gadgets will always be found in the "Add a Gadget" library, and be labeled "By Blogger". You have to trust Blogger, if you are going to use their publishing platform in general.
The optional gadget library, and gadgets "By Blogger", is just as safe as the dashboard, and components referenced by the dashboard.
2. Websites maintained by well known Internet services.
Most well known Internet services and social networking platforms will provide gadgets that are designed for Blogger. The best gadgets will be labeled "For Blogger", and be written in Blogger compatible XML. Some general purpose gadgets, written in HTML / JavaScript, will also be suitable.
Almost any gadget in this category, if written by the staff of the service in question, will be free from malicious intent. Both FaceBook, and Twitter, for instance, provide gadget libraries. Because these gadgets were not written by Blogger staff, they will not be as reliable as Category #1.
3. Blogger "Add a Gadget", and gadgets not labeled "By Blogger".
Many gadgets provided in "Add a Gadget" will be provided by third party developers. Hopefully, Blogger / Google exercises some quality control, over gadgets distributed through their library.
That said, the first mass hacking of Blogger blogs, of 2009 - 2010, came through gadgets that were distributed from the "Add a Gadget" libraries. One such gadget was discovered, just last week.
Not all third party accessories are provided with malicious intent. Unfortunately, even if not provided maliciously, some accessories may be unreliable because of periodic changes by Blogger.
4. Non Blogger websites provided by developers.
After the unforgettable blog hijacks of 2009 / 2010, then 2010 / 2011, Blogger / Google Security got aggressive with the problems of malicious gadgets being served from their libraries. Most recent hacking attacks have been distributed from websites outside the control of Blogger / Google.
Some non Google websites are provided by third party developers, who write code almost as reliable as Blogger staff. However, if the choice for my blog was between gadgets in Categories #3 and #4, and be of equal functionality and suitability, I would choose #3 over #4 - and I would seriously recommend the same, if asked.
In some cases, legitimate third party developers have provided accessories that require access to their code libraries. The developers have gone out of business, and have cancelled the domains where the code libraries were served. The abandoned domains have been bought by spammers, as investments - based on serving ads to accumulated incoming traffic, from people surfing to the blogs and websites which have the accessories installed.
In some cases, the domains were actually abandoned by the developers. In other cases, the developers were spammers, who sold their domains for a good profit, to other spammers.
We, the blog owners, cannot really tell which case is involved, when our blogs start redirecting to pages of spam - or even malicious domains, serving malware to our readers. We do need to protect our readers, though.
5. Non Blogger websites provided by hackers and spammers.
Some websites outside the control of Blogger / Google should not be trusted. I would seriously suggest without hesitating, that you stay away from websites like "SEOYourBlog.com", "MakeMunyFromHome.info", and such.
Any blog or website, with clever initials in the name, should be considered, with great caution. Although "SEO" was originally a serious concept, most websites with "SEO" in the name will not have your best interests in mind. Likewise "GPT, "PTC", "PTS" will do you no good.
If and when you add gadgets, always add them using a new HTML / JavaScript gadget. Gadgets added using "Add a Gadget" can be easily removed, if they go bad. Gadgets added using "Edit HTML" must be removed using "Edit HTML" - and some gadgets will be extremely challenging to diagnose and remove.
Security begins with you.
An interesting bit of confusion is seen, occasionally, in Blogger Help Forum: Something Is Broken.I added a gadget using code from a third party website - but the new gadget shows the code, instead of the gadget content, when I view my blog!
This is somebody who was confused by the options offered by the gadget setup wizard.
When you add an HTML / JavaScript, or a Text, gadget to a blog, you can get odd results.
"Add a Gadget" provides the "HTML / JavaScript" and "Text" gadgets - your choice.
The captions and labels in the "Configure HTML/JavaScript" or "Configure Text" wizard can be a bit confusing. From the "Add a Gadget" wizard, you can select either an "HTML/JavaScript" gadget ("Configure HTML/JavaScript") or a "Text" gadget ("Configure Text").
The "HTML / JavaScript" and "Text" gadgets are identical - excepting the title.
Both the "Configure HTML/JavaScript" and "Configure Text" wizards use the same code - the only difference between the two is the header.
- Configure HTML/JavaScript
- Configure Text
Everything else is the same. Either wizard can create an "HTML / JavaScript" gadget (in HTML mode) - or a "Text" gadget (in Text mode) - as you wish.
- When the wizard is in HTML mode, the caption at the upper right border of the Content window will read "Rich Text". Positioning the cursor over "Rich Text" (and noting that the cursor does not change to a pointer), and clicking on "Rich Text", brings up the Text mode of the wizard.
- When the wizard is in Text mode, the caption will read "Edit Html" - and clicking on "Edit Html" puts the wizard into HTML mode, again.
The title of the wizard does not change, when switching modes.
The header of the wizard - "Configure HTML/JavaScript" or "Configure Text" - will remain as it was when the wizard was opened, ignoring any mode changes. The caption, at the upper right border of the Content window, is what matters.
- If you want to add code (HTML / JavaScript), you will want the caption to read "Rich Text".
- If you want to add text (Rich Text), you will want the caption to read "Edit Html".
Being in the wrong mode will produce inconsistent and odd results.
If you're in the wrong mode, you'll be able to enter a limited amount of content - but with odd results.
- If you're in HTML mode (with "Rich Text" showing), you'll be able to enter text - to a limited degree. HTML is simply fancy text, with tags (special keywords and symbols).
- The HTML editor toolbar will lack a few buttons - and using special characters like ampersand ("&"), greater than (">") - and less than ("<"), will produce random and unpredictable results.
- If you're in Text mode (with "Edit html" showing), you'll be able to enter the HTML code - but when the blog is displayed, you'll see code (which is just text) in place of a working gadget.
If you just added a new gadget - and ended up with visible code, when you tried to setup an HTML gadget - now you know why. Similarly, if the "Save" button is now broken, and you are trying to add or update a Text gadget.
This is one of several possible causes of problems seen when adding / updating the HTML / JavaScript / Text gadgets.
Almost every blogger is used to adding gadgets of various types, using the "Page Elements" wizard, to the header, the sidebar, and / or the footer of their blog. If you can't do that, you just aren't enjoying Layout Templates, to their fullest.
Some folks haven't yet realised that you can also add a gadget just above, or just below, the posts.
This is not the same as adding a gadget to the bottom of the header (which is, admittedly, just above the posts); nor is it the same as adding a gadget to the top of the footer (again, just below the posts).
A gadget just above, or just below, the Blog Posts gadget stops next to the sidebar - as opposed to continuing above or below the sidebar, should you add a gadget to the header or the footer. It's just as easy to add a gadget to one place, as to the other, though.

Just drag and drop any gadget of your choice, to the right spot. See what this looks like, in my demonstration blog, Nitecruzr New Template Laboratory.
For a variation on this, you can setup such a gadget to appear only on the first page.