The "Featured Post" gadget is a useful tool, for spotlighting individual posts.
One of the limitations of the gadget is that it, like many (though not all) Blogger supplied gadgets, allows only one copy on the blog, at any time. The gadget is, after all, called "Featured Post" - not "Featured Posts". Blogger does not give us the ability to feature multiple posts, simultaneously.
Given a little imagination, we can make the gadget work, for multiple posts. We can't feature multiple posts, simultaneously - but we can alternate featured posts, sequentially.
Combining the "Featured Post" gadget and labels, we can alternately feature multiple posts, in a daily or weekly sequence.
I added a label in this blog, "Featured Posts".
I identified a couple dozen posts, in this blog, which need to be featured - and gave each post the label "Featured Posts". My intention, once the Blogger Followers gadget rewrite effort is behind us, is to feature one different post in "Featured Posts", each day.
Just edit the "Featured Post" gadget, and select a different post - each day.
The "Featured Post" gadget is at the top of my blog.
I can edit the gadget, and open the label list.
And, select "Featured Posts".
That gives me a list of my posts, with the "Featured Posts" label.
And, I selected the currently featured post, "Dear Followers Of This Blog".
Next month, I may select a different post to be displayed as a Featured Post.
So I can't feature more than one post at a time - but I can alternately feature different posts. And with some planning, I can make it easy to alternately feature different posts.
The #Blogger supplied "Featured Post" gadget can't be used with more than one such gadget on any blog, simultaneously. It is called "Featured Post" - maybe, for a reason.
With a little planning, though, you can organise the posts to be featured - and change the gadget, daily or weekly.
Showing posts with label How Do I. Show all posts
Wednesday, May 25, 2016
Saturday, April 30, 2016
Now, You See It - Now, You Don't
Some blog owners create a post, with content that should be visible, only when required.
The post contains a question - accompanied by the answer to the question. The question should be viewed, without the answer being visible, to make the reader think about the answer. This is called, by many, a "spoiler".
Not everybody knows how to construct a spoiler. Some blogs use JavaScript - painful to construct, and maybe not effective for every reader. Security conscious blog readers may block scripts from Blogger blogs - and either your spoiler is visible, immediately - or never becomes visible.
Neither of the latter scenarios make the post a lot of fun to read.
You don't need JavaScript, to make a spoiler.
This is fortunate, because not every reader is going to allow scripts, from every blog. Personally, I block JavaScript, in general - and enable only for my own blogs - and for specific websites, like the Blogger dashboard and most Google pages.
If the blog posts have a solid white background, you make the post text white.
Examine a post, in my text blog.
Two spoilers - both blank.
Click and drag across the first spoiler - and see the first answer.
Click and drag across the second spoiler - and see the second answer.
The spoiler code is not complicated.
Hoping that your blog does not use a semi transparent floating background over a multi colour background, just make the text the same color as the background. Then, instruct the reader to click and drag the cursor, to highlight and make the spoiler visible.
A #Blogger blog post which contains a question and answer section is fun to read - but not every blog reader will benefit, with posts that use JavaScript, to hide text content.
An easy way to hide content is to make the text the color of the background. The reader can click and drag, to highlight the text, when then is visible.
http://blogging.nitecruzr.net/2011/10/cookies-vs-scripts-two-types-of-server.html
http://blogging.nitecruzr.net/2009/04/many-faces-of-google.html
</span>
The post contains a question - accompanied by the answer to the question. The question should be viewed, without the answer being visible, to make the reader think about the answer. This is called, by many, a "spoiler".
Not everybody knows how to construct a spoiler. Some blogs use JavaScript - painful to construct, and maybe not effective for every reader. Security conscious blog readers may block scripts from Blogger blogs - and either your spoiler is visible, immediately - or never becomes visible.
Neither of the latter scenarios make the post a lot of fun to read.
You don't need JavaScript, to make a spoiler.
This is fortunate, because not every reader is going to allow scripts, from every blog. Personally, I block JavaScript, in general - and enable only for my own blogs - and for specific websites, like the Blogger dashboard and most Google pages.
If the blog posts have a solid white background, you make the post text white.
Examine a post, in my text blog.
Two spoilers - both blank.
Click and drag across the first spoiler - and see the first answer.
Click and drag across the second spoiler - and see the second answer.
The spoiler code is not complicated.
What would YOU do?
What Lancelot chose is hidden. But - make <span style="font-weight:bold;">your</span> choice before peeking. To see the answer, highlight the area indicated, by clicking the mouse and dragging the cursor between the arrows.
The answer is here ==><span style="color: rgb(255, 255, 255);">Noble Lancelot said that he would allow <span style="font-weight:bold;">her</span> to make the choice herself. Upon hearing this, she announced that she would be beautiful all the time because he had respected her enough to let her be in charge of her own life.</span><==
Now - what is the moral to this story? To see the answer, highlight the area indicated.
The answer is here ==><span style="color: rgb(255, 255, 255);">If you don't let a woman have her own way, things are going to get <span style="font-weight:bold;">ugly</span>.</span>==
Hoping that your blog does not use a semi transparent floating background over a multi colour background, just make the text the same color as the background. Then, instruct the reader to click and drag the cursor, to highlight and make the spoiler visible.
A #Blogger blog post which contains a question and answer section is fun to read - but not every blog reader will benefit, with posts that use JavaScript, to hide text content.
An easy way to hide content is to make the text the color of the background. The reader can click and drag, to highlight the text, when then is visible.
http://blogging.nitecruzr.net/2011/10/cookies-vs-scripts-two-types-of-server.html
http://blogging.nitecruzr.net/2009/04/many-faces-of-google.html
</span>
Saturday, April 2, 2016
Disable AdSense Gadgets, On Static Pages
One problem with AdSense, that some blog owners have reported, is that AdSense ads are not permitted on pages with very little AdSense relevant content.
Unfortunately for some blog owners, the responsibility for preventing this is left to the blog owner.
Blogs with static pages, and AdSense gadgets in the sidebar, are a problem here. Static pages with little blog relevant content - such as label indexes, expanded owner profiles, special gadgets like Followers displays - cause problems with the AdSense ad classifier - and can cause blogs to lose ads.
As an AdSense publisher, the blog owner is expected to ensure that ads are not displayed on unsuitable blog pages.
Fortunately, it's not difficult to block AdSense ads from static pages. Just add a CSS rule with a "static page" conditional, to block display of each AdSense gadget.
If you want to block gadget "AdSense1" from displaying on all static pages, that's a simple CSS rule, added using "Add CSS".
Note that I wrote this to selectively block AdSense gadgets from displaying - but you can use it with any gadget, that you need to block. AdSense is simply one gadget that needs to be selectively displayed.
As always, be aware that the blank line above and below the code, as displayed here, is not intended to be decorative. Any time you add CSS rules, the blank line is required, to separate each CSS rule - and make each rule operational.
If the blog publishes actual blog content on some static pages, conditionals will be a bit more complicated. This is one more reason why static pages are not typically used for blog content.
Owners of #Blogger blogs with AdSense ads, that use static pages without AdSense relevant content, need to block ads from displaying on such pages. Failure to display ads selectively can cause problems with ads on the blog.
Fortunately, a simple CSS rule can be used, to block ads from static pages.
https://productforums.google.com/d/topic/blogger/7ANVOrQuvIo/discussion
https://productforums.google.com/d/topic/blogger/-p6mdLF2B08/discussion
Unfortunately for some blog owners, the responsibility for preventing this is left to the blog owner.
Blogs with static pages, and AdSense gadgets in the sidebar, are a problem here. Static pages with little blog relevant content - such as label indexes, expanded owner profiles, special gadgets like Followers displays - cause problems with the AdSense ad classifier - and can cause blogs to lose ads.
As an AdSense publisher, the blog owner is expected to ensure that ads are not displayed on unsuitable blog pages.
Fortunately, it's not difficult to block AdSense ads from static pages. Just add a CSS rule with a "static page" conditional, to block display of each AdSense gadget.
<b:if cond='data:blog.pageType == "static_page"'>
If you want to block gadget "AdSense1" from displaying on all static pages, that's a simple CSS rule, added using "Add CSS".
Note that I wrote this to selectively block AdSense gadgets from displaying - but you can use it with any gadget, that you need to block. AdSense is simply one gadget that needs to be selectively displayed.
<b:if cond='data:blog.pageType == "static_page"'>
<style>
#AdSense1 {display: none !important;}
</style>
</b:if>
As always, be aware that the blank line above and below the code, as displayed here, is not intended to be decorative. Any time you add CSS rules, the blank line is required, to separate each CSS rule - and make each rule operational.
If the blog publishes actual blog content on some static pages, conditionals will be a bit more complicated. This is one more reason why static pages are not typically used for blog content.
Owners of #Blogger blogs with AdSense ads, that use static pages without AdSense relevant content, need to block ads from displaying on such pages. Failure to display ads selectively can cause problems with ads on the blog.
Fortunately, a simple CSS rule can be used, to block ads from static pages.
https://productforums.google.com/d/topic/blogger/7ANVOrQuvIo/discussion
https://productforums.google.com/d/topic/blogger/-p6mdLF2B08/discussion
Friday, April 1, 2016
Add A Fixed Location "Subscribe" Button To Your Blog
To encourage email subscriptions, and other social connections, some blog owners provide gadget toolbars, with useful links.
Some blog owners would like to position their gadgets in fixed screen positions.
Adding a custom subscription gadget, in a fixed screen location, is not complicated.
AddThis has a large library of social sharing gadgets, with their icons - but they don't have any email subscription selections. But you can add an icon based "subscribe" button, "hovering" at the top of the page.
An occasional request suggests using a popup window, containing a subscription form. We don't recommend using a popup window - but a subscription form, on a FeedBurner hosted page, will provide the same function.
See below "See the code asssembled.", for the detailed procedure.
Add FeedBurner "Subscribe by Email".
Using the dashboard Layout page, and "Add a Gadget", add a "Subscribe by Email" gadget. This creates a blog posts FeedBurner hosted feed.
FeedBurner provides the "Subscribe by Email" gadget, with the choice to display either an on screen form - or a simple link to a FeedBurner hosted form page.
Add a "Subscribe by Email" FeedBurner hosted form, and a link.
Once a "Subscribe by Email" gadget has been added, get the gadget link from the FeedBurner dashboard, at Publicize - "Email Subscriptions" - "Subscription Management" - "Preview Subscription Link…".
Start from the dashboard, at Publicize - "Email Subscriptions" - "Subscription Management".
The "Preview Subscription Link…" window contains the code, that we need.
Add a suitable icon, containing the FeedBurner subscription link.
Choose an attractive icon to contain the FeedBurner supplied link. Add an HTML gadget using "Add a Gadget", containing the icon with the link to the FeedBurner form - and displayed in a fixed location.
Try It.
I added a button, and a new subscription, to my test blog, "Chucks Tech World".
See the icon, in the top right margin?
See how the new icon floats?
See how it floats from the top - and from the right?
See the code, assembled.
A floating subscription button is simply an "HTML / Javascript" gadget, containing button code, linking to a FeedBurner subscription form. I position my gadget, in the footer, out of sight. The code "top:40px;right:60px;" positions the button to display relative to the top right corner - regardless of where the HTML gadget is positioned.
Start with an icon, uploaded:
Here's the FeedBurner Subscription Link:
Here's the Floating Top Of Page Button:
And put them all together:
And that's it.
I now have a hovering subscription icon, in this blog. Given a collection of icons, carefully arranged, you can have a hovering toolbar - to maybe complement a social media button toolbar.
Some #Blogger blog owners would like a hovering button or toolbar, to provide an email subscription form. This is an accessory that is not difficult to add.
Some blog owners would like to position their gadgets in fixed screen positions.
I want to have a subscribe button hover at the top of the page, while people read my blog.This blog has a hovering AddThis toolbar, which provides selected social sharing options. And, it has a hovering "Top of Page" button.
Adding a custom subscription gadget, in a fixed screen location, is not complicated.
AddThis has a large library of social sharing gadgets, with their icons - but they don't have any email subscription selections. But you can add an icon based "subscribe" button, "hovering" at the top of the page.
An occasional request suggests using a popup window, containing a subscription form. We don't recommend using a popup window - but a subscription form, on a FeedBurner hosted page, will provide the same function.
- Add FeedBurner "Subscribe by Email".
- Add a "Subscribe by Email" FeedBurner hosted form, and a link.
- Add a suitable icon, containing the FeedBurner subscription link.
- Try It.
See below "See the code asssembled.", for the detailed procedure.
Add FeedBurner "Subscribe by Email".
Using the dashboard Layout page, and "Add a Gadget", add a "Subscribe by Email" gadget. This creates a blog posts FeedBurner hosted feed.
FeedBurner provides the "Subscribe by Email" gadget, with the choice to display either an on screen form - or a simple link to a FeedBurner hosted form page.
Add a "Subscribe by Email" FeedBurner hosted form, and a link.
Once a "Subscribe by Email" gadget has been added, get the gadget link from the FeedBurner dashboard, at Publicize - "Email Subscriptions" - "Subscription Management" - "Preview Subscription Link…".
Start from the dashboard, at Publicize - "Email Subscriptions" - "Subscription Management".
The "Preview Subscription Link…" window contains the code, that we need.
Add a suitable icon, containing the FeedBurner subscription link.
Choose an attractive icon to contain the FeedBurner supplied link. Add an HTML gadget using "Add a Gadget", containing the icon with the link to the FeedBurner form - and displayed in a fixed location.
Try It.
I added a button, and a new subscription, to my test blog, "Chucks Tech World".
See the icon, in the top right margin?
See how the new icon floats?
See how it floats from the top - and from the right?
See the code, assembled.
A floating subscription button is simply an "HTML / Javascript" gadget, containing button code, linking to a FeedBurner subscription form. I position my gadget, in the footer, out of sight. The code "top:40px;right:60px;" positions the button to display relative to the top right corner - regardless of where the HTML gadget is positioned.
- Upload a suitable icon.
- Add the FeedBurner Subscription link code.
- Add the button code.
Start with an icon, uploaded:
<a href="https://blogger.googleusercontent.com/img/b/R29vZ2xl/AVvXsEii2fCZTJEcS0rg0NliF0abn3LvuRvBFczagaR3aJo66JQ2X2VzNScrxHothiYOgP83ZrrLHN7fFcFeA5ihXLTdIHu8oO7kaxaILeNXcICvNkVNwj2pVG86bXn2qyvJd13-luA-hoijps09/s1600/Subscribe+Icon.png" imageanchor="1" ><img border="0" src="https://blogger.googleusercontent.com/img/b/R29vZ2xl/AVvXsEii2fCZTJEcS0rg0NliF0abn3LvuRvBFczagaR3aJo66JQ2X2VzNScrxHothiYOgP83ZrrLHN7fFcFeA5ihXLTdIHu8oO7kaxaILeNXcICvNkVNwj2pVG86bXn2qyvJd13-luA-hoijps09/s320/Subscribe+Icon.png" /></a>
Here's the FeedBurner Subscription Link:
<a href="https://feedburner.google.com/fb/a/mailverify?uri=ChucksTechWorld&loc=en_US">Subscribe to Chucks Tech World by Email</a>
Here's the Floating Top Of Page Button:
<a style="display:scroll;position:fixed;bottom:20px;right:60px;" href="#" title="Top"><img border="0" height="60" width="60" src="https://blogger.googleusercontent.com/img/b/R29vZ2xl/AVvXsEh2eOcCRS3N1_JwNrk6zva82CQybo8TWCvgMs6lUtZhyl_6XrkbjWP8Ayf2eQLtg3KEaUMruYNMT3uHK7llf3gltPNd6PMaMEjSWXuTpPzCX-fAebzTg5xQTb9kdRRiRhVVm347DAyfZzdk/s320/Up+Arrow+4.jpg" /></a>
And put them all together:
<a style="display:scroll;position:fixed;top:40px;right:60px;" href="https://feedburner.google.com/fb/a/mailverify?uri=ChucksTechWorld&loc=en_US" title="Subscribe by Email" target="_blank"><img border="0" height="60" width="60" src="https://blogger.googleusercontent.com/img/b/R29vZ2xl/AVvXsEii2fCZTJEcS0rg0NliF0abn3LvuRvBFczagaR3aJo66JQ2X2VzNScrxHothiYOgP83ZrrLHN7fFcFeA5ihXLTdIHu8oO7kaxaILeNXcICvNkVNwj2pVG86bXn2qyvJd13-luA-hoijps09/s320/Subscribe+Icon.png" /></a>
And that's it.
I now have a hovering subscription icon, in this blog. Given a collection of icons, carefully arranged, you can have a hovering toolbar - to maybe complement a social media button toolbar.
Some #Blogger blog owners would like a hovering button or toolbar, to provide an email subscription form. This is an accessory that is not difficult to add.
Saturday, January 3, 2015
Adding A "Top Of Page" Button To The Blog
This week, I added a gadget that's been needed, on this blog, for some time.
You may see my new "Top" button, at the lower right corner of this blog. If you have a normally wide browser window, with wallpaper showing on either side of the posts / sidebar section, you'll see the new gadget floating on top of the wallpaper. If you have squeezed your browser window to save horizontal space, you may see the new gadget floating on top of the sidebar (but beneath the sidebar gadgets).
This is an extremely easy tweak to add. The hard part was finding - and sizing - the icon that I used.
To find a suitable icon for the button, Google for it.
To find the icon, Google Is Your Friend. Just look through the search listings, until you find one that fits with your blog.
Once you have found an icon that you like, download to your computer - then upload to your blog - politely. Don't hot link icons.
Once your chosen icon is saved as a blog image, setup the button code.
Once you have your icon politely saved as part of your blog, add an HTML gadget - and add the gadget code, in the Content window of the HTML gadget.
Here's the magic.
That positions the icon in a fixed location on the screen. The new HTML gadget contains the code - and can be located anywhere in the blog. The magic determines where the icon is displayed.
Adjust settings, to make the button appear in an acceptable screen position.
Adjust "Bottom" and "Right" values, to position your new icon in the desired location, for your blog. Resize the browser window a few times - make it narrower and wider - and get an idea how the final location of the icon may vary. Test in different browsers, too.
This is my icon:
Your icon will have a different URL. Use your own icon, please!
Then sit back, and enjoy your blog, with its new navigational aid.
A caveat.
If you add your "Top Of Page" button code into a page or post, never switch between Compose and HTML modes, when editing that page or post.
You may see my new "Top" button, at the lower right corner of this blog. If you have a normally wide browser window, with wallpaper showing on either side of the posts / sidebar section, you'll see the new gadget floating on top of the wallpaper. If you have squeezed your browser window to save horizontal space, you may see the new gadget floating on top of the sidebar (but beneath the sidebar gadgets).
This is an extremely easy tweak to add. The hard part was finding - and sizing - the icon that I used.
To find a suitable icon for the button, Google for it.
To find the icon, Google Is Your Friend. Just look through the search listings, until you find one that fits with your blog.
free up arrow icon
Once you have found an icon that you like, download to your computer - then upload to your blog - politely. Don't hot link icons.
- Hotlinking is rude, and may abuse somebody's limited bandwidth.
- Hotlinking depends upon somebody's intention to host their icons, using their service, for eternity (however long you publish your blog, anyway).
Once your chosen icon is saved as a blog image, setup the button code.
Once you have your icon politely saved as part of your blog, add an HTML gadget - and add the gadget code, in the Content window of the HTML gadget.
<a style="display:scroll;position:fixed;bottom:20px;right:60px;" href="#" title="Top"><img border="0" height="60" width="60" src="https://blogger.googleusercontent.com/img/b/R29vZ2xl/AVvXsEh2eOcCRS3N1_JwNrk6zva82CQybo8TWCvgMs6lUtZhyl_6XrkbjWP8Ayf2eQLtg3KEaUMruYNMT3uHK7llf3gltPNd6PMaMEjSWXuTpPzCX-fAebzTg5xQTb9kdRRiRhVVm347DAyfZzdk/s320/Up+Arrow+4.jpg" /></a>
Here's the magic.
style="display:scroll;position:fixed;bottom:20px;right:60px;"
That positions the icon in a fixed location on the screen. The new HTML gadget contains the code - and can be located anywhere in the blog. The magic determines where the icon is displayed.
Adjust settings, to make the button appear in an acceptable screen position.
Adjust "Bottom" and "Right" values, to position your new icon in the desired location, for your blog. Resize the browser window a few times - make it narrower and wider - and get an idea how the final location of the icon may vary. Test in different browsers, too.
This is my icon:
https://blogger.googleusercontent.com/img/b/R29vZ2xl/AVvXsEh2eOcCRS3N1_JwNrk6zva82CQybo8TWCvgMs6lUtZhyl_6XrkbjWP8Ayf2eQLtg3KEaUMruYNMT3uHK7llf3gltPNd6PMaMEjSWXuTpPzCX-fAebzTg5xQTb9kdRRiRhVVm347DAyfZzdk/s320/Up+Arrow+4.jpg
Your icon will have a different URL. Use your own icon, please!
Then sit back, and enjoy your blog, with its new navigational aid.
A caveat.
If you add your "Top Of Page" button code into a page or post, never switch between Compose and HTML modes, when editing that page or post.
Monday, December 8, 2014
Use Common Sense, And Protect Your Blog
We see various questions about getting advice and non standard accessories / code, from blogs and websites advertised outside Blogger / Google control - generally in Blogger Help Forum: Get Help with an Issue.
We have several known bad actors, right now - who have been putting out various blog accessories which, initially, work fine.
After thousands of victims have installed some accessories on their blogs, the owners and readers observe that the blogs are suddenly redirecting to advertising pages, or throwing popup ads on top of blog content. The latency period, for some blogs which are the first to install a new hacker provided gadget, may be as long as 6 months to a year.
By the time any malicious gadgets are discovered, identified, and removed, the victims have to deal with unhappy readers, who don't enjoy seeing a screen full of ads, instead of their favourite blog to read.
Search engine reputation is also affected by this problem. In some cases, the malicious gadgets may be detected by Blogger - and the host blog (ie, your blog) is locked, as a suspected malware host. Even if Blogger does not detect a problem, services outside Blogger will trash your blog.
Thoughtful blog owners will ask how they can get good, reliable, and safe blog accessories. I would start, by ranking the possibilities.
1. Blogger "Add a Gadget", and gadgets labeled "By Blogger".
The most reliable and safe gadgets will always be found in the "Add a Gadget" library, and be labeled "By Blogger". You have to trust Blogger, if you are going to use their publishing platform in general.
The optional gadget library, and gadgets "By Blogger", is just as safe as the dashboard, and components referenced by the dashboard.
2. Websites maintained by well known Internet services.
Most well known Internet services and social networking platforms will provide gadgets that are designed for Blogger. The best gadgets will be labeled "For Blogger", and be written in Blogger compatible XML. Some general purpose gadgets, written in HTML / JavaScript, will also be suitable.
Almost any gadget in this category, if written by the staff of the service in question, will be free from malicious intent. Both FaceBook, and Twitter, for instance, provide gadget libraries. Because these gadgets were not written by Blogger staff, they will not be as reliable as Category #1.
3. Blogger "Add a Gadget", and gadgets not labeled "By Blogger".
Many gadgets provided in "Add a Gadget" will be provided by third party developers. Hopefully, Blogger / Google exercises some quality control, over gadgets distributed through their library.
That said, the first mass hacking of Blogger blogs, of 2009 - 2010, came through gadgets that were distributed from the "Add a Gadget" libraries. One such gadget was discovered, just last week.
Not all third party accessories are provided with malicious intent. Unfortunately, even if not provided maliciously, some accessories may be unreliable because of periodic changes by Blogger.
4. Non Blogger websites provided by developers.
After the unforgettable blog hijacks of 2009 / 2010, then 2010 / 2011, Blogger / Google Security got aggressive with the problems of malicious gadgets being served from their libraries. Most recent hacking attacks have been distributed from websites outside the control of Blogger / Google.
Some non Google websites are provided by third party developers, who write code almost as reliable as Blogger staff. However, if the choice for my blog was between gadgets in Categories #3 and #4, and be of equal functionality and suitability, I would choose #3 over #4 - and I would seriously recommend the same, if asked.
In some cases, legitimate third party developers have provided accessories that require access to their code libraries. The developers have gone out of business, and have cancelled the domains where the code libraries were served. The abandoned domains have been bought by spammers, as investments - based on serving ads to accumulated incoming traffic, from people surfing to the blogs and websites which have the accessories installed.
In some cases, the domains were actually abandoned by the developers. In other cases, the developers were spammers, who sold their domains for a good profit, to other spammers.
We, the blog owners, cannot really tell which case is involved, when our blogs start redirecting to pages of spam - or even malicious domains, serving malware to our readers. We do need to protect our readers, though.
5. Non Blogger websites provided by hackers and spammers.
Some websites outside the control of Blogger / Google should not be trusted. I would seriously suggest without hesitating, that you stay away from websites like "SEOYourBlog.com", "MakeMunyFromHome.info", and such.
Any blog or website, with clever initials in the name, should be considered, with great caution. Although "SEO" was originally a serious concept, most websites with "SEO" in the name will not have your best interests in mind. Likewise "GPT, "PTC", "PTS" will do you no good.
If and when you add gadgets, always add them using a new HTML / JavaScript gadget. Gadgets added using "Add a Gadget" can be easily removed, if they go bad. Gadgets added using "Edit HTML" must be removed using "Edit HTML" - and some gadgets will be extremely challenging to diagnose and remove.
Security begins with you.
Why can't I see my blog? Every time I click on "View blog", I get a face full of ads!and
Where can I get accessories, gadgets, and templates for my blog??and
How do I know what accessories, gadgets, and templates are safe, for my blog?and
Why did Blogger lock my blog, as a malware host?All of these folks are discussing the same issue - blog content security. Some are asking properly, before they cause their problems - but others are not.
We have several known bad actors, right now - who have been putting out various blog accessories which, initially, work fine.
After thousands of victims have installed some accessories on their blogs, the owners and readers observe that the blogs are suddenly redirecting to advertising pages, or throwing popup ads on top of blog content. The latency period, for some blogs which are the first to install a new hacker provided gadget, may be as long as 6 months to a year.
By the time any malicious gadgets are discovered, identified, and removed, the victims have to deal with unhappy readers, who don't enjoy seeing a screen full of ads, instead of their favourite blog to read.
Search engine reputation is also affected by this problem. In some cases, the malicious gadgets may be detected by Blogger - and the host blog (ie, your blog) is locked, as a suspected malware host. Even if Blogger does not detect a problem, services outside Blogger will trash your blog.
Thoughtful blog owners will ask how they can get good, reliable, and safe blog accessories. I would start, by ranking the possibilities.
- Blogger "Add a Gadget", with gadgets labeled "By Blogger".
- Websites provided by well known Internet services.
- Blogger "Add a Gadget", with gadgets not labeled "By Blogger".
- Non Blogger websites provided by developers.
- Non Blogger websites provided by hackers and spammers.
1. Blogger "Add a Gadget", and gadgets labeled "By Blogger".
The most reliable and safe gadgets will always be found in the "Add a Gadget" library, and be labeled "By Blogger". You have to trust Blogger, if you are going to use their publishing platform in general.
The optional gadget library, and gadgets "By Blogger", is just as safe as the dashboard, and components referenced by the dashboard.
2. Websites maintained by well known Internet services.
Most well known Internet services and social networking platforms will provide gadgets that are designed for Blogger. The best gadgets will be labeled "For Blogger", and be written in Blogger compatible XML. Some general purpose gadgets, written in HTML / JavaScript, will also be suitable.
Almost any gadget in this category, if written by the staff of the service in question, will be free from malicious intent. Both FaceBook, and Twitter, for instance, provide gadget libraries. Because these gadgets were not written by Blogger staff, they will not be as reliable as Category #1.
3. Blogger "Add a Gadget", and gadgets not labeled "By Blogger".
Many gadgets provided in "Add a Gadget" will be provided by third party developers. Hopefully, Blogger / Google exercises some quality control, over gadgets distributed through their library.
That said, the first mass hacking of Blogger blogs, of 2009 - 2010, came through gadgets that were distributed from the "Add a Gadget" libraries. One such gadget was discovered, just last week.
Not all third party accessories are provided with malicious intent. Unfortunately, even if not provided maliciously, some accessories may be unreliable because of periodic changes by Blogger.
4. Non Blogger websites provided by developers.
After the unforgettable blog hijacks of 2009 / 2010, then 2010 / 2011, Blogger / Google Security got aggressive with the problems of malicious gadgets being served from their libraries. Most recent hacking attacks have been distributed from websites outside the control of Blogger / Google.
Some non Google websites are provided by third party developers, who write code almost as reliable as Blogger staff. However, if the choice for my blog was between gadgets in Categories #3 and #4, and be of equal functionality and suitability, I would choose #3 over #4 - and I would seriously recommend the same, if asked.
In some cases, legitimate third party developers have provided accessories that require access to their code libraries. The developers have gone out of business, and have cancelled the domains where the code libraries were served. The abandoned domains have been bought by spammers, as investments - based on serving ads to accumulated incoming traffic, from people surfing to the blogs and websites which have the accessories installed.
In some cases, the domains were actually abandoned by the developers. In other cases, the developers were spammers, who sold their domains for a good profit, to other spammers.
We, the blog owners, cannot really tell which case is involved, when our blogs start redirecting to pages of spam - or even malicious domains, serving malware to our readers. We do need to protect our readers, though.
5. Non Blogger websites provided by hackers and spammers.
Some websites outside the control of Blogger / Google should not be trusted. I would seriously suggest without hesitating, that you stay away from websites like "SEOYourBlog.com", "MakeMunyFromHome.info", and such.
Any blog or website, with clever initials in the name, should be considered, with great caution. Although "SEO" was originally a serious concept, most websites with "SEO" in the name will not have your best interests in mind. Likewise "GPT, "PTC", "PTS" will do you no good.
If and when you add gadgets, always add them using a new HTML / JavaScript gadget. Gadgets added using "Add a Gadget" can be easily removed, if they go bad. Gadgets added using "Edit HTML" must be removed using "Edit HTML" - and some gadgets will be extremely challenging to diagnose and remove.
Security begins with you.
Sunday, November 30, 2014
Extracting HTML / JavaScript From A Source Listing
If you do any work on your blog, and the template, eventually you will need to extract gadget source code.
The ability to extract source code can be useful in various tasks.
In each case, use of the proper text browser or source listing is where I start.
Having produced the source listing, I must find and extract the relevant code which represents the gadget in question.
Here is a very basic example, from my Template Laboratory blog. We'll look at a gadget in the sidebar, which I labeled "Empty HTML Gadget".
HTML13
If I locate the gadget, when viewing the blog - and I am logged in as an administrator, I can use the Quick Edit icon (if Quick Edit is enabled), and identify the gadget by the URL. I can do the same, with the "Edit" link in the dashboard Layout wizard.
I have this luxury, when I am able to view the blog - or to view the dashboard Layout wizard. If I am identifying a problem gadget - maybe a malicious accessory on somebody else's blog, I won't have that ability. Searching for a malicious gadget may require use of two or more source code listings - plus imagination or deductive reasoning.
But, once I identify the gadget, in the source listing, I can start.
See "id='HTML13'"?
Here is the complete section of code, which this gadget produces.
Identifying the proper closing "</div>" can be tricky. Many gadgets have nested "<div>" ... "</div>" pairs in the "widget content" - so I search for the "<span class='widget-item-control'>" tag, and work backwards from there.
Now, take the extracted gadget code, and publish the gadget to a specific blog page.
The ability to extract source code can be useful in various tasks.
- Identifying a problem gadget, to others.
- Publishing a gadget on a separate page, by embedding the code in a page or post.
- Recovering the content of a deleted gadget.
In each case, use of the proper text browser or source listing is where I start.
Having produced the source listing, I must find and extract the relevant code which represents the gadget in question.
Here is a very basic example, from my Template Laboratory blog. We'll look at a gadget in the sidebar, which I labeled "Empty HTML Gadget".
HTML13If I locate the gadget, when viewing the blog - and I am logged in as an administrator, I can use the Quick Edit icon (if Quick Edit is enabled), and identify the gadget by the URL. I can do the same, with the "Edit" link in the dashboard Layout wizard.
http://www.blogger.com/rearrange?blogID=6231987187698503326&widgetType=HTML&widgetId=HTML13&action=editWidget§ionId=sidebar-right-1In this case, I know to search for gadget "HTML13".
I have this luxury, when I am able to view the blog - or to view the dashboard Layout wizard. If I am identifying a problem gadget - maybe a malicious accessory on somebody else's blog, I won't have that ability. Searching for a malicious gadget may require use of two or more source code listings - plus imagination or deductive reasoning.
But, once I identify the gadget, in the source listing, I can start.
See "id='HTML13'"? Here is the complete section of code, which this gadget produces.
The code which I need is inside the "widget-content" tags.
<div class='widget HTML' id='HTML13'>
<h2 class='title'>Empty HTML Gadget</h2>
<div class='widget-content'>
This is a (<span style="font-weight:bold;">somewhat</span>) empty HTML gadget.
</div>
<div class='clear'></div>
<span class='widget-item-control'>
<span class='item-control blog-admin'>
<a class='quickedit' href='//www.blogger.com/rearrange?blogID=6231987187698503326&widgetType=HTML&widgetId=HTML13&action=editWidget§ionId=sidebar-right-1' onclick='return _WidgetManager._PopupConfig(document.getElementById("HTML13"));' target='configHTML13' title='Edit'>
<img alt='' height='18' src='http://img1.blogblog.com/img/icon18_wrench_allbkg.png' width='18'/>
</a>
</span>
</span>
And, in this case, what I need:
<div class='widget-content'>
... (Everything here is the "widget content").
</div>
<div class='clear'></div>
<span class='widget-item-control'>
This is a very simple example - but you will find, consistently, that you need to look for the proper tag set, starting with "<div class='widget-content'>", and ending with the corresponding "</div>".
This is a (<span style="font-weight:bold;">somewhat</span>) empty HTML gadget.
Identifying the proper closing "</div>" can be tricky. Many gadgets have nested "<div>" ... "</div>" pairs in the "widget content" - so I search for the "<span class='widget-item-control'>" tag, and work backwards from there.
And copy the code, from inside the tag set.
<div class='widget-content'>
...
</div>
<div class='clear'></div>
<span class='widget-item-control'>
Once you practice, you'll find it easily enough.
This is a (<span style="font-weight:bold;">somewhat</span>) empty HTML gadget.
Now, take the extracted gadget code, and publish the gadget to a specific blog page.
Thursday, November 13, 2014
The Blogger "Contact" Form - What You See Is What You Get
Blog owners add the Blogger supplied Contact Form, then wonder about the details, and what options are available.
The Blogger supplied "Contact Form" gadget provides a very basic form, with few options. There's not a lot to do or see.
With the Blogger "Contact Form" gadget, what you see is what you get.
You add the form to the blog, and you change the Title of the form.
Use is simple. You fill out the form, and Send. The content, once sent, can't be edited.
The reply address is whatever you entered, in the "Email" box.
If you are the owner of the blog, the message goes to you. If the blog has multiple administrators, Send a test message, and have everybody check their Inboxes. Find out who should expect to see Contact messages, and what email addresses are targeted.
If you test the form on your blog, when using a Blogger account based on a non GMail email address, you may not receive the test entry in your Inbox.
If you, as the blog owner, want a form with more options, or the ability to manage form recipients, you use a third party form. You can use Google Docs, and create a simple "Contact Me" form, in 15 minutes. A Google Docs created form can have multiple, designated recipients, and can be edited by the sender. The Docs based form entry goes into an online database, which can be accessible by designated recipients.
You can embed a Google Docs based form in a page or post - and you can create your page or post as a separate tab, in the blog - as I added my Blogger "Contact Me" form or alternately, my Expanded Followers gadget, to this blog.
What you see below is my demonstration Google Docs form, embedded using an IFrame. The IFrame code is provided with the form, which required a brief 10 minutes to create. When you create your form, hit "Send form", then "Embed", to get the code for your form. You can see my improved Contact form, in my page, "Contact Me, Improved".
There are various third party, non Google "Contact" form suppliers - some free, others not - some reliable and safe, others not. Be careful, if you decide to use a non Google, third party, product.
>> Top
The Blogger supplied "Contact Form" gadget provides a very basic form, with few options. There's not a lot to do or see.
With the Blogger "Contact Form" gadget, what you see is what you get.
You add the form to the blog, and you change the Title of the form.
Use is simple. You fill out the form, and Send. The content, once sent, can't be edited.
The reply address is whatever you entered, in the "Email" box.
If you are the owner of the blog, the message goes to you. If the blog has multiple administrators, Send a test message, and have everybody check their Inboxes. Find out who should expect to see Contact messages, and what email addresses are targeted.
If you test the form on your blog, when using a Blogger account based on a non GMail email address, you may not receive the test entry in your Inbox.
If you, as the blog owner, want a form with more options, or the ability to manage form recipients, you use a third party form. You can use Google Docs, and create a simple "Contact Me" form, in 15 minutes. A Google Docs created form can have multiple, designated recipients, and can be edited by the sender. The Docs based form entry goes into an online database, which can be accessible by designated recipients.
You can embed a Google Docs based form in a page or post - and you can create your page or post as a separate tab, in the blog - as I added my Blogger "Contact Me" form or alternately, my Expanded Followers gadget, to this blog.
What you see below is my demonstration Google Docs form, embedded using an IFrame. The IFrame code is provided with the form, which required a brief 10 minutes to create. When you create your form, hit "Send form", then "Embed", to get the code for your form. You can see my improved Contact form, in my page, "Contact Me, Improved".
<iframe src="https://docs.google.com/forms/d/1JvoY2yf5aTChnvXlCgGsUerSCtI7RHpRdkq5SPBPm90/viewform?embedded=true" width="700" height="800" frameborder="0" marginheight="0" marginwidth="0">Loading...</iframe>
There are various third party, non Google "Contact" form suppliers - some free, others not - some reliable and safe, others not. Be careful, if you decide to use a non Google, third party, product.
>> Top
Friday, March 21, 2014
Getting Out Of Draft Blogger
Occasionally, in Blogger Help Forum: How Do I?, we see a plaintive query
Some blog owners use Draft Blogger because of a specific problem - then discover later, that use of Draft Blogger, in general, is not a good idea.
Generally, one simply logs out of Blogger, then logs into Blogger using the normal Blogger login.
Simply logging out, from Draft Blogger, won't always fix the problem.
Sometimes, though, simply logging out of Draft Blogger won't return the browser to normal.
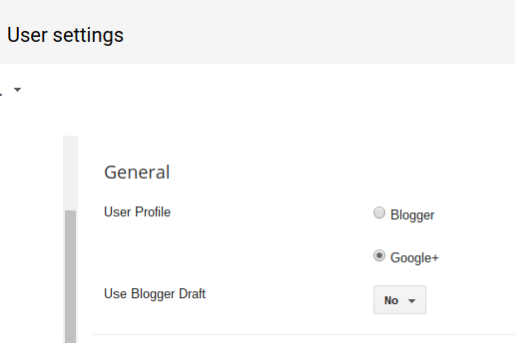
In the latter case, one must first clear the Draft Blogger setting, using the "User settings" dashboard page - where we see the key setting
Use the Settings - "User settings" dashboard page.
Use the Blogger "User settings" dashboard page.
Change "Use Blogger Draft" to "No".
Then, hit "Save settings".
Finally, login to Blogger, properly.
Finally, log into Blogger, using a normal Blogger login. Avoid any bookmarks, favorites, or other saved access URLs. And, be sure to login properly.
How do I remove my blog from using Draft Blogger?
Some blog owners use Draft Blogger because of a specific problem - then discover later, that use of Draft Blogger, in general, is not a good idea.
Generally, one simply logs out of Blogger, then logs into Blogger using the normal Blogger login.
Simply logging out, from Draft Blogger, won't always fix the problem.
Sometimes, though, simply logging out of Draft Blogger won't return the browser to normal.
In the latter case, one must first clear the Draft Blogger setting, using the "User settings" dashboard page - where we see the key setting
Use Blogger DraftChange that option to "No" - then clear cache, cookies, and sessions, and restart the browser, to remove all residual components of Draft Blogger.
Use the Settings - "User settings" dashboard page.
Use the Blogger "User settings" dashboard page.
Change "Use Blogger Draft" to "No".
Then, hit "Save settings".
Finally, login to Blogger, properly.
Finally, log into Blogger, using a normal Blogger login. Avoid any bookmarks, favorites, or other saved access URLs. And, be sure to login properly.
Wednesday, November 16, 2011
Verifying Ownership Of Your Site To Bing Webmaster
As a web master (aka blog master), besides adding posts and enhancing the template, you have a third activity - connecting your web site (blog) to other web sites and blogs. In many cases, you'll simply send the owners of the other web site (blog) a request to link to your blog.
For links to large and very active web sites, you'll use an online wizard. To prove ownership of your web site, instead of sending email, you'll add a file of specific name, or maybe specific content, into the web site. You can't add a file to your blog, though. With a Blogger blog, you have no control over files and folders - all that you do is publish posts.
One of the most important web sites that you can add your blog to, similar to Google Webmaster Tools and Yahoo Site Explorer, is the Microsoft search engine, Bing.
Similar to Google Webmaster Tools and Yahoo Site Explorer, Microsoft provides Bing Webmaster, which provides you the web site (blog) owner the ability to monitor and tune the relationship between your web site (blog) and Bing, the Microsoft Search Engine. When you add a non Blogger web site to Bing Webmaster, you add a file of specific name and content, to the root. When you add your blog, you add a record of specific content - a meta record - to the template.
This meta record, which provides your verification of ownership to Bing, may be one of the most important single lines of code in the template. Add this with care.
Having verified ownership of your site, you now have access to various features of Bing Webmaster.
>> Top
For links to large and very active web sites, you'll use an online wizard. To prove ownership of your web site, instead of sending email, you'll add a file of specific name, or maybe specific content, into the web site. You can't add a file to your blog, though. With a Blogger blog, you have no control over files and folders - all that you do is publish posts.
One of the most important web sites that you can add your blog to, similar to Google Webmaster Tools and Yahoo Site Explorer, is the Microsoft search engine, Bing.
Similar to Google Webmaster Tools and Yahoo Site Explorer, Microsoft provides Bing Webmaster, which provides you the web site (blog) owner the ability to monitor and tune the relationship between your web site (blog) and Bing, the Microsoft Search Engine. When you add a non Blogger web site to Bing Webmaster, you add a file of specific name and content, to the root. When you add your blog, you add a record of specific content - a meta record - to the template.
This meta record, which provides your verification of ownership to Bing, may be one of the most important single lines of code in the template. Add this with care.
- First, and always, backup the template for the blog.
- Sign in to your HotMail / Live / Microsoft account (Yes, here, too, you have to sign in! And you will need a Microsoft accepted account!)
- You start from Bing Webmaster Center - Home.
- Under "Sites", you'll see the "Add Site" button. Hit the button.
- Paste or type the URL of the blog into the "Site:" box.
- Hit "Submit".
- Now you'll have "Verify Ownership".
- Click on "Option 2: Copy and paste a tag in your default webpage".
- Copy the meta record, as presented to you.
- You'll take the record as provided, and reformat it slightly. Here's an example of what they provide.
<meta name="msvalidate.01" content="XXXXXXXXXXXXXXXXXXXXXXXXXXXXXXXX">
Here's what I used.<meta content='XXXXXXXXXXXXXXXXXXXXXXXXXXXXXXXX' name='msvalidate.01'/>
- In another tab or window, open the template editor window, for the blog.
- Copy the record into the template for your blog, just below the records added for Google Webmaster Tools and / or Yahoo Site Explorer verification.
- Save the template.
- Back in the Bing Webmaster "Verify Ownership" window, click on the "Verify" button.
- You'll now see your site, added to the Sites list, and the "Dashboard" for your newly added site will be displayed.
- And again, backup the template for the blog. Save both backups.
Having verified ownership of your site, you now have access to various features of Bing Webmaster.
>> Top
Friday, April 16, 2010
Putting A Post At The Top (A "Welcome" Post) - Part 2
Many people have asked how they can have a Welcome or Index message in their blog.
I have a Welcome message, at the top of Nitecruzr Buzz, or on this blog, for instance.
This blog uses a text gadget, positioned above the post gadget, which leaves a gadget that shows up on every page. On Nitecruzr Buzz, I used a future dated post, so my "Welcome" showed up only on the "Home" page. Neither solution was optimal.
Today, I fixed my Buzz Welcome message, so it only shows up on the "Home" page, and it does not show up as a post, in an archive index.
What I now have is a Text gadget, that only displays on the "Home" page. Here's how you do that.
First, (you should have to ask?) backup the template. Then add a Text gadget to the page, and position the gadget just above the post gadget. Give it a snappy title, "Welcome To My Blog!".
Then tweak the new gadget.
Remember to add a blank line, above or below the code block being added, if there is already code visible in "Add CSS".
Save the change. Edit the text gadget as displayed on the blog, and remove the "WelcomeMessage" title. And of course, backup the template, again. And, it's done.
Now, if you want a dynamic "Welcome" page - maybe one based on posts published to a given label, you can do that too, with just a bit more work. And there are several variations on the "if" statement, that will let you selectively display (or not display) your gadget on other specific pages.
An easy alternative solution for this need, more recently offered, would be to use a static page, and a redirected Home page.
The choices are multiple. Just consider your needs, and how easy the various alternatives may be.
I have a Welcome message, at the top of Nitecruzr Buzz, or on this blog, for instance.
This blog uses a text gadget, positioned above the post gadget, which leaves a gadget that shows up on every page. On Nitecruzr Buzz, I used a future dated post, so my "Welcome" showed up only on the "Home" page. Neither solution was optimal.
- A true "Welcome" message should show up only on the "Home" (first) page. A text gadget shows up on every page.
- A future dated post shows up only on the "Home" page, but it shows up in the Archive index with a future date.
Today, I fixed my Buzz Welcome message, so it only shows up on the "Home" page, and it does not show up as a post, in an archive index.
What I now have is a Text gadget, that only displays on the "Home" page. Here's how you do that.
First, (you should have to ask?) backup the template. Then add a Text gadget to the page, and position the gadget just above the post gadget. Give it a snappy title, "Welcome To My Blog!".
Then tweak the new gadget.
- Identify the gadget to be tweaked.
- Add the Conditional Gadget CSS rule, using the Template Designer "Add CSS" wizard.
<b:if cond='data:blog.canonicalUrl != data:blog.homepageUrl'>
<style>
#Text1 {display: none !important;}
</style>
</b:if>
Remember to add a blank line, above or below the code block being added, if there is already code visible in "Add CSS".
Save the change. Edit the text gadget as displayed on the blog, and remove the "WelcomeMessage" title. And of course, backup the template, again. And, it's done.
Now, if you want a dynamic "Welcome" page - maybe one based on posts published to a given label, you can do that too, with just a bit more work. And there are several variations on the "if" statement, that will let you selectively display (or not display) your gadget on other specific pages.
An easy alternative solution for this need, more recently offered, would be to use a static page, and a redirected Home page.
The choices are multiple. Just consider your needs, and how easy the various alternatives may be.
Thursday, November 5, 2009
Blogging Anonymously
We know that Blogger allows us to blog anonymously, by promising to never reveal our identity as a blog owner.
This policy leads to mysterious scenarios, like when someone forgets the account that they used to create a blog, that they do own. And, it leads sometimes to tragic scenarios, like bloggers who don't have access to the back door email account, and can't prove blog ownership.
Even though Blogger allows us to pursue our anonymity, though, that doesn't guarantee absolute anonymity without effort.
There are things that we still need to do, to ensure that our name / identity isn't connected with a given blog.
Setup a new Blogger account, with no personally identifying details.
If you want true anonymity, make a new Blogger account, and put no personal details into the new account. "No personal details" includes no links to any existing Blogger accounts, or blogs - in either direction.
If you want to go through life with a second (or third, ...) account, please understand the risks. If you truly anonymise your new account, and blog, you will have no way to identify yourself as the owner, if you ever forget the account name, or password.
Start a new blog - published as private.
If your current blog(s) have been published for a while, you may think of making your blog(s) private.
The next possibility, then, would be to start a new blog - and publish your blog(s) as private.
With a blog published privately, we then disable indexing of the blog(s). This won't be 100% effective.
So, look at additional techniques - but be aware of techniques that will have no effect.
Don't provide any visible biographical content.
First, remove the "About Me" gadget from the blogs. Either publish blogs without a native Blogger "About Me" gadget, or make up a custom one.
Second, remove the blogs from the "My Blogs" list in your Blogger profile, or don't share your profile at all. And setup a second owner for your blog, so your Blogger profile number isn't visible, in the blog header.
Watch how you follow other blogs.
Third, and not the least of your concerns, is what blogs interest you? Be careful how you Follow blogs - both your own, and those published by other people.
Visibility of other blogs in your profile, as well as your visibility in various Following communities, may tell a lot about you.
Be aware of what profiles you use, as a Follower. For maximum anonymity, don't Follow at all - just subscribe to the blogs that interest you, using the newsfeed reader of your choice.
Use separate, multiple Blogger accounts.
If you're truly paranoid, you could transfer control of the blogs, to a secondary account that you own.
If you use a second account, it would be wise to use a non GMail account, so you can avoid a Google cookie clash caused by trying to use two Google accounts simultaneously. And please, if you want to retain control of your blogs, use a valid non GMail email address, and keep control of the email address.
And you can always Follow other blogs using a different identity.
Finally, check behind yourself, carefully. Comb the contents of your blogs, and make sure that you don't inadvertently reveal any personal details. This may be an ongoing concern, as you publish any blog, anonymously or not.
Protect yourself. These are things that you have to do, for yourself. But at the same time, remember that anonymity, when achieved, may have a price.
Be aware of the risks involved, when anonymising yourself.
Successful anonymity can mean problems identifying yourself - when you travel, or when you change computers, or especially when you forget your account name or password.
Consider setting up Google 2-Step Verification, if you want long term public anonymity - and want to continue publishing a blog.
(Update July 2001): To let us selectively share information about ourselves with some people (as we choose), Blogger / Google is giving us Google+, which lets us replace boring unshared static information with exciting selectively shared dynamic information.
This policy leads to mysterious scenarios, like when someone forgets the account that they used to create a blog, that they do own. And, it leads sometimes to tragic scenarios, like bloggers who don't have access to the back door email account, and can't prove blog ownership.
Even though Blogger allows us to pursue our anonymity, though, that doesn't guarantee absolute anonymity without effort.
There are things that we still need to do, to ensure that our name / identity isn't connected with a given blog.
- Setup a new Blogger account, with no personally identifying details.
- Start a new blog - published as private.
- Don't provide any visible biographical content.
- Watch how you follow other blogs.
- Use separate, multiple Blogger accounts.
- Be aware of the risks involved, when anonymising yourself.
Setup a new Blogger account, with no personally identifying details.
If you want true anonymity, make a new Blogger account, and put no personal details into the new account. "No personal details" includes no links to any existing Blogger accounts, or blogs - in either direction.
If you want to go through life with a second (or third, ...) account, please understand the risks. If you truly anonymise your new account, and blog, you will have no way to identify yourself as the owner, if you ever forget the account name, or password.
Start a new blog - published as private.
If your current blog(s) have been published for a while, you may think of making your blog(s) private.
- This change won't take effect, immediately
- Even after the blog becomes private, cached copies of the blog can be retrieved - and your personal details can be extracted from the cached copy.
The next possibility, then, would be to start a new blog - and publish your blog(s) as private.
With a blog published privately, we then disable indexing of the blog(s). This won't be 100% effective.
- Not all search engine spiders will respect the "NoIndex, NoFollow" directives.
- Not all bloggers want their blogs to be private, even if they don't want a personal and permanent connection with the blogs.
- Private blogs are not completely hidden from public view.
- RSS feeds may contain information which we do not select for appearance in the visual blog copy.
So, look at additional techniques - but be aware of techniques that will have no effect.
Don't provide any visible biographical content.
First, remove the "About Me" gadget from the blogs. Either publish blogs without a native Blogger "About Me" gadget, or make up a custom one.
Second, remove the blogs from the "My Blogs" list in your Blogger profile, or don't share your profile at all. And setup a second owner for your blog, so your Blogger profile number isn't visible, in the blog header.
Watch how you follow other blogs.
Third, and not the least of your concerns, is what blogs interest you? Be careful how you Follow blogs - both your own, and those published by other people.
Visibility of other blogs in your profile, as well as your visibility in various Following communities, may tell a lot about you.
Be aware of what profiles you use, as a Follower. For maximum anonymity, don't Follow at all - just subscribe to the blogs that interest you, using the newsfeed reader of your choice.
Use separate, multiple Blogger accounts.
If you're truly paranoid, you could transfer control of the blogs, to a secondary account that you own.
If you use a second account, it would be wise to use a non GMail account, so you can avoid a Google cookie clash caused by trying to use two Google accounts simultaneously. And please, if you want to retain control of your blogs, use a valid non GMail email address, and keep control of the email address.
And you can always Follow other blogs using a different identity.
Finally, check behind yourself, carefully. Comb the contents of your blogs, and make sure that you don't inadvertently reveal any personal details. This may be an ongoing concern, as you publish any blog, anonymously or not.
Protect yourself. These are things that you have to do, for yourself. But at the same time, remember that anonymity, when achieved, may have a price.
Be aware of the risks involved, when anonymising yourself.
Successful anonymity can mean problems identifying yourself - when you travel, or when you change computers, or especially when you forget your account name or password.
Consider setting up Google 2-Step Verification, if you want long term public anonymity - and want to continue publishing a blog.
(Update July 2001): To let us selectively share information about ourselves with some people (as we choose), Blogger / Google is giving us Google+, which lets us replace boring unshared static information with exciting selectively shared dynamic information.
Saturday, October 24, 2009
Keep Malicious Content Out Of Your Blog
Every day or so, we see reported from concerned bloggers, about unknown content in their blogs.
The bad guys are out there - and the more fun, interesting, and shiny your blog is, the more it's likely to have readership, reputation, and value.
The more readership, reputation, and value that your blog has, the more attractive it is to the bad guys. And the bad guys have various ways to attack a given blog.
Malicious Comments
One of the easiest way to add third party content to your blog is from allowing comments.
Comments are contributed by people who, at best, you simply do not know. Any content from someone who you do not know can always be malicious, or obnoxious in some way.
Some blog owners will try to identify and block individual commentors. I will continue to insist that anybody who you should fear will not be bothered greatly by anything that you can do here.
You absolutely must moderate comments, or risk having a blog known for hosting malicious links - or worse.
Malicious Posts
Besides comments, posts are a constant concern. If you have a team blog, you have to be able to trust the other members in the blog.
Post moderation, using post editor to publish, isn't an option. Anybody who you make an author can publish what they feel like publishing. You can only moderate posts after they are published, when using post editor.
An alternative to using post editor to publish is Mail-to-Blogger, where contributions are emailed to the blog. If Mail-to-Blogger is setup to publish straight to the blog, and the bad guys figure out your MTB account and password, you'll have malicious content a plenty.
You can moderate before publishing, using Mail-to-Blogger.
Malicious Accessories
Any time that you install third party accessories of any type, you are placing your blog at risk.
Don't be overly paranoid - you have to make your blog interesting to your readers. But do keep the risks in mind.
This is similar to layered security for your computer, which is a related concern here.
Malicious Blog Members
Sometimes, possibly having unwisely installed a third party accessory, the install process may have enabled the addition of an unknown member to the blog. The unwanted content may be added by the attacker, using this unknown blog member.
If none of the above advice offers you an explanation for the existence of unwanted content, check your blog member list.
BlogList / Feed Gadgets
Occasionally, we may Follow a blog where the owner will later decide to try to get more traffic to the blog, and will redirect the blog feed to a cloud of random blogs. If you are Following such a blog, or have such a blog in your BlogList or Feed gadget, you'll see your BlogList or Feed gadget show odd content - and frequent spam.
Where did those ads come from? I didn't add them!or
How do I keep this other blogger from posting porn links in my blog?As we add content to our blogs, and make them fun, interesting, and shiny, to attract readers, we risk adding undesirable content. This is a constant problem.
The bad guys are out there - and the more fun, interesting, and shiny your blog is, the more it's likely to have readership, reputation, and value.
The more readership, reputation, and value that your blog has, the more attractive it is to the bad guys. And the bad guys have various ways to attack a given blog.
- Malicious Comments
- Malicious Posts
- Malicious Accessories
- Malicious Blog Members
- BlogList / Feed Gadgets
Malicious Comments
One of the easiest way to add third party content to your blog is from allowing comments.
Comments are contributed by people who, at best, you simply do not know. Any content from someone who you do not know can always be malicious, or obnoxious in some way.
Some blog owners will try to identify and block individual commentors. I will continue to insist that anybody who you should fear will not be bothered greatly by anything that you can do here.
You absolutely must moderate comments, or risk having a blog known for hosting malicious links - or worse.
Malicious Posts
Besides comments, posts are a constant concern. If you have a team blog, you have to be able to trust the other members in the blog.
Post moderation, using post editor to publish, isn't an option. Anybody who you make an author can publish what they feel like publishing. You can only moderate posts after they are published, when using post editor.
An alternative to using post editor to publish is Mail-to-Blogger, where contributions are emailed to the blog. If Mail-to-Blogger is setup to publish straight to the blog, and the bad guys figure out your MTB account and password, you'll have malicious content a plenty.
You can moderate before publishing, using Mail-to-Blogger.
Malicious Accessories
Any time that you install third party accessories of any type, you are placing your blog at risk.
Don't be overly paranoid - you have to make your blog interesting to your readers. But do keep the risks in mind.
This is similar to layered security for your computer, which is a related concern here.
Malicious Blog Members
Sometimes, possibly having unwisely installed a third party accessory, the install process may have enabled the addition of an unknown member to the blog. The unwanted content may be added by the attacker, using this unknown blog member.
If none of the above advice offers you an explanation for the existence of unwanted content, check your blog member list.
BlogList / Feed Gadgets
Occasionally, we may Follow a blog where the owner will later decide to try to get more traffic to the blog, and will redirect the blog feed to a cloud of random blogs. If you are Following such a blog, or have such a blog in your BlogList or Feed gadget, you'll see your BlogList or Feed gadget show odd content - and frequent spam.
Wednesday, September 10, 2008
Verifying Ownership Of Your Site To Google Webmaster Tools
As a web master (blog master), besides adding posts and enhancing the template, you have a third activity which is almost as time consuming.
You will be constantly connecting your web site (blog) to other web sites and blogs. In many cases, you'll simply send the owners of the other web site (blog) a request to link to your blog.
For links to some web sites, you'll not use email, you'll use an online wizard. To prove ownership of your web site, instead of sending email, you'll add a file of specific name, or maybe specific content, into the web site. You can't add a file to your blog, though - with blogs, you have no control over files and folders - all that you do is publish posts.
One of the most important web sites that you can add your blog to is Google Webmaster Tools.
"Webmaster Tools" - now known as "Search Console" - provides you the web site (blog) owner the ability to monitor and tune the relationship between your web site (blog) and the Google Search Engine.
Note that some time ago, Blogger added a quick, universal verification of your blogs. At the bottom of your dashboard, under "Tools and Resources", you'll find a link "Webmaster Tools". This appears to generate a file known as the "WMX Verification File".
Right now, there are some odd circumstances which may be a result of using that link. For right now, I would only verify my blogs, one at a time, adding a meta record - as shown below.
When you verify ownership of your web site to GWT, you add a file of specific name and content, to the root. When you add your blog, you can't do that, so you add a record of specific content - a meta record - to the template. Note that the automated process which reads the blog header, and verifies your ownership, appears to be sensitive to private blog settings.
This meta record, which provides your verification of ownership to Google Webmaster Tools, may be the most important single line of code in the template. Add this with care.
Having verified ownership of your site, you now can add a Google Sitemap, or use the other features of Google Webmaster Tools.
You will be constantly connecting your web site (blog) to other web sites and blogs. In many cases, you'll simply send the owners of the other web site (blog) a request to link to your blog.
For links to some web sites, you'll not use email, you'll use an online wizard. To prove ownership of your web site, instead of sending email, you'll add a file of specific name, or maybe specific content, into the web site. You can't add a file to your blog, though - with blogs, you have no control over files and folders - all that you do is publish posts.
One of the most important web sites that you can add your blog to is Google Webmaster Tools.
"Webmaster Tools" - now known as "Search Console" - provides you the web site (blog) owner the ability to monitor and tune the relationship between your web site (blog) and the Google Search Engine.
Note that some time ago, Blogger added a quick, universal verification of your blogs. At the bottom of your dashboard, under "Tools and Resources", you'll find a link "Webmaster Tools". This appears to generate a file known as the "WMX Verification File".
Right now, there are some odd circumstances which may be a result of using that link. For right now, I would only verify my blogs, one at a time, adding a meta record - as shown below.
When you verify ownership of your web site to GWT, you add a file of specific name and content, to the root. When you add your blog, you can't do that, so you add a record of specific content - a meta record - to the template. Note that the automated process which reads the blog header, and verifies your ownership, appears to be sensitive to private blog settings.
This meta record, which provides your verification of ownership to Google Webmaster Tools, may be the most important single line of code in the template. Add this with care.
- Sign in to your Google account.
- You start from Google Webmaster Tools - Dashboard.
- In the Click here to add a site box, enter the URL to your blog, and then hit Add Site. Make this entry identical to the URL to which the blog is published. Use the following examples, substituting appropriately your value for "myblog", "mydomain", "xxxxx", and "zzz".
- If the blog is published to "myblog.blogspot.com", enter it as "myblog.blogspot.com".
- The blog will never be published to "www.myblog.blogspot.com", so do not enter it as "www.myblog.blogspot.com".
- If the blog is published to "mydomain.zzz", enter it as "mydomain.zzz".
- If the blog is published to "www.mydomain.zzz", enter it as "www.mydomain.zzz".
- If the blog is published to "xxxxx.mydomain.zzz", enter it as "xxxxx.mydomain.zzz".
- This will take you to Overview.
Next Step
Verify your site. By verifying your site you can access comprehensive statistics and crawl errors about the pages in your site - Click the link for "Verify your site".
- This will take you to Verify a Site.
- In the Choose verification method... pull down list, select Add a meta tag.
- This will generate your site verification meta tag. Highlight and Copy the text from the box.
- In a separate window, edit the template for your blog. Add into the template, in the heading section, your site verification meta tag, that's provided by the GWT wizard. After you add the meta tag, you should have something like:
<head>
<b:include data='blog' name='all-head-content'/>
<title><data:blog.pageTitle/></title>
<meta name="description" content="......."></meta>
<meta name="keywords" content="......."></meta>
<meta name="verify-v1" content="......."></meta>
<b:skin><