Showing posts with label Layout. Show all posts

Wednesday, June 8, 2016

Blogger Magic - Resequence Pages Buttons / Links

Some blog owners add pages - dynamic and static - to their blog, then discover that the Pages gadget lists them in the wrong sequence.

We see an occasional question, in Blogger Help Forum: Learn More About Blogger.
My pages are poorly organised. How do I change the sequence?
This is not a difficult problem, to correct.

It's not difficult to change the sequence of the Pages buttons or links, using "Configure Page List".

Use "List Order" in "Configure Page List" to change button / link sequence.

The "List Order" wizard, in "Configure Page List", is used to resequence all pages entries (buttons / links) - for dynamic and static pages, alike.

Just "grab" a pages entry to be moved, using the "handle" - and re position it as desired.


Start in the dashboard Layout page.

Find the Pages gadget. Here, it's in the "Cross-Column" container.


Edit the Pages gadget.


That gives you "Configure Page List".


Find "List Order".


To re locate a button / link, find the "9 dot" handle.


Grab the page button to be moved. Mouse over the "9 dots", click and hold the left mouse button.

Drag the button, to its new location - and release. And Save.


And now, we see the page buttons, in the new sequence.


Just "click and grab", and move any button, into its new sequence. And don't forget to Save.


It's easy to change the order of the #Blogger Pages buttons / links, using the "List Order" GUI in "Configure Page List". Just click and drag any button / link, using the "9 dot" handle, into the desired location sequence.

Monday, May 23, 2016

Blogger Magic - Using "Add a Gadget"

One of the most useful features of Blogger is the ability to add many different accessories, to a blog.

There are accessories, for every blog - and for every owner preference. The "Add a Gadget" wizard, in the Blogger dashboard, is the best procedure for adding accessories, to customise a blog reliably.

Using "Add a Gadget" is a simple process. It will be most useful, in the long term, if used cautiously, however.

Adding a gadget is not difficult.


Start from the Blogger dashboard Layout page.


Click on any link to "Add a Gadget", to that template section.

This link, for instance, will add a gadget to the right sidebar.


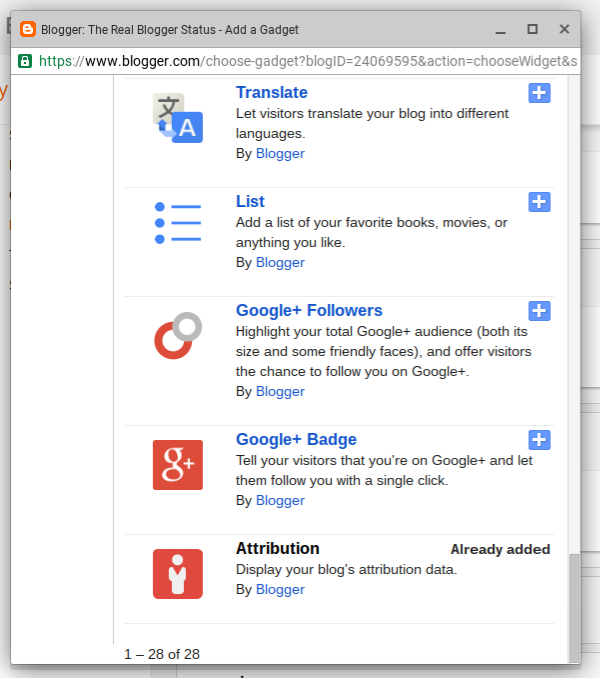
Choose any of dozens of interesting and useful accessories.


Be knowledgeable, when adding accessories.

Similar to the process of adding an HTML gadget, there are a few mistakes that you can avoid, when adding a gadget in general.

  1. Some sections of the Layout page may not allow gadgets to be added.
  2. When you find an interesting gadget, be selective!
  3. Some Blogger provided gadgets are found under "More Gadgets".
  4. Don't use "Add your own" - unless you know what you're doing!
  5. Add a new gadget, when adding important features.
  6. A gadget, as added, will be displayed on every page of the blog.

Some sections of the Layout page may not allow gadgets to be added.

Each template section can be subject to gadget limits, and to locking. This will prevent addition, removal, and / or re positioning of gadgets.

If you're unable to add, remove, or reposition a gadget, you may have to edit the template - and change the section settings.

When you find an interesting gadget, be selective!

"Add Gadget" lists gadgets produced by third party developers, as well as by Blogger Engineering. Some non Blogger produced gadgets won't benefit your blog, in the long term.


Look for "By Blogger", for the best choices.


Not all third party gadgets are intentionally malicious - but the most reliable gadgets will be explicitly labeled "By Blogger".

Some Blogger provided gadgets are found under "More Gadgets".

The "Basics" tab in "Add a Gadget" contains mostly gadgets "By Blogger" - and most gadgets "By Blogger" are found in "Basics". Some gadgets "By Blogger" are in "More Gadgets" - and you may have to search that list, carefully, to find what you need.

Don't use "Add your own" - unless you know what you're doing!

There are 3 tabs, in "Add a Gadget".
  1. Basics.
  2. More Gadgets.
  3. Add your own.
The latter, "Add your own", can lead to frustration.

If you are not familiar with coding XML gadgets (and probably do not need this advice), don't bother with "Add your own". Stick with "Basics" and "More Gadgets".

Add a new gadget, when adding important features.

You can install HTML code using the Template Editor - or you can add an HTML snippet into an existing HTML gadget - if you wish. I highly recommend that you add a new HTML gadget, for each important accessory, though.

A gadget, as added, will be displayed on every page of the blog.

By default, a gadget, once added, will be visible on every template page. You can, with some care and effort, make specific gadgets display selectively.

Enjoy adding accessories, properly.

So enjoy accessorising your blog - just accessorise carefully.


You can add any number of useful accessories, to a #Blogger blog, using the "Add a Gadget" wizard in the dashboard Layout page. The best choices are explicitly labeled "By Blogger".

Friday, May 20, 2016

Share Posts, From Private Blogs, By Email

Owners of private blogs have, periodically, lamented the lack of options for distribution of comments and posts. We've seen a few queries, in Blogger Help Forum: Learn More About Blogger.
How do I let my readers subscribe to my private blog?
There's no good answer, to please everybody, here.

You can't use EMail, FeedBurner, or Reading List, for sharing private blog content. FeedBurner requires the blog comments / posts newsfeeds - and private blogs don't produce newsfeeds.

If you need to distribute content from a private blog, you'll have to use BlogSend.

Private blog post subscriptions require the dashboard "BlogSend" feature.

You'll have to use "BlogSend" to provide email subscriptions, for private blogs - and that limits you to 10 subscribers (1 who should be you). That's the "Email posts to" option in the dashboard Settings - Email page.


"BlogSend" aka "Email posts to" is the only option, for private blogs.


You can try to email specific posts, from a private blog.

You can try to use the Blogger post footer "Email Posts" feature.

Just enable the "Email Post Links" option in "Configure Blog Posts". You cannot enable "Show Share Buttons" - but you can enable "Show Email Post Links".


Use "Configure Blog Posts" from the dashboard Layout page.


Look under "Post Page Options" for "Show Email Post Links".


With the option enabled, and the icon visible, it's still a no go.


D'Ohh!


There's still no social sharing of private blog content.

Note the advice for "Show Share Buttons".

Sharing is available only for public blogs.

You can't share blog content, outside Blogger, if the blog is private. That protects private blog owners, from having their confidential posts distributed to the world.

We can't share content from private blogs, using EMail, FaceBook, Google+, Pinterest, or Twitter.


If you publish a private #Blogger blog, you cannot email or share comments or posts. Your only option will be BlogSend aka the "Email posts to" dashboard option.

Tuesday, April 19, 2016

Post Data Cannot Be Moved Above The Post Body

Blog owners have been requesting the ability to position various post content items above the post body, for years.

We've seen reports, in Blogger Help Forum: Get Help with an Issue, about problems moving Comments, Labels, Share Bar, and others.

Several years, "Arrange Items" was upgraded to allow Labels to be moved above the post body. That option was provided briefly - then removed later.

Depending upon what items are currently in a specific location, moving other items into - or out of - that location may or may not be successful.


The "Arrange Items" wizard is not magical.

Code for each item, which can be moved, has to specifically support repositioning into any one of the target boxes.


Any item move may, or may not, be successful. Various details may affect success.

  • Item being moved.
  • Item current location.
  • Item target location.
  • Other items in the same current location.
  • Other items in the same target location.
  • Post template status - customisation, etc.

Frequently, when a problem with "Arrange Items" is reported, the blog owner is trying to target a position above the post body.

Diagnosing a post template problem, which involves arranging items, can involve any of these details. Not so many blog owners want to re arrange items - and even less want to arrange items above the post body - so there is not a lot of experience with diagnosing these problems.

Success - or failure - may involve several scenarios.

In some cases, the drag and drop operation, in "Arrange Items", may not accomplish anything. The owner may drag the item into place - and watch as the item perversely moves itself back, to where it was.

In other cases, the move may appear successful. The item may seem to move, and stay where is is dropped.

The owner may Save - then refresh blog display, and see the item still where it was. Opening "Configure Blog Posts", the item may or may not be displayed where it is now - or where it is wanted.

In some cases, the item may be moved successfully - and some other item, in the original or current location, may stop working.

We have seen all of these problems reported. Frequently, there is only one course of action.

  • Reset the post template.
  • Start over.

In many cases, resetting the post template is the only way to repair a problem caused by moving an item to where it should not go. With the template reset, the owner will have to choose whether to try again - and risk a repeat, of the same problem.


Moving #Blogger post template items, from one location to another, is not always successful - and sometimes causes problems with other blog content. Attempting to move items above the post body is a frequent cause of problems.


https://productforums.google.com/forum/#!topic/blogger/Gv2Mgnpg3TE

https://productforums.google.com/forum/#!topic/blogger/u6mZEd1mjLY

https://productforums.google.com/d/topic/blogger/u6mZEd1mjLY/discussion

Sunday, April 17, 2016

Blogger Magic - Set Main Page Size

One of the most visible changes, to the blog display, involves properly setting main page size.

You change the posts count using "Show at most" on the dashboard Settings - "Posts, comments and sharing" page - or "Number of posts on main page" in the "Configure Blog Posts" wizard. Both let you set the main page display limit.

You can limit main page size by days with posts, or by total post count.

Main page size is your choice, for your blog - but think of your readers, waiting for a typical main page display to download.

Many don't have extreme bandwidth, nor are the Blogger servers overly robust. When your blog, or even a single post, takes 2 or 3 minutes to load, your blog may need tuning.

Main page size is one key setting, in encouraging reader activity, and in improving search engine relationships.

  • "Show at most" on the dashboard Settings - "Posts, comments and sharing" page.
  • "Number of posts on main page" in the "Configure Blog Posts" wizard.

"Show at most" on the dashboard Settings - "Posts, comments and sharing" page.


"Number of posts on main page" in the "Configure Blog Posts" wizard.


There are alternate techniques, for changing main page size - use of a dynamic template, with endless scrolling - and segmenting the blog using pages. And adding Jump Break, to the posts, lets you make the individual posts smaller.

Also, note that only main page size can be limited. Archive retrievals and label searches use a fixed 20 posts / display page.

But for a simple blog setup, just limiting main page size is the first step to showing your readers that you respect their need to view your blog, without excessive waiting.


One of the simplest changes that you can make to a #Blogger blog, to make it easier to view, involves setting a reasonable main page size. This helps your readers view the blog, in main page view, without a lot of waiting.

target="_blank"

Monday, January 5, 2015

Inviting Comments To Your Blog Is Not Cut And Dried

Blog owners are periodically asking themselves
How do I invite my readers to leave comments?
Some blog owners think of commenting as the most important way to get new readers.

One of the most seemingly insignificant components of the Blogger template is the link to invite the readers to leave comments. This is not a simple feature - it varies according to where the comment form is placed, and to different language and style decisions.

Variations
There are four comment form placement options, for Blogger blogs.
  1. Embedded.
  2. Full page.
  3. Pop up window.
  4. Dynamic template.
There are two display contexts.
  1. Index page view (archive retrieval, label search, main page).
  2. Post page view.
Some blog owners may confuse index page view, with "Show at most" set to "1 Post", to post page view. This won't be the case. "Show at most" will only apply to main page view. And main page display with only one post displayed, without jump break, will still be index page view.

Some blog owners may confuse index page view, with "Show at most" set to "1 Post", to post page view. This won't be the case. "Show at most" will only apply to main page view. And main page display with only one post displayed, without jump break, will still be index page view.

The placement option, added to the display context, creates a combination of various needs for phrasing the simple caption, which I will call for example
Please, leave a comment!
That simple invitation can vary according to the the nationality of the blog owner, and to the nature of the blog.

Blog Language
Comments is an English word. Every blog that's published in a non English language has a different word for "comments".
  • en français: commentaires.
  • in italiano: commenti.
  • en español: comentarios.
And some languages phrase plurals significantly.
  • 0 comments.
  • 1 comment.
  • 2 comments.
Very few blog owners publish a blog in (USA) English, and want the blog captioned with "1 comments", or "2 comment".

Long ago, somebody decided that inviting comments would be easier, if a blog with 0 comments was captioned with "No comments". Then, another grammar expert (lawyer?) decided that "No comments" could be interpreted by some people as "We don't want comments!".

Blog Nature
Then, some blog owners don't like the word "comments", they feel that the word should be changed, to reflect the nature of their blog. For my blog, "Chucks Musings", I would use "musings", instead of "comments" (but with dynamic templates, that option is not yet available). Other blog owners have used "dreams", "introspections", and "wanderings" (to name a few).

Form Placement
One of the most controversial features of comments is the limitation of displaying the individual comments, and the comment form, only beneath the individual posts. On the main page, for all comment placement options, you will see the comment caption "No comments", "1 comment", etc - which then links to the display of existing comments - and to the form to publish a comment.

All existing placement options now display existing comments only beneath the individual posts. With the full page and popup window options, a link captioned "Post a Comment" then leads to the comment form itself.

With the full page and popup window form, for the convenience of the owner and reader, existing comments are displayed there also. And, wherever the comment form is displayed, so must be the hated CAPTCHA form.

The Reader's Language
To further the confusion, some blog features are automatically translated into the readers language - when the reader is logged in to Blogger / Google, and when the reader's login status and Blogger profile can be determined by the blog display. In some cases, the readers location is used.

Sometimes, both the blog owner and reader could read / speak different languages, neither being English. Not every world citizen understands "Please, leave a comment!" - or even "Post a Comment". And some blogs are published in French - and read in both Italian and Spanish.

The Tower Of Babel
The Tower Of Babel is not going away, in this lifetime.

Friday, December 5, 2014

Simple Edit / Removal Of Problem Blog Gadgets

Blog owners frequently have to edit or remove various blog gadgets - and sometimes need coaching, to edit or remove.

Editing or removing gadgets, normally, is pretty simple - when you know what you're looking for. Whenever you are logged in to Blogger, as a blog administrator, you can find the "Edit" link, on the dashboard Layout wizard - or the "Quick Edit" link on the blog (when "Quick Edit" is enabled), as displayed.

Sometimes, identifying a problem blog gadget, to another person, isn't easy. What happens, if someone misreads your instructions?

Even when identified, it may not be a simple task to locate a given gadget.
  • The "Quick Edit" option may not be enabled, on a blog.
  • Even when "Quick Edit" is enabled, a blog with lots of gadgets may be tedious to search, looking for the gadget in question.
  • Mistakes can be made. What happens, if you click on the wrong link, and remove the wrong gadget?
  • When a malicious or misbehaving gadget is involved, either loading the blog or the dashboard may produce unacceptable results.

Fortunately, with the right diagnostic work, we may not have to load either the blog, or the dashboard, to edit or remove an identified gadget.

Start by locating, and identifying, the gadget in question. As an example, I will use a gadget from my test blog. First extract the code, for gadget "HTML13" - my so called "Empty HTML Gadget".
<div·class='widget·HTML'·id='HTML13'>(LF)
<h2·class='title'>Empty·HTML·Gadget</h2>(LF)
<div·class='widget-content'>(LF)
This·is·a·(<span·style="font-weight:bold;">somewhat</span>)·empty·HTML·gadget.(LF)
</div>(LF)
<div·class='clear'></div>(LF)
<span·class='widget-item-control'>(LF)
<span·class='item-control·blog-admin'>(LF)
<a·class='quickedit'·href='//www.blogger.com/rearrange?blogID=6231987187698503326&widgetType=HTML&widgetId=HTML13&action=editWidget§ionId=sidebar-right-1'·onclick='return·_WidgetManager._PopupConfig(document.getElementById("HTML13"));'·target='configHTML13'·title='Edit'>(LF)
<img·alt=''·height='18'·src='http://img1.blogblog.com/img/icon18_wrench_allbkg.png'·width='18'/>(LF)
</a>(LF)
</span>(LF)
</span>(LF)
<div·class='clear'></div>(LF)
</div>
Look for "quickedit" - and extract the "href" value.
//www.blogger.com/rearrange?blogID=6231987187698503326&widgetType=HTML&widgetId=HTML13&action=editWidget§ionId=sidebar-right-1
Be really careful here - extract the complete string, between the ' ... '.

Add "https:" to the front of the extracted value.
https://www.blogger.com/rearrange?blogID=6231987187698503326&widgetType=HTML&widgetId=HTML13&action=editWidget§ionId=sidebar-right-1
And there is the exact URL needed, to access the Edit wizard, for the gadget, "HMTL13".

Now, to point out the "obvious".
  • The URL will work, for the gadget on any blog, even if "Quick Edit" is not enabled for the blog - for a blog administrator.
  • The URL will not work, for the gadget on any blog, even if "Quick Edit" is enabled for the blog - for a non blog administrator.
  • Disclosure / possession of the URL poses no security threat to your blog - nor any benefit to a hacker. Try the link below, and see for yourself.
  • Even if you are logged in as an administrator, the URL may not work - if "third party" cookies are not enabled.

The URL is simply a tool, which can be extracted, by anybody - and can be used, by a blog administrator (and only by a blog administrator), when properly logged in to Blogger.

Having noted the "obvious", your life can be a bit simpler, when instead of having to instruct someone how to locate and use the correct "Quick Edit" or Layout Edit link, to remove a problem gadget, you simply instruct them.
Login to Blogger, and click on the link below:
https://www.blogger.com/rearrange?blogID=6231987187698503326&widgetType=HTML&widgetId=HTML13&action=editWidget§ionId=sidebar-right-1.
Then click "Remove".

Now, extract and try a link from your blog - and see for yourself. Isn't that simpler?

Sunday, November 9, 2014

Use "Quick Edit" To Bypass The Dashboard Menu

One very useful Blogger feature is the option to bypass the Blogger dashboard - to edit the various gadgets, and existing blog posts.

The feature, termed "Quick Edit", provides two different icons, generally visible to the proper recipients, with the option enabled, on the published blog.
  • The "Quick Edit" "pencil" is visible to administrators and authors, in the posts toolbar, to the right of the "Email Post" icon. This will generally be in one of the post footer lines.
  • The gadget "screwdriver / wrench" icon is visible to administrators, to the lower right of each template gadget (except for "Blog Posts").
Though the "screwdriver / wrench" icon is more visible, that icon has no name, and no selection option in the Blogger dashboard. And, there are more mysteries.

The "Quick Edit" option is selected using "Configure Blog Posts", as "Show Quick Editing".

Most blog owners enable "Quick Edit" on their blogs, routinely.


What I see, of the"Search Me, Direct" gadget, in this blog.


The Quick Edit icon, that I see. You should not not see the icon, when you view this blog - but you may see it, on a gadget in your blog, when you view your own blog.


You enable "Quick Edit" from the dashboard Layout page.
Though the option affects visibility of the "screwdriver / wrench" icons, in the blog template, there is no dashboard Settings selection. It is only selected as a post template option, in "Configure Blog Posts".

The "Configure Blog Posts" wizard is accessible only by Editing the "Blog Posts" gadget, from the dashboard Layout wizard. There is no "screwdriver / wrench" icon which allows access to the "Configure Blog Posts" wizard.

Names used to identify the "Quick Edit" icon may vary.
Adding to the mystique here, residents of Europe may term the "wrench" as a "spanner". Long ago, some blog owners referred to the "screwdriver / spanner / wrench" icon as "dragonflies".

Both the "pencil" and "screwdriver / wrench" icons may or may not be consistently visible. Both icons have been known to be invisible / non functional, with improperly configured cookie or script filters.

The icon may be visible, even when not operational.
And thanks to caching, a blog owner may see either the "pencil" or "screwdriver / wrench" icon when logged out of Blogger - and mistakenly conclude that the public, in general, is able to access the Dashboard or Post Editor for his blog, and change blog options or edit posts. Having logged out, then clicking on any visible icon - or clicking on a carefully configured link URL, we can verify that no illegal access is possible.

And some blog owners, thanks to an intriguing terminology variation, may refer to the "pencil" as an option for editing a "blog".

All that said, use of the Quick Edit URL - with Quick Edit enabled or not - can be very useful, in removing gadgets properly identified.

Monday, September 1, 2014

Blogger Magic - "Configure Page List"

The "Configure Page List" wizard is an extremely useful - yet obscure - feature in the dashboard Layout page.

Not every blog owner sees the "Pages" gadget, in the "Layout" page and knows to click on "Edit", to access "Configure Page List". Nor do all owners know how many assorted functions, previously part of the "Pages" dashboard wizard, are now found, exclusively, under "Configure Page List".

"Configure Page List" is an essential component in the pages management suite, in the Blogger dashboard.

"Configure Page List" is accessible in two different ways.

  • From the Layout dashboard menu - if the Pages gadget has been added to the blog.
  • Using the appropriate "Quick Edit" icon - if "Quick Edit" is enabled, for the blog.

Add the Pages gadget, to the blog, if it's not present.

If the Pages gadget is not visible on the Layout display, you may need to add the gadget, to the blog.

To make the Pages gadget function as a horizontal link bar - the most popular layout - you add the gadget into the "crosscol" template section, in the dashboard Layout page. The "crosscol" section, on standard Blogger templates, contains CSS rules which make lists display horizontally.

Enable "Quick Edit", if necessary.

If you wish to use "Quick Edit" to access "Configure Page List", you may need to enable "Quick Edit".

"Configure Page List" has many functions.


Find the Page List gadget, in "Layout", and click on the pencil icon.


When you edit the Page List gadget, you get "Configure Page List".


Here, we see "Pages to show" (to select static pages), "Add external link" (to add dynamic pages), and "List Order" (to delete dynamic pages, using the "X").

"Configure Page List" has various functions, in managing both dynamic and static pages.

  • Change the Title of the Pages gadget, in the Layout wizard display, using "Title".
  • Hide / Show "Home" and various static pages, created by Page Editor, by using "Pages to show".
  • Resequence the order of display of the various pages, by dragging and dropping using "List order".
  • Add dynamic pages, previously called "Web address" entries, using "Add external link". Dynamic pages can include individual posts, archive retrievals, label searches, and other blogs or websites. Be very precise, when entering an "Add external link" entry for "Web address (URL)".
  • Delete dynamic pages, by clicking on the "X", using "List order".
  • Note that to change the caption or URL for a dynamic page, you must delete then re add a new dynamic page entry, using the desired name and URL.
  • Let you remove the Pages gadget, using the "Remove" button.

To use "Configure Page List" effectively, you need to understand the differences between Pages and Posts.

The gadget will change form, depending upon location.

The "Pages" gadget may be present in various locations, in the blog - and may have different appearances, depending upon location.

In either appearance, if "Quick Edit" is enabled, you can access "Configure Page List" by clicking on the "Quick Edit" icon. Or, you can Edit the Pages gadget from the Layout menu in the dashboard.

History.

In 2014, Blogger reorganised the various pages maintenance utilities, and moved a wide assortment of functions into "Configure Page List". This change caused some confusion, with many blog owners.

Tuesday, June 10, 2014

Confusion From "Add external link" In Pages

The recently redesigned Pages gadget and wizard has been with us for just over 3 months.

We are occasionally seeing some confusion from people who can't add a dynamic page link to their blog - even when they manage to find the redesigned Pages gadget.
I added a dynamic page, linking from "mymainblog.blogspot.com" to "mysecondblog.blogspot.com". Imagine my dismay, when the new page link goes to "mymainblog.blogspot.com/mysecondblog.blogspot.com", instead of to my actual target "mysecondblog.blogspot.com"!
Here is a blog owner who is not aware of the unforgiving syntax of the "New Page › Web Address" wizard, and the "Web address (URL)" entry.

If we were to view the HTML code for this web page, 'Confusion From The "Add external link" Procedure In The Pages Gadget', and look at my link to a previous post "Adding A Link To Your Blog Post, Part 2", where I discussed link entry syntax confusion, we could see the HTML behind a typical post to post link.

<a href="http://blogging.nitecruzr.net/2010/08/adding-link-to-your-blog-post-part-2.html">link entry syntax confusion</a>

See the code for the link target?

http://blogging.nitecruzr.net/2010/08/adding-link-to-your-blog-post-part-2.html

When adding a link, many blog owners would simply think

blogging.nitecruzr.net/2010/08/adding-link-to-your-blog-post-part-2.html

If I were to add a link, using the "Add link" wizard in post editor - or using the "Web address (URL)" entry in the "New Page › Web Address" wizard, I would see a window, with the essential prefix "http://" preformatted there.

Taking my target address of "blogging.nitecruzr.net/2010/08/adding-link-to-your-blog-post-part-2.html", and pasting the target after the prefomatted prefix "http://", I would get "http://blogging.nitecruzr.net/2010/08/adding-link-to-your-blog-post-part-2.html".

If I were to simply paste "blogging.nitecruzr.net/2010/08/adding-link-to-your-blog-post-part-2.html" into the window, I would end up with (no surprise, here)

<a href="blogging.nitecruzr.net/2010/08/adding-link-to-your-blog-post-part-2.html">link entry syntax confusion</a>

That's a bit odd looking - and that gets worse. A URL which lacks the prefix (for instance) "http://" has the current base URL added, when the post is compiled into the blog.

This would result in HTML code

<a href="http://blogging.nitecruzr.net/blogging.nitecruzr.net/2010/08/adding-link-to-your-blog-post-part-2.html">link entry syntax confusion</a>

With these two Blogger link entry wizards, you must remember to add the link target selectively, if and only if it is not already prefixed by "http://" - after the preformatted "http://".

Conversely, if you start with a target

http://blogging.nitecruzr.net/blogging.nitecruzr.net/2010/08/adding-link-to-your-blog-post-part-2.html

you want to overlay the "http://" prefix in the window. If you follow the "http://" in the window with

http://blogging.nitecruzr.net/blogging.nitecruzr.net/2010/08/adding-link-to-your-blog-post-part-2.html

you'll end up with

http://http://blogging.nitecruzr.net/blogging.nitecruzr.net/2010/08/adding-link-to-your-blog-post-part-2.html

and that will present a new problem.

Some link entry wizards are more forgiving - and will add / strip the target URL, as necessary, so it always ends up with the right syntax construction. This is just another Blogger peccadillo.

Friday, April 4, 2014

Dynamic Templates, And Problems Editing The Layout Pages Gadget

Ever since the new Pages wizards have been in use, we've been seeing reports from blog owners, who have problems with adding, deleting, and re sequencing links on the dynamic template menu bars.

Most blog owners have gotten used to the idea of maintaining dynamic pages ("link pages", formerly known as "web address"), using the Layout Pages gadget - separately from maintaining static pages (formerly known as "blank pages"), using the dashboard Pages wizard.

Even understanding the changes, some blog owners, who publish blogs that use dynamic templates, cannot add or delete dynamic pages - or cannot resequence the various page links.

Some owners claim to have links on the menu bar that they can't delete. Others have added, deleted, or resequenced links - but have found their changes to be lost, when viewing the blog, after saving the changes.

It appears that some blogs have had multiple Pages gadgets.

Blogs using a dynamic template, with multiple Pages gadgets in their history, become a problem.

If we look at the "Edit" link of the Pages gadget, in most blogs, we find the gadget referenced as "PageList1".
https://www.blogger.com/rearrange?blogID=1573647684922284136&widgetType=PageList&widgetId=PageList1&action=editWidget§ionId=sidebar-right-1
That is the "Edit" link for the gadget, for my dynamic template test blog.

Some blogs show signs of having had multiple Pages gadgets. "PageList2" - or even "PageList3" - are seen in some blogs.
https://www.blogger.com/rearrange?blogID=3821418744348630367&widgetType=PageList&widgetId=PageList2&action=editWidget§ionId=sidebar-right-1
That is the "Edit" link for the gadget, for one blog with this problem.

Apparently the dynamic templates only use "PageList1" in the menu bar - even if "PageList2" or "PageList3" is the active "Pages" gadget. This is not a problem for non dynamic templates.

The workaround, in this case, is simple enough. The blog owner must edit "PageList1".
https://www.blogger.com/rearrange?blogID=3821418744348630367&widgetType=PageList&widgetId=PageList1&action=editWidget§ionId=sidebar-right-1
Just extract the URL from the "Edit" link, paste it into the browser address window, change the "2" to "1", and hit Enter. Then add, delete, and rearrange links as necessary - and Save the changes.

The workaround is simple enough - but until Blogger Engineering fixes the problem, the blog owners affected have to use the workaround, each time they need to update Pages. And, if they ever switch back to a non dynamic template, they will need to update the active alias of "PageList", with any changes made to "PageList1".

Let's hope that Blogger Engineering can identify and fix the problem.

Saturday, March 15, 2014

Renaming The Home Page, Using The New Pages Gadget

The recent Blogger redesign of the Pages list / Pages gadget has caused some confusion.
How do I create a "Web address" page?
and
How do I hide a page?
and even
How do I edit a "Web address" page?
Once you understand how to use the newly designed Pages gadget, it's not complicated do each of the above.

Then there are those who want to rename the Home page - which used to be obvious. Just use the Pages gadget.
  • Look under “Pages to show”.
  • There’s the box, containing “Home” (in the language of the blog).
  • Type a new value for “Home”.
  • Hit “Save”.
  • Done.
That's how it used to work.

Now, you can hit "Save" all that you want. It just won't accomplish anything.

Fortunately, this simple omission by Blogger Engineering is not difficult to work around, using "Configure Page List".
  • Use “Add external link”, and create a dynamic page, with “Web address” of the blog Home page.
  • Use “Pages to show”, and de select the default “Home” page.
  • Use “Page order”, and position the newly renamed “Home” page as desired.
  • Hit "Save".
  • Done.
It's a 60 second effort, instead of 30 seconds.

Eventually, Blogger Engineering will fix their mistake. Until then, just do it - then get back to work on your blog.

>> Top

Friday, April 27, 2012

Continued Inability To Update The Labels Gadget, With A Large Partial List

In February, we observed that various blog owners were reporting problems with updating label and link lists. We setup a problem rollup in Blogger Help Forum: Something Is Broken, where we observed a small but significant number of reports from unhappy blog owners, unable to update the gadgets on their blogs.

Last month, Blogger Support supposedly resolved the reported problem, and the volume of problem reports dropped significantly. The problem, however, has not been eliminated.

The problem with updating various accessory gadgets, initially reported several months ago, is still present in various Blogger blogs - though significantly reduced - following an improvement last month.

This blog has a total of 626 labels defined, in the various posts. If I want to spare my readers (slightly) from an excessively long list of labels, I can edit the list and selectively display only significant ones. I cannot display all significant ones, unfortunately. I currently have 501 of 626 labels selected for display.

If I edit my label list, in "Select labels to show", I can select any one of the remaining 125 labels. Having hit the tiny "Done" caption at the bottom left of the window, I am left with "Configure Labels". If I hit "Save", the earlier reported problem continues - the yellow "Saving ..." flag pops up, and the gadget hangs while saving.

If I hit Cancel, and edit the list again, I can de select any one label, and save the list, successfully - again with exactly 501 labels selected. Then adding any one label, and attempting to Save once more, the gadget will again hang. The bottom line is that I can selectively display 501 labels - and no more.

I have observed this problem in both Chrome and Firefox (V11 and V12) - and using both the Classic and New GUIs. With up to 501 labels selected, no problem. With any more than 501 labels selected - big problem. During the past month, after I first observed this problem, I added half a dozen new labels, to reach the current total of 626. The problem has limited me to 501 selected labels, consistently, regardless of the total number.

Various reports, in both this blog, and in [Problem Rollup] Updating Label List Gadget Hangs, indicate that other blog owners are still observing this problem. It's becoming increasingly obvious that this problem still exists in
  • BlogLists.
  • Label Lists.
  • LinkLists.

>> Top

Friday, April 20, 2012

Adding An HTML / JavaScript / Text Gadget?

An interesting bit of confusion is seen, occasionally, in Blogger Help Forum: Something Is Broken.
I added a gadget using code from a third party website - but the new gadget shows the code, instead of the gadget content, when I view my blog!
This is somebody who was confused by the options offered by the gadget setup wizard.

When you add an HTML / JavaScript, or a Text, gadget to a blog, you can get odd results.

"Add a Gadget" provides the "HTML / JavaScript" and "Text" gadgets - your choice.

The captions and labels in the "Configure HTML/JavaScript" or "Configure Text" wizard can be a bit confusing. From the "Add a Gadget" wizard, you can select either an "HTML/JavaScript" gadget ("Configure HTML/JavaScript") or a "Text" gadget ("Configure Text").

The "HTML / JavaScript" and "Text" gadgets are identical - excepting the title.

Both the "Configure HTML/JavaScript" and "Configure Text" wizards use the same code - the only difference between the two is the header.

  • Configure HTML/JavaScript
  • Configure Text

Everything else is the same. Either wizard can create an "HTML / JavaScript" gadget (in HTML mode) - or a "Text" gadget (in Text mode) - as you wish.

  • When the wizard is in HTML mode, the caption at the upper right border of the Content window will read "Rich Text". Positioning the cursor over "Rich Text" (and noting that the cursor does not change to a pointer), and clicking on "Rich Text", brings up the Text mode of the wizard.
  • When the wizard is in Text mode, the caption will read "Edit Html" - and clicking on "Edit Html" puts the wizard into HTML mode, again.

The title of the wizard does not change, when switching modes.

The header of the wizard - "Configure HTML/JavaScript" or "Configure Text" - will remain as it was when the wizard was opened, ignoring any mode changes. The caption, at the upper right border of the Content window, is what matters.

  • If you want to add code (HTML / JavaScript), you will want the caption to read "Rich Text".
  • If you want to add text (Rich Text), you will want the caption to read "Edit Html".

Being in the wrong mode will produce inconsistent and odd results.

If you're in the wrong mode, you'll be able to enter a limited amount of content - but with odd results.

  • If you're in HTML mode (with "Rich Text" showing), you'll be able to enter text - to a limited degree. HTML is simply fancy text, with tags (special keywords and symbols).
  • The HTML editor toolbar will lack a few buttons - and using special characters like ampersand ("&"), greater than (">") - and less than ("<"), will produce random and unpredictable results.
  • If you're in Text mode (with "Edit html" showing), you'll be able to enter the HTML code - but when the blog is displayed, you'll see code (which is just text) in place of a working gadget.

If you just added a new gadget - and ended up with visible code, when you tried to setup an HTML gadget - now you know why. Similarly, if the "Save" button is now broken, and you are trying to add or update a Text gadget.

This is one of several possible causes of problems seen when adding / updating the HTML / JavaScript / Text gadgets.

Sunday, February 5, 2012

Blog Owners Reporting Inability To Update Various Template Gadgets

For several weeks, we've been seeing a light but steady stream of reports from blog owners unable to update various template gadgets, on their blogs. This blog, personally, has the full page Topics Index, which needs to be updated with half a dozen newly created labels.

In some cases, the "Save" button may appear inactive or dim; in other cases, the owner will see the "Saving..." status endlessly displayed, while the wizard appears to "hang".

We have a problem rollup in Blogger Help Forum: Something Is Broken, where we are collecting details from the blog owners reporting.
  1. What is the URL of the blog? If published to a non BlogSpot URL, both the BlogSpot and domain URLs may be relevant.
  2. Is this a team administered blog, or are you the sole administrator / owner?
  3. What is your Blogger / Google ProfileID?
  4. Does the blog use a dynamic template, or a non dynamic template?
  5. Do you use a Classic Blogger GUI, or a New (2011) Blogger GUI?
  6. What is the Title of the Gadget that you are Saving, unsuccessfully (please copy the title, accurately, from the popup window, before hitting Cancel)?
  7. What browser (name, and version, please) are you using?
If you are observing this problem, with your blog, providing as many details as possible may help Blogger Support focus on your problem, by identifying a pattern.


(Update 2012/04/27): Following an update last month, the problem was significantly reduced - though not eliminated.

>> Top

Thursday, November 10, 2011

Make A Custom Pages Index For Your Blog

Even before Blogger added static pages as a blog feature, blog owners have been asking how to make hidden or separate pages for their blogs.

When static pages, and the Pages index gadget, were added, people started asking about indexing label searches and external links in the Pages gadget.

There are several solutions to the need to have a Pages gadget that indexes archive / label searches, and external URLs. Each solution has its advantages, and disadvantages.

If you want a Pages gadget for your blog, that indexes more than just static pages, you have two basic choices. Each choice gives you different possibilities.

  1. Replace the Pages gadget with a linklist. You can index any URLs that interest you, in a linklist.
  2. Use the Pages editor, in the dashboard Layout page, which lets you add URLs of your choice, directly to the Pages gadget.

I've been advising people for several years, how to make a horizontal index bar for the blog.

With most Blogger templates, the Tabs section contains CSS that displays any linklist positioned there, horizontally. This gives you the choice of using "Add a gadget", and creating a linklist as an XML based "Linklist" - or one created as an HTML based "HTML / JavaScript" gadget - and both choices have advantages.

Use an XML based linklist.

If you look at the menu bar on this blog, you'll see how the active menu button "lights up" when selected. The "Selected" feature is a CSS tweak - and requires that you use a linklist that's XML based.

I created the menu bar here, using "Add a gadget", and tweaked the template code. The default Pages gadget is XML based - and does not require the latter tweak.

Use the Blogger supplied Pages gadget.

As an alternate to using a linklist gadget, you could use the Pages gadget.

If you use the Pages Editor, and you position the Pages gadget in the proper position, your blog, when displayed using a dynamic template, will populate the black menu bar with your Pages list. When that happens, the dynamic view menu will be displayed as a drop-down list, at the far left of the menu bar.

Saturday, May 1, 2010

Identify The Gadgets In The Template, Reliably

When you tweak the code in a gadget, based upon my instructions, you'll be editing the template HTML. Or, you might be using the Layout wizard, to locate and remove a problem gadget.

You'll do most editing with widget code unfolded. You'll have a lot of code to sift through - and with many gadgets in your blog, there's always the chance that you'll see the code for one gadget, and confuse it for another.

If you delete or tweak the wrong gadget, you may not like what you get. Before deleting anything, or editing the template, take an extra minute, and find the specific gadget, by its name. This could save you a lot of grief.

Here, I'll look at the Welcome message in my Buzz blog.

This is what I did, as I tweaked it to make it show up only on the Home page.

So, welcome to The Buzz.

If I right click on the screwdriver / wrench ("dragonfly") under that gadget, and select "Copy Link Location" (or possibly "Copy link address"), I can paste the URL into Notepad for easy examination.

Alternately, use the Layout wizard, click on "Edit" - and stretch the gadget window out horizontally, until the entire URL is visible.
http://www.blogger.com/rearrange?blogID=6525860816441104874&widgetType=Text&widgetId=Text1&action=editWidget

The gadget in question is "Text1". To find the code to tweak, I use the Template "Edit HTML" wizard - and completely unfold the code for "Text1".
<b:widget id='Text1' locked='false' title='' type='Text'>
<b:includable id='main'>
<b:if cond='data:blog.url == data:blog.homepageUrl'>
<!-- only display title if it's non-empty -->
<b:if cond='data:title != ""'>
<h2 class='title':gt;<data:title/:gt;</h2>
</b:if>
<div class='widget-content'>
<data:content/>
</div>
</b:if>

<b:include name='quickedit'/>
</b:includable>
</b:widget>
That beats an eyeball based search, any day. It's 100% reliable, and takes just a few seconds to find the code for "Text1". After you do this a few times, you'll be able to hover the mouse, and spot the widgetId=Text1 in the URL display in the browser status area - and go straight to
The gadget in question is "Text1".

(Update 2014/12): If you use a text browser, you can locate and identify a problem gadget, much more easily.

>> Top

Monday, April 26, 2010

Adding A Gadget Above Or Below The Posts Gadget

Almost every blogger is used to adding gadgets of various types, using the "Page Elements" wizard, to the header, the sidebar, and / or the footer of their blog. If you can't do that, you just aren't enjoying Layout Templates, to their fullest.

Some folks haven't yet realised that you can also add a gadget just above, or just below, the posts.

This is not the same as adding a gadget to the bottom of the header (which is, admittedly, just above the posts); nor is it the same as adding a gadget to the top of the footer (again, just below the posts).

A gadget just above, or just below, the Blog Posts gadget stops next to the sidebar - as opposed to continuing above or below the sidebar, should you add a gadget to the header or the footer. It's just as easy to add a gadget to one place, as to the other, though.


Just drag and drop any gadget of your choice, to the right spot. See what this looks like, in my demonstration blog, Nitecruzr New Template Laboratory.

For a variation on this, you can setup such a gadget to appear only on the first page.

Wednesday, March 24, 2010

Static Pages In A Renamed Blog

It's possible that Blogger takes the term "static", as in "Static Pages", very seriously.

I've been hearing rumours of odd URLs in blogs that are renamed - ie, published under a new URL - where static pages are present. Today, I setup a brief experiment.

You may see the result of my experiment, in my test blog "Nitecruzr Test Pages In Renamed Blog". The blog started out as "nitecruzr-test-pages-blog-rename.blogspot.com". You are welcome to click on that link, if you wish. It won't get you anywhere, though.

After I setup the blog, I published a couple Static Pages - "About Me" and "About This Blog", with a tab bar below the header, as the Pages gadget.

After publishing the pages, I renamed the blog to its current URL "nitecruzr-test-pages-blog-renamed.blogspot.com". Do you see the name change?
nitecruzr-test-pages-blog-rename.blogspot.com
nitecruzr-test-pages-blog-renamed.blogspot.com

A very small change, but it's significant.

And now, please examine the blog itself. Observe the URL of the first post, "Lorem Ipsum".
nitecruzr-test-pages-blog-renamed.blogspot.com/2010/03/lorem-ipsum.html

And look at the Pages gadget
Home    About Me    About This Blog

The 3 static links:
nitecruzr-test-pages-blog-rename.blogspot.com
nitecruzr-test-pages-blog-rename.blogspot.com/p/about-me.html
nitecruzr-test-pages-blog-rename.blogspot.com/p/about-this-blog.html

That's a problem. What we should have is

Home    About Me    About This Blog

The 3 static links:
nitecruzr-test-pages-blog-renamed.blogspot.com
nitecruzr-test-pages-blog-renamed.blogspot.com/p/about-me.html
nitecruzr-test-pages-blog-renamed.blogspot.com/p/about-this-blog.html


So, try it. Click on an link in the first example, above.
The blog you were looking for was not found.


What have we observed?
  • Static Pages get a new URL, when the blog is renamed.
  • The links in the Pages gadget are not changed.
I think somebody has some work to do, yet.

Fortunately, if you know that this oddity exists, it's not hard to correct it. Just delete the Pages gadget. Then go to "Layout", and add a Pages gadget again. The re added Pages gadget will now have links with the correct URLs.

But please, only delete the Pages gadget - please, do not delete the individual pages. It appears that pages are given the same duplication prevention treatment, as are posts. If you delete the pages, you'll end up with suffixed URLs, when you re create the pages.

There is more to consider, when we examine a blog published to a custom domain, and the blog In Transition. We will examine that, later.

Thursday, March 11, 2010

The Layout Template "Edit HTML" Wizard And "Expand Widget Templates"

Sometimes, when we're working on a problem that requires editing the HTML in a layout template, we need to understand the need to expand (or not expand) the widget templates. This month, for instance, we have hundreds of blogs containing malicious code, unknowingly installed by the blog owners. The malicious code must be removed, but the installed code aggressively prevents use of the "Page Elements" wizard, and the "Remove" button.

Note: The selection to "Expand Widget Templates" has been replaced, by folded lines of code, which are now expanded selectively.

When the "Page Elements" wizard can't be used to remove code, you have to use the "Edit HTML" wizard, and remove the individual gadget entries, one by one.

Here's what the unexpanded line entry for one problem gadget looks like
<div class='widget Gadget' id='Gadget1' />

That's easy enough to find - and to delete.

Here's what that entry looks like, expanded. To examine, and maybe modify, the gadget code, you have to select "Expand Widget Templates". To simply remove an entire gadget, on the other hand, do not select "Expand Widget Templates".
<div class='widget Gadget' id='Gadget1'>
<h2 class='title'>Maukie - the virtual cat</h2>

<div class='widget-content'>
<script type="text/javascript">
if (!window.gadgets || !gadgets.rpc) {
document.write('<script type="text/javascript"' +


'src="http://www.gmodules.com/gadgets/js/rpc.js?v\x3d9261b340ef5af1e5faca55914670c7\x26container\x3dblogger\x26debug\x3d0\x26c\x3d1">'

+
'</scr' + 'ipt>');
}
</script>

...


</span>
</span>
<div class='clear'></div>
</div>


OK, the example above was heavily excerpted. If I was to include the entire code set for this one gadget, I would risk this post (my main page display) being subject to segmentation, caused by Auto Pagination. So, I gutted 95% of the interior code. But, you should get the idea.

The point is, when you need to remove malicious code, do not select "Expand Widget Templates". Then, find (as an example)
<div class='widget Gadget' id='Gadget1' />

and delete that one line.

Problem solved.

And next time, be more selective what gadgets you install in your blog.

>> Top

Navigate» Become author for this Blog