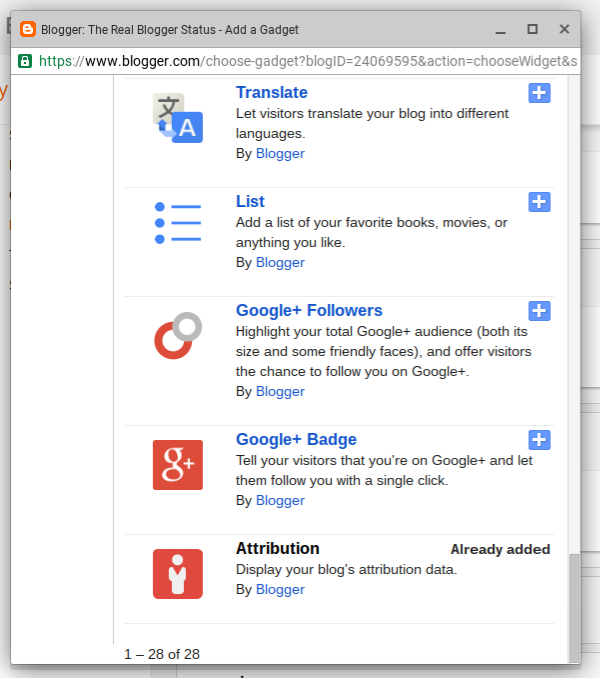
One of the most useful features of Blogger is the ability to add many different accessories, to a blog.
There are accessories, for every blog - and for every owner preference. The "Add a Gadget" wizard, in the Blogger dashboard, is the best procedure for adding accessories, to customise a blog reliably.
Using "Add a Gadget" is a simple process. It will be most useful, in the long term, if used cautiously, however.
Adding a gadget is not difficult.
Start from the Blogger dashboard Layout page.
Click on any link to "Add a Gadget", to that template section.
This link, for instance, will add a gadget to the right sidebar.
Choose any of dozens of interesting and useful accessories.
Be knowledgeable, when adding accessories.
Similar to the process of adding an HTML gadget, there are a few mistakes that you can avoid, when adding a gadget in general.
- Some sections of the Layout page may not allow gadgets to be added.
- When you find an interesting gadget, be selective!
- Some Blogger provided gadgets are found under "More Gadgets".
- Don't use "Add your own" - unless you know what you're doing!
- Add a new gadget, when adding important features.
- A gadget, as added, will be displayed on every page of the blog.
Some sections of the Layout page may not allow gadgets to be added.
Each template section can be subject to gadget limits, and to locking. This will prevent addition, removal, and / or re positioning of gadgets.
If you're unable to add, remove, or reposition a gadget, you may have to edit the template - and change the section settings.
When you find an interesting gadget, be selective!
"Add Gadget" lists gadgets produced by third party developers, as well as by Blogger Engineering. Some non Blogger produced gadgets won't benefit your blog, in the long term.
Look for "By Blogger", for the best choices.
Not all third party gadgets are intentionally malicious - but the most reliable gadgets will be explicitly labeled "By Blogger".
Some Blogger provided gadgets are found under "More Gadgets".
The "Basics" tab in "Add a Gadget" contains mostly gadgets "By Blogger" - and most gadgets "By Blogger" are found in "Basics". Some gadgets "By Blogger" are in "More Gadgets" - and you may have to search that list, carefully, to find what you need.
Don't use "Add your own" - unless you know what you're doing!
There are 3 tabs, in "Add a Gadget".
- Basics.
- More Gadgets.
- Add your own.
The latter, "Add your own", can lead to frustration.
If you are not familiar with coding XML gadgets (and probably do not need this advice), don't bother with "Add your own". Stick with "Basics" and "More Gadgets".
Add a new gadget, when adding important features.
You can install HTML code using the Template Editor - or you can add an HTML snippet into an existing HTML gadget - if you wish. I highly recommend that you add a new HTML gadget, for each important accessory, though.
A gadget, as added, will be displayed on every page of the blog.
By default, a gadget, once added, will be visible on every template page. You can, with some care and effort, make specific gadgets display selectively.
Enjoy adding accessories, properly.
So enjoy accessorising your blog - just accessorise carefully.
You can add any number of useful accessories, to a #Blogger blog, using the "Add a Gadget" wizard in the dashboard Layout page. The best choices are explicitly labeled "By Blogger".
Many popular accessories start with raw HTML / JavaScript code, from different third party services.
One of the advantages of publishing a Blogger blog is the abundance of available accessories. With Blogger being in the top 3 of Internet publishing platforms, every third party service wants customers who publish using Blogger.
There are plenty of abusive or malicious accessories, that should not be installed, even when offered - and there are ways to best install the accessories, that can be safely installed.
Most accessories, from third party services, will be provided as HTML / JavaScript.
To add HTML / JavaScript code, to a blog, you can use any of several techniques - though using a new HTML / JavaScript gadget is the smartest choice. Adding an HTML gadget, to a Blogger blog, is not difficult.
Add an HTML / JavaScript gadget, using "Add a Gadget" in Layout.
- Start from the "Layout" dashboard menu page.
- Click "Add a Gadget".
- Click the "+" button, for "HTML/JavaScript".
- Paste the code, given to you, into the "Content" box.
- Click "Show HTML/JavaScript", if the option is provided.
- Click "Save".
- Position the new gadget anywhere in the Layout display.
- Click on "Save arrangement".
Start from the dashboard Layout page, and select any convenient link to "Add a Gadget". Select "HTML/JavaScript" from the "Basics" tab, in the "Add a Gadget" wizard.
Select "HTML/JavaScript" in "Basics".
Paste the code, that you have to add, into the "Content" window, in the "Configure HTML/JavaScript" wizard. And if you wish, give your new gadget a Title.
Paste the code that you have, into "Content" - with the wizard in HTML mode ("Rich Text" displayed).
And select "Show HTML/JavaScript", if provided for this template - then click on "Save". Finally, click on "Save arrangement".
Avoid several well known mistakes, when adding gadgets.
There are mistakes, that you can avoid - if you know what to do.
- Be selective, when adding third party code.
- Add a gadget, using "Basics".
- Edit an HTML gadget, with "Rich Text" displayed as the caption (for HTML) - or with "Edit html" displayed as the caption (for Rich Text).
- With a dynamic template, attach or embed the content in a static page.
- With a mobile display, enable the gadget, if you want it to be viewed.
- With templates that have a disappearing sidebar, position the gadget in the footer.
- If "Show HTML/JavaScript" is provided for this template, select that option.
Be selective, when adding third party code.
It's your blog - and you are allowed to install any accessories and tweaks that interest you. For long term stability and success, though, you should try to only install code from reliable sources.
Your readers will be happier, with your blog using reliable accessories.
Add a gadget, using "Basics".
You'll start with an "Add a Gadget" link, on the dashboard Layout page - and the "Add a Gadget" wizard.
The "Add a Gadget" wizard has the "Basics" tab, with the "HTML / JavaScript" gadget in the list - and it has the "Add your own" tab. You should find the "HTML / JavaScript" gadget, in "Basics".
Edit an HTML gadget, with "Rich Text" / "Edit html" displayed as the caption.
The "HTML" / "Text" gadgets, intriguingly have the "Edit Html" / "Rich Text" tabs.
If you want to add / edit HTML or JavaScript, the caption should read "Rich Text".

The HTML gadget, in HTML mode.
Conversely, if you want to add / edit text, the caption should read "Edit html".
It's your choice. The "HTML / JavaScript" and "Text" gadgets are the same - just the captions ("Edit html" and "Rich Text") differ.
With a dynamic template, attach or embed the content in a static page.
Adding gadgets to dynamic templates is not a straightforward process. Gadgets have to be written specifically to support dynamic templates - and the HTML gadget is not written for this.
If you want an HTML gadget to work in a dynamic template, you'll need to attach or embed the gadget, in a static page.
With a mobile display, enable the gadget, if you want it to be viewed.
By default, the "HTML / JavaScript" gadget does not display, on a mobile browser. You will have to use the Template Editor, and enable the gadget to display, in mobile mode.
With templates that have a disappearing sidebar, position the gadget in the footer.
Some Responsive class templates have a sidebar that is hidden by default. To see the sidebar, you click on the "hamburger" icon in the header.
If you want your new gadget to work with the blog loaded - even without the sidebar showing - you need the gadget in a visible section. The footer is a better choice, in this case.
If "Show HTML/JavaScript" is provided for this template, select that option.
If the option to "Show HTML/JavaScript" is provided in the "Configure HTML/JavaScript" wizard, be sure to select that - if you want the gadget to operate, with the blog loaded. If the gadget should not be visible to the reader, but it needs to operate, you still must enable this option.
It's your blog.
There are ways to make an HTML gadget work, while ignoring the above advice. Long term success will be much more likely, though, with attention to the details.
One of the most common accessories, added to a #Blogger blog, starts with an HTML / JavaScript gadget. This is a very versatile gadget - and it's not difficult to install. There are several common sense details, however.
To encourage email subscriptions, and other social connections, some blog owners provide gadget toolbars, with useful links.
Some blog owners would like to position their gadgets in fixed screen positions.
I want to have a subscribe button hover at the top of the page, while people read my blog.
This blog has a hovering AddThis toolbar, which provides selected social sharing options. And, it has a hovering "Top of Page" button.
Adding a custom subscription gadget, in a fixed screen location, is not complicated.
AddThis has a large library of social sharing gadgets, with their icons - but they don't have any email subscription selections. But you can add an icon based "subscribe" button, "hovering" at the top of the page.
An occasional request suggests using a popup window, containing a subscription form. We don't recommend using a popup window - but a subscription form, on a FeedBurner hosted page, will provide the same function.
- Add FeedBurner "Subscribe by Email".
- Add a "Subscribe by Email" FeedBurner hosted form, and a link.
- Add a suitable icon, containing the FeedBurner subscription link.
- Try It.
See below "See the code asssembled.", for the detailed procedure.
Add FeedBurner "Subscribe by Email".
Using the dashboard Layout page, and "Add a Gadget", add a "Subscribe by Email" gadget. This creates a blog posts FeedBurner hosted feed.
FeedBurner provides the "Subscribe by Email" gadget, with the choice to display either an on screen form - or a simple link to a FeedBurner hosted form page.
Add a "Subscribe by Email" FeedBurner hosted form, and a link.
Once a "Subscribe by Email" gadget has been added, get the gadget link from the FeedBurner dashboard, at Publicize - "Email Subscriptions" - "Subscription Management" - "Preview Subscription Link…".
Start from the dashboard, at Publicize - "Email Subscriptions" - "Subscription Management".
The "Preview Subscription Link…" window contains the code, that we need.
Add a suitable icon, containing the FeedBurner subscription link.
Choose an attractive icon to contain the FeedBurner supplied link. Add an HTML gadget using "Add a Gadget", containing the icon with the link to the FeedBurner form - and displayed in a fixed location.
Try It.
I added a button, and a new subscription, to my test blog, "Chucks Tech World".
See the icon, in the top right margin?
See how the new icon floats?
See how it floats from the top - and from the right?
See the code, assembled.
A floating subscription button is simply an "HTML / Javascript" gadget, containing button code, linking to a FeedBurner subscription form. I position my gadget, in the footer, out of sight. The code "top:40px;right:60px;" positions the button to display relative to the top right corner - regardless of where the HTML gadget is positioned.
- Upload a suitable icon.
- Add the FeedBurner Subscription link code.
- Add the button code.
Start with an icon, uploaded:
<a href="https://blogger.googleusercontent.com/img/b/R29vZ2xl/AVvXsEii2fCZTJEcS0rg0NliF0abn3LvuRvBFczagaR3aJo66JQ2X2VzNScrxHothiYOgP83ZrrLHN7fFcFeA5ihXLTdIHu8oO7kaxaILeNXcICvNkVNwj2pVG86bXn2qyvJd13-luA-hoijps09/s1600/Subscribe+Icon.png" imageanchor="1" ><img border="0" src="https://blogger.googleusercontent.com/img/b/R29vZ2xl/AVvXsEii2fCZTJEcS0rg0NliF0abn3LvuRvBFczagaR3aJo66JQ2X2VzNScrxHothiYOgP83ZrrLHN7fFcFeA5ihXLTdIHu8oO7kaxaILeNXcICvNkVNwj2pVG86bXn2qyvJd13-luA-hoijps09/s320/Subscribe+Icon.png" /></a>
Here's the FeedBurner Subscription Link:
<a href="https://feedburner.google.com/fb/a/mailverify?uri=ChucksTechWorld&loc=en_US">Subscribe to Chucks Tech World by Email</a>
Here's the Floating Top Of Page Button:
<a style="display:scroll;position:fixed;bottom:20px;right:60px;" href="#" title="Top"><img border="0" height="60" width="60" src="https://blogger.googleusercontent.com/img/b/R29vZ2xl/AVvXsEh2eOcCRS3N1_JwNrk6zva82CQybo8TWCvgMs6lUtZhyl_6XrkbjWP8Ayf2eQLtg3KEaUMruYNMT3uHK7llf3gltPNd6PMaMEjSWXuTpPzCX-fAebzTg5xQTb9kdRRiRhVVm347DAyfZzdk/s320/Up+Arrow+4.jpg" /></a>
And put them all together:
<a style="display:scroll;position:fixed;top:40px;right:60px;" href="https://feedburner.google.com/fb/a/mailverify?uri=ChucksTechWorld&loc=en_US" title="Subscribe by Email" target="_blank"><img border="0" height="60" width="60" src="https://blogger.googleusercontent.com/img/b/R29vZ2xl/AVvXsEii2fCZTJEcS0rg0NliF0abn3LvuRvBFczagaR3aJo66JQ2X2VzNScrxHothiYOgP83ZrrLHN7fFcFeA5ihXLTdIHu8oO7kaxaILeNXcICvNkVNwj2pVG86bXn2qyvJd13-luA-hoijps09/s320/Subscribe+Icon.png" /></a>
And that's it.
I now have a hovering subscription icon, in this blog. Given a collection of icons, carefully arranged, you can have a hovering toolbar - to maybe complement a social media button toolbar.
Some #Blogger blog owners would like a hovering button or toolbar, to provide an email subscription form. This is an accessory that is not difficult to add.
It's possible that Blogger takes the term "static", as in "Static Pages", very seriously.
I've been hearing rumours of odd URLs in blogs that are renamed - ie, published under a new URL - where static pages are present. Today, I setup a brief experiment.
You may see the result of my experiment, in my test blog "Nitecruzr Test Pages In Renamed Blog". The blog started out as "nitecruzr-test-pages-blog-rename.blogspot.com". You are welcome to click on that link, if you wish. It won't get you anywhere, though.
After I setup the blog, I published a couple Static Pages - "About Me" and "About This Blog", with a tab bar below the header, as the Pages gadget.
After publishing the pages, I renamed the blog to its current URL "nitecruzr-test-pages-blog-renamed.blogspot.com". Do you see the name change?
nitecruzr-test-pages-blog-rename.blogspot.com
nitecruzr-test-pages-blog-renamed.blogspot.com
A very small change, but it's significant.
And now, please examine the blog itself. Observe the URL of the first post, "Lorem Ipsum".
nitecruzr-test-pages-blog-renamed.blogspot.com/2010/03/lorem-ipsum.html
And look at the Pages gadget
Home About Me About This Blog
The 3 static links:
nitecruzr-test-pages-blog-rename.blogspot.com
nitecruzr-test-pages-blog-rename.blogspot.com/p/about-me.html
nitecruzr-test-pages-blog-rename.blogspot.com/p/about-this-blog.html
That's a problem. What we should have is
Home About Me About This Blog
The 3 static links:
nitecruzr-test-pages-blog-renamed.blogspot.com
nitecruzr-test-pages-blog-renamed.blogspot.com/p/about-me.html
nitecruzr-test-pages-blog-renamed.blogspot.com/p/about-this-blog.html
So, try it. Click on an link in the first example, above.The blog you were looking for was not found.
What have we observed?- Static Pages get a new URL, when the blog is renamed.
- The links in the Pages gadget are not changed.
I think somebody has some work to do, yet.
Fortunately, if you know that this oddity exists, it's not hard to correct it. Just delete the Pages gadget. Then go to "Layout", and add a Pages gadget again. The re added Pages gadget will now have links with the correct URLs.
But please, only delete the Pages gadget - please, do not delete the individual pages. It appears that pages are given the same duplication prevention treatment, as are posts. If you delete the pages, you'll end up with suffixed URLs, when you re create the pages.
There is more to consider, when we examine a blog published to a custom domain, and the blog In Transition. We will examine that, later.