Showing posts with label Settings. Show all posts

Wednesday, June 22, 2016

Blogger Magic - Disable The HTTPS Redirect

SSL has been an option, for BlogSpot published blogs, since late last year - and we still see occasional questions, in Blogger Help Forum: Get Help with an Issue, about its use.
When I saved my post, I saw the error message
This page contains HTTP resources which may cause mixed content affecting security and user experience if blog is viewed over HTTPS.
I clicked "Fix" - and the error message went away. Should I have to go back and "fix" all my old blog posts, this way?
This blog owner will be better off, with "HTTPS Redirect" disabled.

Until HTTPS availability, for all Internet content and services, becomes a consistent reality, there will be problems with Blogger blogs - and confusion, as in the example.

Custom domain publishing is the most vulnerable Blogger feature, with blogs using "HTTPS Redirect". It's not the only possible complication, though.

Some blog owners will be better off, not enabling "HTTPS Redirect" - or if enabled, they will need to disable it.

HTTPS Redirect can be easily disabled.

"HTTPS Redirect" is not difficult, to disable. Go to the dashboard Settings - Basic page.


Click on "Yes".


Select "No".


And, the option is disabled.


And the owner won't see the confusing "Fix" / "Dismiss" options.


Now, you can publish the blog, to a custom domain. With "HTTPS Availability" not optional, blogs, with essential features that don't provide SSL, will still have unsatisfied readers who will demand HTTPS.

Some blogs would be better off with "HTTPS Availability" as an option.

You cannot eliminate all confusion, until SSL is uniformly available.

I will note, however, that disabling the redirection will not eliminate reader concern, from "Mixed Content" alerts - nor will it prevent owner confusion, from Post Editor warnings. As long as SSL is (may be) involved - automatic redirect or not - and until every Internet feature and service uses SSL consistently - there is going to be some confusion.


Some #Blogger blog owners will need to disable the "HTTPS Redirect" option, to publish their blogs as they need. Right now, "HTTPS Redirect" is an option - and "HTTPS Availability" needs to be an option also.

Monday, June 20, 2016

Blogger Magic - Export From A Blogger Blog

One of the most useful skills, when maintaining and publishing a blog, is backing up the content.

As you publish a blog, it's a very good idea to periodically backup the content - comments, pages, and posts. Sometimes, backed up content may save you hours of anguish.

Backed up content is not a waste of time or resources.

Backing up content - comments, pages (static pages), and posts (dynamic pages) is a very quick task - that consumes a minimal amount of resources.

Many people will benefit from a daily routine of backup. Backed up content can be used, in a variety of ways - if it is available.

Periodic backup of content is simple - and may save you much inconvenience.


Start from Settings - Other.


Click on "Back up Content".


Click on "Save to your computer".


Some operating systems may leave the browser, to save your content.

Click on "Leave".


Now, you use the file manager provided by your operating system, to select a file / folder, and actually save the file.


"Back up Content" is useful, in several tasks.

You'll find that daily backups uses a minimal amount of time, and computer resources. And even if you don't ever use the backed up content, you will be better off having it.


All of these tasks use the "Back up Content" wizard. Do this regularly - and you won't regret it. Just remember where you save the content. Setup one or more standard folders, on your local computer.


Using the "Back up Content" #Blogger dashboard wizard is a good task to do frequently - and regularly. It will save you a lot of time and trouble, if ever needed.

Saturday, June 11, 2016

Recovering From A Corrupt Template - The Next Step

There are three possible dashboard wizards, used to recover a blog with a corrupt template aka "500 Internal Server Error".
  1. The Template Designer page.
  2. The Template page.
  3. The Template Editor ("Edit HTML") page.
With most blogs, one of the three can eventually be used, to install a clean, new template - and recover a blog that's offline because of the broken template.

Some blogs, unfortunately, cannot be recovered this way.

Some blogs have templates so badly broken, that no dashboard template wizard can be accessed - and used to restore the blog to operational status.

If there's no way to recover a broken blog by replacing the template, the next possibility is to recover the URL - and install a new blog at that URL.

  1. Create a new blog - with a clean, working, Blogger supplied template.
  2. Swap URLs between the old and new blogs.
  3. Export content from the broken blog - and Import to the new blog.
  4. Transfer / update Followers.
  5. Rebuild the template, and add gadgets.
  6. Provide notice to your Followers, readers, subscribers, and other viewers.

Create a new blog - with a clean, working template.

Use the dashboard "New Blog" button, and create a new blog. You'll only create the new blog, in this case, to recover the URL of the broken blog - so just use a random, non valued URL.

Choose a template similar to the one on the broken blog, from the dashboard Template page - and get your new blog online. Use a Blogger standard template, until you are satisfied that the problem won't continue.

Swap URLs between the old and new blogs.

Hoping that you can access the Settings - Basic ("basicsettings") page - first rename the URL Of the broken blog, to a second random, non valued URL. Then you can rename your new blog - created above - to the URL previously used by the broken blog.


Just Edit "Blog Address", twice, to swap URLs.

First, for the broken blog, to free up the current URL - then, for the new blog, to recover the current URL.


Now, your broken URL is back online, with a clean template - though without content.

Export content from the broken blog - and Import to the new blog.

Use the "Import & back up" wizard at the Settings - Basic ("othersettings") page for the broken blog, and export comments, pages, and posts. Then use the wizard for the new blog, and import the content just exported.

Transfer / update Followers.

If the broken blog uses Blogger Followers for community building, and you had a significant Followers community, the community will remain on the old, broken blog. This is the one down side of recovering a broken template using this technique.

Fortunately, the only specific problem is the effect upon the Followers community. The other half of Following - the blog feed - will be re established with the new blog, which will now have the desired URL being recovered. And the sooner you get the blog back online, the sooner you can rebuild / recover your Followers.

Rebuild the template, and add gadgets.

If you periodically back up the template, as you tweak it, this will be the easiest step in the recovery. Of course, since you are here because the template is broken, maybe you should rebuild the template, one step at a time. Try to not repeat the previous mistake.

Then add gadgets back, one at a time - and test carefully.

Provide notice to your Followers, readers, and viewers.

If you care about your community - Followers, readers, subscribers, and other viewers - a new post, briefly admitting to your mistake might be a good idea. You can even display your new post, as a Featured Post.


Sometimes, it's not possible to recover a broken #Blogger blog, using any of the Template dashboard pages, with a blog sidelined by a "500 Internal Server Error" broken template. If the URL has any value to you - or your viewers - you can recover it, using a new blog.

target="_blank"

Tuesday, May 24, 2016

Blogger Magic - Comment Moderation Settings

If you publish a blog, and want your readers to comment, you need to decide whether to moderate comments.

Comment moderation, applied properly, help you to keep abusive and spam comments off your blog. If you want to publish a blog, and have real people commenting, you need to keep spam comments off the blog. People won't comment, if they have to compete with spam.

If you want to publish a blog, and allow Blogger Hosted comments, you really should moderate. If you don't moderate, prepare to remove spam comments after they are published. Remember that Google+ Hosted comments are moderated by the community.

You setup moderation, for Blogger Hosted comments, from the dashboard Settings - "Posts, comments and sharing" page.

Under "Comments", you have "Comment Moderation", with 3 settings.

  • Always.
  • Sometimes.
  • Never.


Moderation settings are in the Settings - Posts, comments and sharing page.


Moderate Always.

Every comment, published by somebody who is not an administrator or author, will be moderated.

With "Always" or "Sometimes" selected, moderated comments will be sent to each email address listed in "Email moderation requests to".


Select "Always", "Sometimes", or "Never".


You - or whoever is addressed under "Email moderation requests to" - will have the ability to moderate from the email message received. You, or any blog administrator, can moderate from the dashboard Comments - "Awaiting moderation" page.

Moderate Sometimes.

You can selectively moderate comments for older posts, with newer posts not subject to moderation.


If you select "Sometimes", you provide a moderation threshold.


Here, we are set to moderate all posts older than 14 days.


Every post subject to moderation will receive the treatment, selected for "Always". Every newer post, not subject to moderation, will permit any comment to be published immediately.

Moderate Never.

Any comment, submitted to be published, will publish immediately.

Dashboard moderation offers three options.

With every comment listed in the dashboard Comments - "Awaiting moderation" page, you have 3 options.

  • Publish.
  • Delete.
  • Spam.

Once one of these options is chosen, for any comment being moderated, you'll have similar - but not symmetrical - options.

EMail moderation offers similar options.

With each comment moderated by email, you'll have 3 similar options.

  • Publish.
  • Delete.
  • Mark as spam.


Select "Publish", "Delete", or "Mark as spam".


Besides moderation, you can select CAPTCHA verification.

Besides moderation, you can reduce spam, using CAPTCHA verification. If selected, all non administrators and authors will be subject to CAPTCHA verification.

If not selected, anybody commenting anonymously - and not signed in with a Google account - will still be subject to CAPTCHA verification. The "Show word verification" setting applies to comments posted with the publisher properly authenticated.

Right now, the CAPTCHA used is a word puzzle - and has received mixed reviews.

The bottom line.

As a blog owner, you should choose a comment moderation policy - if you allow Blogger Hosted comments.


If you allow #Blogger Hosted comments on your blog, you need to choose a moderation policy. Moderation is essential, to reduce spam, and encourage comments by actual blog readers.

Friday, May 20, 2016

Share Posts, From Private Blogs, By Email

Owners of private blogs have, periodically, lamented the lack of options for distribution of comments and posts. We've seen a few queries, in Blogger Help Forum: Learn More About Blogger.
How do I let my readers subscribe to my private blog?
There's no good answer, to please everybody, here.

You can't use EMail, FeedBurner, or Reading List, for sharing private blog content. FeedBurner requires the blog comments / posts newsfeeds - and private blogs don't produce newsfeeds.

If you need to distribute content from a private blog, you'll have to use BlogSend.

Private blog post subscriptions require the dashboard "BlogSend" feature.

You'll have to use "BlogSend" to provide email subscriptions, for private blogs - and that limits you to 10 subscribers (1 who should be you). That's the "Email posts to" option in the dashboard Settings - Email page.


"BlogSend" aka "Email posts to" is the only option, for private blogs.


You can try to email specific posts, from a private blog.

You can try to use the Blogger post footer "Email Posts" feature.

Just enable the "Email Post Links" option in "Configure Blog Posts". You cannot enable "Show Share Buttons" - but you can enable "Show Email Post Links".


Use "Configure Blog Posts" from the dashboard Layout page.


Look under "Post Page Options" for "Show Email Post Links".


With the option enabled, and the icon visible, it's still a no go.

D'Ohh!


There's still no social sharing of private blog content.

Note the advice for "Show Share Buttons".

Sharing is available only for public blogs.

You can't share blog content, outside Blogger, if the blog is private. That protects private blog owners, from having their confidential posts distributed to the world.

We can't share content from private blogs, using EMail, FaceBook, Google+, Pinterest, or Twitter.


If you publish a private #Blogger blog, you cannot email or share comments or posts. Your only option will be BlogSend aka the "Email posts to" dashboard option.

Sunday, April 24, 2016

Blogger Magic - The Custom Domain Root Redirect

When you setup a custom domain, for a Blogger blog, the DNS addresses are the most important issue.

A close second in importance, to righteous DNS addressing, is redirecting the domain root to the published URL. We see frequent problem reports, in Blogger Help Forum: Get Help with an Issue.
Why does my domain only work, with the "www" in the address?
The domain root provides a backup to the published URL, in many domain setups. If the domain root is not redirected, and DNS for the "www" or other published alias is down, the domain is down.

With the proper DNS addresses in place, redirecting the domain root is a very simple process.

Start from Settings - Basic.


Start from the dashboard Settings - Basic page.


Click on "Edit" in the Publishing "Blog Address" wizard.


With this blog, I have the option to select "Redirect nitecruzr.net to blogging.nitecruzr.net."


You can only redirect the domain root - no virtual hosts.

Generally, you would publish to "www.mydomain.com" - then you would have the option to "Redirect mydomain.com to www.mydomain.com".

Note that you can only redirect the domain root - even if you publish to a virtual host, such as "www.blog.mydomain.com". "blog.mydomain.com" and www.blog.mydomain.com" are separate hosts - and cannot be aliased.

Whatever you have, the option will work best, when you start with righteous DNS addresses.


Given righteous DNS addresses, publishing a #Blogger blog to a custom domain will produce a more stable blog, with the domain root redirected to the published URL. As the blog owner, you need to be sure to select the redirect option.

Sunday, April 17, 2016

Blogger Magic - Set Main Page Size

One of the most visible changes, to the blog display, involves properly setting main page size.

You change the posts count using "Show at most" on the dashboard Settings - "Posts, comments and sharing" page - or "Number of posts on main page" in the "Configure Blog Posts" wizard. Both let you set the main page display limit.

You can limit main page size by days with posts, or by total post count.

Main page size is your choice, for your blog - but think of your readers, waiting for a typical main page display to download.

Many don't have extreme bandwidth, nor are the Blogger servers overly robust. When your blog, or even a single post, takes 2 or 3 minutes to load, your blog may need tuning.

Main page size is one key setting, in encouraging reader activity, and in improving search engine relationships.

  • "Show at most" on the dashboard Settings - "Posts, comments and sharing" page.
  • "Number of posts on main page" in the "Configure Blog Posts" wizard.

"Show at most" on the dashboard Settings - "Posts, comments and sharing" page.


"Number of posts on main page" in the "Configure Blog Posts" wizard.


There are alternate techniques, for changing main page size - use of a dynamic template, with endless scrolling - and segmenting the blog using pages. And adding Jump Break, to the posts, lets you make the individual posts smaller.

Also, note that only main page size can be limited. Archive retrievals and label searches use a fixed 20 posts / display page.

But for a simple blog setup, just limiting main page size is the first step to showing your readers that you respect their need to view your blog, without excessive waiting.


One of the simplest changes that you can make to a #Blogger blog, to make it easier to view, involves setting a reasonable main page size. This helps your readers view the blog, in main page view, without a lot of waiting.

target="_blank"

Thursday, March 31, 2016

CloudFlare, Custom Domain Publishing, And HTTPS

A few blog owners, who publish blogs published to custom domains, are becoming impatient, waiting for Blogger Engineering to finish the Blogger upgrade to support HTTPS / SSL.
If I get a domain through Google Domains, will I be able to get HTTPS?
Unfortunately, no. HTTPS / SSL is simply not available, to blogs published to custom domains.

HTTPS is not available, for non BlogSpot published blogs.

Whether registered by eNom, GoDaddy, or Google Domains, it simply is not possible to publish a non BlogSpot URL as a supported custom domain, and make HTTPS / SSL available. CloudFlare, a supposed alternative, does not produce a supported custom domain.

A proxied CloudFlare domain looks like malicious redirection.

In some cases, a CloudFlare DNS "solution" tried by some blog owners, will look like dangerous / malicious redirection. Some blogs will show up as "Deceptive sites", aka "phishing".


Some blogs using CloudFlare, for custom domain publishing, will be classified as "Deceptive" sites.


Others will produce alarming warnings about malware.


"This blog is not hosted by Blogger and has not been checked for spam, viruses and other forms of malware."


Click on "Details".


Look at the warning.

Phishing sites pretend to be other websites to trick you.

And there is the typical Dig log, with a redirecting proxy service, like CloudFlare.

kireisubs.id. 300 IN A 104.27.133.198
www.kireisubs.id. 300 IN A 104.27.133.198

or

topmovies21.biz. 300 IN A 104.28.0.106
www.topmovies21.biz. 300 IN A 104.28.0.106

This is the basis for malware / phishing classification.

Any observed malware warning is generally a false positive - most custom domain published blogs do not contain malware. Even so, it's not likely that the "Deceptive site" classification will be easily corrected - or the malware warning interstitial display removed.

And this is one more blog owner, who must next be provided instruction to correct the DNS addresses.

Having corrected as instructed, DNS addresses will be asymmetrical, and righteous.

kireisubs.id. 86400 IN A 216.239.32.21
kireisubs.id. 86400 IN A 216.239.34.21
kireisubs.id. 86400 IN A 216.239.36.21
kireisubs.id. 86400 IN A 216.239.38.21
www.kireisubs.id. 86400 IN CNAME ghs.google.com.

With DNS corrected, Google shows "Not dangerous" - but the warning still displays.


"Not dangerous".


Note "CloudFlare" is still seen as the host.


You can report an error, to SafeBrowsing.


False classification now requires time consuming site review.

Use "Report Incorrect Phishing Warning", if you believe the site is safe.

Finally, get the site reviewed, from the Security Issues page in Security Console (Webmaster Tools) - Security Issues.

And while the blog remains offline, search reputation - and the owner - will suffer.


Some #Blogger blog owners want to provide blogs published to custom domains - and offer HTTPS connectivity. Since Blogger cannot provide custom domains with HTTPS right now, the blog owners are using CloudFlare, which provides an HTTPS proxy.

Unfortunately, a CloudFlare proxy looks like malicious redirection - and blogs using CloudFlare are being labeled as "Deceptive" sites.

https://productforums.google.com/forum/#!category-topic/blogger/ApuJ58a4-kg

https://productforums.google.com/forum/#!category-topic/blogger/-LoJCeX6DEA

https://productforums.google.com/forum/#!category-topic/blogger/DhAFOtJFoCw

Saturday, March 19, 2016

You Cannot Fit Your Entire Blog Onto The Main Page

Some blog owners would like their readers to view the entire blog in one page.

A small blog, with very limited size, can theoretically fit on one page. If you intend to publish a blog with any future, and page rank, you will have to publish content periodically - and the size of the blog will increase, steadily.

And eventually, thanks in part to main page limitation by auto pagination, older posts in your blog will be forced into archive pages.

For a blog with any future, and publishing activity, there are four possibilities for main page size.

  • Segment main page, limiting post count.
  • Segment your blog, using virtual blogs.
  • Use a dynamic template, and "continuous scrolling".
  • Use a non dynamic template, and Jump Break - and accept archiving.

Segment main page, limiting post count.

One of the simplest ways to make your blog reader friendly is to limit main page size, using a post count limit. This won't work as a final solution, however, if you're planning to publish the blog with any regularity.

Segment your blog, using virtual blogs.

If you can break your blog into multiple subjects, you can use a Pages tabbed index to access each different subject. You can fit each different subject, possibly using Jump Break, onto one page.

To complement the virtual blogs, you can have a static main page - providing a "welcome" message, and / or indexing the virtual blogs.

Use a dynamic template, and "continuous scrolling".

For public blogs, a dynamic template, with continuous scrolling, may provide a solution. Dynamic templates, unless you a very comfortable with editing the blog template, will never offer the accessory and customisation possibilities of non dynamic templates, however.

With a dynamic template, you won't be able to use Jump Break - though some dynamic views may provide a summarised main page view.

Use a non dynamic template, and Jump Break - and accept archiving.

Careful use of Jump Break will let you limit the size of the main page. If you continue to publish posts - which is necessary for a blog with any future - you will eventually have posts displayed on archive pages.

For best results, design the blog structure - and the posts structure - consistently, and accept archiving and pagination.


Some #Blogger blog owners would like to display all post content in one page - and ignore page display size. They do not realise that not all blog readers want to read a blog with an unlimited page size, all at once.

Saturday, February 20, 2016

Using The Meta Search Description In Your Blog

There is some confusion, about including "search description" meta content, in blog template code, to provide source for data shares to social sharing sites.

In various topics in Blogger Help Forum: Get Help with an Issue, I've seen references to "data:post.metaDescription", "data:post.snippet", and "data:post.pageTitle" used, in providing the blog post source for the FaceBook "og:description" tag. As far as I can tell, none of these exist.

The Layout data tag "data:blog.metaDescription", which provides "og:description", does exist - though it seems to be referenced, ambiguously.

Some FaceBook Open Graph content references different Blogger tags, depending upon page type. The FaceBook "og:title" references "data:blog.pageName" with an "item" (post) page, and "data:blog.title"; with other pages.

"og:description", on the other hand, only references one Blogger tag - "data:blog.metaDescription". The latter appears to change its source, depending upon whether the main page, or a post page, is being viewed.

  • In main page mode, the per blog "Description", from Settings - Search preferences, is referenced.
  • In post page mode, the per post "Search Description", from the Post Editor "Post settings", is referenced.


Source listing for this blog, in main page view.

"What Blogger won't (or can't) tell you. Blogger features and problems explained, using real life examples."


Source listing for this post, in post page view.

"Blogger provides the meta tag "data:blog.metaDescription", which seems to vary in source. Learn how it varies."


There is no mention of "data:blog.metaDescription", in the reference Blogger Help: Layouts Data Tags - as either a per blog, or per post, data element.

In my earlier post, my reference to "'data:blog.metaDescription' name='description'" was simple. But simplicity can lead to confusion.

<meta expr:content='data:blog.metaDescription' name='description' property='og:description'/>

Some tags are universal, others vary depending upon page type ("item" being post page).

<!-- BEGIN Open Graph tags -->
<meta expr:content='data:blog.metaDescription' name='description'' property='og:description'/>
<meta expr:content='data:blog.pageTitle' name='keywords'/>
<b:if cond='data:blog.pageType == "item"'>
<meta content='article' property='og:type'/>
<meta content='https://plus.google.com/nnnnnnnnnnnnnnnnnnnnn/about' property='article:author'/>
<meta expr:content='data:blog.canonicalUrl' property='og:url'/>
<meta expr:content='data:blog.pageName' property='og:title'/>
<b:if cond='data:blog.postImageUrl'>
<meta expr:content='data:blog.postImageUrl' property='og:image'/>
<b:else/>
<meta content='http://xxxxxxxxxxxxxxxxx/xxxxxxxxxxxx/xxxxxxxxxxx/xxxxxxxxxxx/xxxxxxxxxxx/S1600-R/yyyyyyyyyyyyy.gif' property='og:image'/>
</b:if>
<b:else/>
<meta expr:content='data:blog.title' property='og:title'/>
<meta expr:content='data:blog.canonicalHomepageUrl' property='og:url'/>
<meta content='blog' property='og:type'/>
<meta content='http://xxxxxxxxxxxxxxxxx/xxxxxxxxxxxx/xxxxxxxxxxx/xxxxxxxxxxx/xxxxxxxxxxx/S1600-R/yyyyyyyyyyyyy.gif' property='og:image'/>
</b:if>
<meta expr:content='"en_US"' property='og:locale'/>
<!-- END Open Graph tags -->

'data:blog.metaDescription' name='description' is referenced once, in the template code - and the source is apparently determined, based on the context.

If you find this confusing, I have to agree with you.

---

#Blogger provides the Layout data tag "data:blog.metaDescription", which is used for the FaceBook meta ag "og:description" - for both blog main page, and post pages, when shared. This is in contrast to the FaceBook meta tag "og:title" and others, which use different Blogger data tags for the main page and post pages.

This variation has caused some confusion - and attempted use of different non existent Blogger data tags.

Friday, January 2, 2015

Change A Post To Draft, To Change The Post URL

Long ago, a renamed blog post would automatically receive a new URL, to match a change in date or title.

Blog owners would happily rename posts - and see a new URL, with no problem. Those blog owners who monitored search engine activity, however, later became concerned by the "404"s, shown in the search engine activity logs, in Webmaster Tools - or from various test searches.

Blogger later gave us dashboard and post editor options, to let us intentionally change a post URL, when necessary - and stopped allowing incidental changes to the date or URL, when editing post content.

Settings - Search preferences has the "Custom Page Not Found" and "Custom Redirects" wizards, for dealing with existing posts with changed URLs - and the Post Editor "Post settings" has the "Permalink" wizard, to change URLs of new posts.

This gives blog owners the ability to Edit and Publish posts, and to adjust URLs, independently - and makes it harder for owners to accidentally generate "404"s with existing posts.

You can change a post to Draft status, to change the date or URL.

Recently, people discovered that changing a Published post, to Draft status, would reset a post. A Published post, changed to Draft, and later Published again, would act as a new post would have, when Published.

Blog owners wishing to change the URL of an existing post would change a post back to Draft status, change the Date and / or Title, then Republish - and the post would have a new URL to match the new Date / Title.

This worked great - for owners intentionally wanting a new URL for their renamed posts.

You can also publish a post to Draft, to re use the URL of that post.

If you delete a post, then publish a new post with that same title, you will get a post with a URL containing a duplication prevention suffix - because deletion of a post does not let you re use a URL. If you publish a post to Draft, that resets the URL - and lets you publish a new post to that same URL.

Saving a post as Draft, to edit, can allow URL change - and cause broken links.

Some blog owners use Draft status, for previously Published posts, differently

You can take a published post offline, as a Draft post - then change the Title, and various other settings. This will not change the URL - unless you also change the Permalink, before you Publish.

If you do change the URL, be mindful of the links that may refer to the old URL.

If you want the URL to change, you will have to change the permalink.

While the post is in Draft status, find "Permalink" in "Post settings", in the right sidebar of post editor. Select "Custom Permalink", and change the title section of the post URL. Then select "Done".

Note you will only be able to change the title section of the permalink. You can't change the year, month, or extension ("html") any more.

If I wanted to, I could rename this post, when in Draft status.

Change Posts To Draft, To Change The Post URLs

I could change the post URL, to match.

change-posts-to-draft-to-change-post-urls

The most obvious change that I could get, then would be

http://blogging.nitecruzr.net/2015/01/change-posts-to-draft-to-change-post-urls.html

Fix broken links, by adding a custom redirect.

We can use the same tools to correct mistakes, as we can to make changes.

If you change the URL - and cause broken links, and / or "404" entries in Search Console / Webmaster Tools, when re Publishing a Draft post, just add a Custom redirect from the old URL, to the new URL. One new redirect takes but a few seconds to add - and will keep your readers, the search engines, and you happier.

Sunday, November 23, 2014

Change Per Post Comment Settings, One Post At A Time

Occasionally, we have a blog owner trying to enable commenting, on a blog - and being unsuccessful diagnosing commenting problems.

Checking the per blog comment settings, in the the dashboard menu under Settings - Posts and comments, there's no obvious problem. The problem, in some cases, is in the per post settings, in the Post Editor "Post settings - Options" wizard - but not all posts will have a problem.

The "Reader comments" setting, for any new post, is taken from the setting for the previously published post. If you publish a post today, with "Reader comments" selected as "Don't allow", the next post will also be set to "Don't allow" - unless you change the setting, before publishing. Similarly, if it's set to "Allow", the next post published will have it set to "Allow".
  • Allow
  • Don't allow
That's the choices, for each new post.

If the setting for any post is wrong, according to your policy, it's up to you to change the setting, for that post.

Since the per post setting overrides the per blog setting, any existing posts, with the setting "Don't allow", will not allow comments. To change this, you have to edit each post, one by one, and change the setting.

If the setting is "Allow", and you want to disable comments, you have to change the per post setting, one post at a time. Again, any new posts will then have the setting "Don't allow" - but any existing posts will have to be changed, one post at a time.


If you occasionally disable comments, check this setting before you publish a new post - and make sure that comments are enabled, when appropriate.


If you backdate a post, and publish it before any previously published posts, the setting for the previously published posts won't change. If this creates a range of posts, with inconsistent settings - some allowing comments, the others not allowing comments - you'll still have to change the setting as you wish, for each post, one by one.

If the setting for a post is currently "Allow", and a post has comments, you'll have 3 options for that post.
  • Allow
  • Don't allow, show existing
  • Don't allow, hide existing
That's the choices, for each post with comments.

If you're in the habit of changing the comment setting for various posts, you'll want to check the setting, for each new post - and make sure that it's appropriate. Better that, then to have to change a whole bunch of posts, one by one, later.

Tuesday, November 11, 2014

The "Reply" Option, For Embedded Comments

The option provided some time ago, to the embedded comment form, to allow "threaded" comments, is becoming quite popular.

Unfortunately, the "Reply" link does not always work. Blog owners and readers alike complain.
I click on "Reply", and nothing happens!
This problem appears to have accelerated recently, possibly resulting from the hasty rollout of the new anonymous comments CAPTCHA - but there are other less obvious possibilities, too.

The threaded comments "Reply" feature, a seemingly minor addition to the Blogger code base, can have problems with a number of issues.

  • A Full Blog Feed.
  • An up to date post template,
  • The Google "One account" login, and cookie filtering.
  • The recent addition of the anonymous commenting CAPTCHA.
  • The threaded comments script, and recent script filter updates.

A Full blog feed is required.

Many blog owners are not aware that the "Reply" option won't be available, without a Full Blog Feed. Go to the dashboard, and look at "Allow Blog Feed", under Settings - Other - Site feed.

For threaded comments, you will need a Full Blog Feed (for both comments and posts) - and this will exclude private blogs.


Any "Allow Blog Feed" selection, other than "Full", will be a problem.


An up to date post template is a good idea.

Threaded comments, like every other post and comment feature, works best on an up to date post template. Any time threaded comments stops working, and you have not changed the blog feed, try resetting the post template. Now, here's hoping that you have not made extensive post template tweaks.

The identity of the person who wants to reply is useful.

Threaded Blogger hosted comments code, like threaded Google+ hosted comments, other commenting scripts, and many other Blogger features, needs access to the login cookie, to identify the person preparing to comment. Because of the use of the Google "One account" login, "third party" cookie filters must be examined.

Anything that interferes with the CAPTCHA will be a problem.

The recent addition of the anonymous comment CAPTCHA, appears to have caused some problems. This may be an matter for Blogger Engineering to correct.

Anything that interferes with scripts will be a big problem.

All Blogger scripts, including the script which services the "Reply" link, are subject to script filtering. Script filters are subject to update, on every different client computer - generally without notice to the computer owner. Always check script filters.

Blog owners and readers, alike, need to be aware of the issues, to use Blogger effectively. Threaded comments are no exception to this requirement.

Sunday, October 19, 2014

Dynamic Templates Require A Full Blog NewsFeed

We see periodic signs of confusion, about publishing a blog to a dynamic template, in Blogger Help Forum: Get Help with an Issue.
My blog seems to load - but it just sits there, spinning gears!
or
The dashboard Template wizard tells me that dynamic templates are not available, for my blog!!
These are two blog owners who are not aware of the requirements of the dynamic templates - and who can't figure out why they see the Spinner of Death when loading the blog.

Most people know that private blogs cannot be published to a dynamic template - but not everybody realises that this is not an arbitrary or capricious restriction.

Whether you publish your blog as Private or Public - if you do not publish a Full Posts newsfeed, a dynamic view won't work.

Dynamic views retrieve blog content from the posts newsfeed - and without a full posts newsfeed, a blog can't be displayed in dynamic view. This may be one more reason why Blogger eliminated on the fly switching to dynamic views.

The comments section, similarly, retrieves content from the comments newsfeed. If the posts newsfeed is properly set, and the comments newsfeed is not, you (and your readers) will see the spinner of death when clicking on "Add a comment".

Look at the dashboard Settings - Other page. In the "Site feed" section, look at "Allow Blog Feed". You should see "Full". Anything besides "Full", for comments or posts, will eventually be a problem.


Allow Blog Feed: Full.


If you don't see either "Full", your blog (and any comments) can't be displayed, using a dynamic view. Neither "Short", or "Until Jump Break" can be used, with a dynamic view.


For a dynamic template blog, no other setting will do.


It's that simple. Without Full Comments and Posts newsfeeds, you cannot publish a blog using a dynamic template.

Either use the Template wizard, and select a non dynamic template - or use Settings - Other, and enable a Full feed.

Saturday, October 11, 2014

If You Want To Keep A Secret, Don't Publish It

Have you ever heard the old saying
I had a friend, and I had a secret. I told my friend my secret - and now, I have neither a friend, or a secret.

Occasionally we see signs of naivete, in Blogger Help Forum: Something Is Broken.

I have a private blog! Why do I see my blog listed in Google?

or

I distinctly set my blog to be invisible! Why is my blog being indexed?

Not all blog owners know that neither the "disallow" statement, in "Robots.Txt" - nor the "noindex, nofollow" directives, in our blogs - are mandatory.

If you publish content on the web, chances are it is - or will eventually be - indexed somewhere, by some search engine.

Obedient search engines won't index content, when instructed.

Obedient search engine robots will observe the Google privacy directives, such as "noindex, nofollow" directives in HTML code, and the instructions in the "robots.txt" file. Not all robots are obedient, however.

There are many search engines besides Google - and not all search engines observe privacy directives.

The various robotic processes, which scan for abusive content, scan all blogs and websites out of necessity. Some archiving robots archive everything - not just content that's provided openly.

Many search engines share indexed content - obedient, or not.

Many search engines share data with other search engines, and / or retrieve data from other search engines. Even Google will index some sites, indirectly, that are not intended to be indexed.

Ownership and privacy laws vary - from country to country, and between Internet services. What you consider private (personal data), if you live in Germany, may be treated as common knowledge, by someone in Russia, or the USA. And if you report someone publishing your private data to Blogger / Google, you may get different treatment than from WordPress, or from an independent hosting service in China.

If you publish content, expect that it will be indexed.

If you want to keep a secret, do not publish your secret on the Internet. Regardless of whether you publish it to a blog with designated readers, using the Blogger dashboard Privacy settings, or even using a custom "robots.txt" file, your secret may be visible on any search engine - even on Google.

If you think the Internet is your friend, try publishing a secret there. You will learn the truth, eventually. And hiding your secret, after it gets out, will not be an easy task.

Sunday, March 23, 2014

Blogger Magic - The "Robots.txt" File

Some new blog owners spend time examining the various settings provided by Blogger, in the dashboard.

Some dashboard settings inspire questions, in Blogger Help Forum: Learn More about Blogger. As helpers there, we know from experience that some questions, asked and answered there, will lead to later questions in Blogger Help Forum: Get Help with an Issue.

The "Robots.Txt" file is one feature which inspires these types of questions.
I was updating my settings on Blogger, and I discovered some settings that I didn't understand. What do I add for "Custom robot text" and "Custom robot header tag"?
When I was young, my mother used to provide advice "That is a well enough!" - as the proper answer, to this question, is to "Leave well enough alone!".

The "Robots.txt" file is a collection of various settings - and the dashboard "Search preferences" wizard provides useful options, for Blogger blog owners.

You may edit "robots.txt", if you wish - but be mindful of possible consequences.

When used properly, "Robots.Txt" provides us several possibilities. That said, we should heed the warning.
Warning! Use with caution. Incorrect use of these features can result in your blog being ignored by search engines.
The section "Crawlers and indexing" is a dashboard feature which should probably be left alone by 99% of all Blogger blog owners - except in specific, documented examples.

All "robots.txt" entries are carefully designed, by Blogger / Google Engineers.

Some portions of "Robots.Txt" are maintained by various well documented Blogger and Webmaster Tools features.
Other sections of "Search preferences" have similar value. Unless you understand "Robots.Txt" functionality, however, you should leave settings in "Crawlers and indexing" alone.

If you are not familiar with the settings, it's best to not play with them.

Leave the magic spells, to the magicians and wizards. See Blogger Help: Help people find your blog on search engines, and Google Developers - Webmasters: Robots.txt Specifications, for details.

Use the Blogger dashboard "Privacy" wizard - and stop there - unless you are prepared to deal with the consequences.

Work on publishing blog content - informative, interesting, and unique. Learn more, as you publish your blog. Indexable blog content will get you more search reputation, than tweaking "robots.txt".

Friday, March 21, 2014

Getting Out Of Draft Blogger

Occasionally, in Blogger Help Forum: How Do I?, we see a plaintive query
How do I remove my blog from using Draft Blogger?

Some blog owners use Draft Blogger because of a specific problem - then discover later, that use of Draft Blogger, in general, is not a good idea.

Generally, one simply logs out of Blogger, then logs into Blogger using the normal Blogger login.

Simply logging out, from Draft Blogger, won't always fix the problem.

Sometimes, though, simply logging out of Draft Blogger won't return the browser to normal.

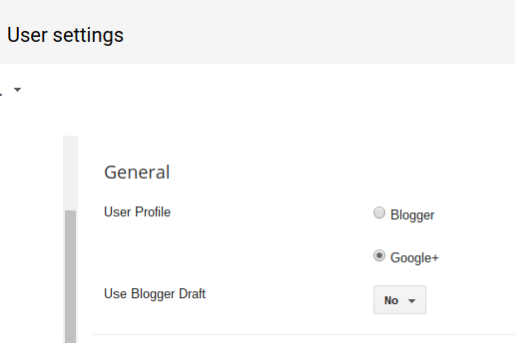
In the latter case, one must first clear the Draft Blogger setting, using the "User settings" dashboard page - where we see the key setting
Use Blogger Draft
Change that option to "No" - then clear cache, cookies, and sessions, and restart the browser, to remove all residual components of Draft Blogger.

Use the Settings - "User settings" dashboard page.


Use the Blogger "User settings" dashboard page.


Change "Use Blogger Draft" to "No".

Then, hit "Save settings".


Finally, login to Blogger, properly.

Finally, log into Blogger, using a normal Blogger login. Avoid any bookmarks, favorites, or other saved access URLs. And, be sure to login properly.

Thursday, March 29, 2012

The New Blogger GUI, Comments, And Word Verification

Recently, we're seeing a few frustrated blog owners, in Blogger Help Forum: How Do I?, who have decided that the recently provided CAPTCHA ("word verification") screening puzzle is simply too much for their readers to handle. Some blog owners have discovered that removing the CAPTCHA, from their blog comment wizard, is not all that easy, either.
Everytime I click on "Save settings", to disable word verification on my blog, as soon as I return to the settings, it is enabled again. How do I get rid of the CAPTCHA?
Some blog owners have not yet learned that the New Blogger GUI (2011) just is not ready for public use.

Until recently, disabling CAPTCHA (word verification") screening in our comments was not simple. The New GUI "Posts and comments" wizard did not always have a setting "Show word verification", and our advice used to be
Go back to the Classic GUI, if you want to disable the CAPTCHA, so your readers can comment with ease.
Now, there is a setting in the New GUI wizard.

Unfortunately, it looks like switching back and forth, between the Classic and New GUI, causes the CAPTCHA to be enabled, for some blogs. Until the exact cause and effect is identified, we are simply advising people to not switch back and forth, unless absolutely necessary.

Given the other known problems with the New GUI, it's (currently) easier to remain in the Classic GUI - at least, if you don't intend to use any of the new Blogger features that have been recently released. If you do switch back and forth, and don't want your readers to suffer "CAPTCHA Anguish", you'll want to check the setting, periodically.

>> Top

Wednesday, February 15, 2012

Cloning Your Blog

Occasionally, we see evidence of wistful thinking in Blogger Help Forum: How Do I?.
How do I make an exact copy of my blog, to another URL?
This should be a simple enough task - but it's not.

Before planning to clone a blog, using exact content, design, and layout, one should always bear in mind the search engines, and the possibility that both a clone may be subject to search engine duplicated content penalty - which may affect both blogs. Search engines want to index one copy of everything. When there are multiple copies of a given post on the Internet, all copies must be treated with suspicion.

When planning any cloning operation, we must consider the essential elements of a blog.
  • Accessories and Gadgets. There is currently no easy way to copy XML based accessories from one blog to another.
  • Blog Address. This is unique for each blog, and cannot be cloned. All blog content, which refers to the blog address (URL) must be updated. Internal links must be edited, to point to other articles within the target blog. External references to the blog may or may not need to be updated, to point to the new address.
  • Comments and Posts. Blog "articles" written by blog members and visitors can be copied from the source blog to the target blog, using the Export / Import wizards. Note one known caution, which should be observed when Importing content.
  • Layout and Template. The blog template can be copied from the source blog to the target blog, using the Template backup and restore wizards.
  • Blog Reputation. As with any new blog, this will start from scratch. All external links and references - whether the search engines, or the user community in general - must start from zero. This will be vaguely similar to the process of renaming a blog - with the exception of the reputation of both the source and target blogs, as noted above.

Some people, mindful of the inability to copy an XML based accessory / gadget, will suggest extracting the HTML rendered equivalent, from a blog source listing - then creating an HTML gadget in the target blog, using the extracted HTML from the source blog. This is a possible workaround, with several downsides.
  • This will be a manual and repetitive process, one gadget at a time.
  • Any gadgets, copied this way, will be based on HTML, and can't be maintained using an XML wizard.
  • The content of any gadgets, copied this way, will be static.

One specific accessory, Followers, is a part of both the source blog, and the Followers community - the collective profiles owned by all of the Followers. The Followers gadget simply cannot be copied, from one blog to another.

Other than the exceptions of the Accessories, and of the Followers community and gadget, almost any Blogger blog can be cloned - with the proper planning and understanding.

>> Top

Monday, January 30, 2012

Custom Domain Publishing - Moving Back To BlogSpot, Using The New GUI, Isn't Obvious

The New Blogger GUI (2011) has been available for just over 6 months - and we see new confusion about using it, daily, in Blogger Help Forum: How Do I?.
How do I cancel my custom domain redirect, in the New GUI?
This is one specific question, that's been asked, recently.

The answer to that specific question is actually right there, in front of us - we just don't see it.

Blogger, like Google, likes to use overlay panels for some displays, such as how you see the picture below - when you click on it.

In the new GUI, if I look at the Blog Address settings for this blog, in Settings - Basic - Publishing, I see

See the "X"?
(Click on the picture, to better see the details.)


"Edit" is a link, that lets me "Edit" my custom domain settings. The "Edit" wizard (which simply pops up in the same display, when I click on "Edit") does not let me change the URL of the blog back to BlogSpot - and this is the start of some confusion.

To remove the custom domain redirect, and re publish the blog to the domain - or publish back to BlogSpot - one must click on the "X" in the top right. With the publishing shown as
blogging.nitecruzr.net                Edit               X
bloggerstatusforreal.blogspot.com redirects
clicking on the "X" lets me remove the custom domain redirect. Clicking on "Edit" only lets me change specific custom domain settings, such as selecting the "naked domain" redirect option.

When you click on the "X", you will get a verification popup.
Are you sure? This will remove the current custom domain.
And you'll want to hit "Yes".

So, click on the "X" (it's actually in black - I show it in red, above, to make it more obvious), to clear the custom domain redirect and publish back to the original BlogSpot URL. If you don't see the "X", click in the upper right corner of that window - to the right of "Edit" and just left of the window border. Apparently, not all browsers display the "X" properly.

Navigate» Become author for this Blog