Showing posts with label Tips. Show all posts

Sunday, May 13, 2018

Reaction Buttons for Blogger using Vicomi


Reaction Buttons for Blogger - here is another big and very useful blogger widgets. You can show reaction buttons on your blogspot blog. Reaction is a smart way for your visitors to leave feedback without leaving any comments. Here is very simple way to add recation buttons for blogspot blogger using vicomi.com.


You can discover lots of awesome blogger widgets by msdesignbd. Now lests starting the tutorial.


Step1: Go to vicomi.com
Step2: Now signup with your Blog title, e-mail and your website.

Step3: Now choose your emotion design and click Done.
Step4: Now copy the code.


Step5: Now go to Edit HTML and find <data:post.body/>
Step6: Past copied code right after <data:post.body/>

Resource https://www.msdesignbd.com/2016/11/reaction-buttons-for-blogger.html

Sunday, April 22, 2018

Remove footer credit link from blogger template without redirect

designer adds footer credit in every custom blogger templates.but if it bothers you then you can easily remove by this effective step. hope you will like this.

Remove Footer Credit From Any Premium Blogger Template Without Redirecting For Free

How to Remove Copyright Credit From Blogger Template Without Redirection 2017 in Urdu/Hindi

Remove Footer Credit From Blogger Template Without Redirecting To Any Website
Curious on how you can remove the footer credit from a Blogger template that you just got from the World Wide Web!? We're talking about those copyright anti-tamper codes that template coders normally attach on their works. These are the ones that will forcefully redirect your site to theirs the moment you remove their copyright blabber. 


DISCLAIMER:


Be advised that this article was written for educational purposes only and no intention to harm fellow coders who is in the template business. TNTTS does not promote stealing other people's work. In fact, we are using a paid mSora Blogger Template at the time of this writing and we got it for $25 lol. Not that we don't know how to make one for ourselves; it's just that the admin of this site usually don't have enough free time to code shits. Keep in mind that the main goal of TNTTS is to promote learning. Further, we are not responsible for any legal complaint filed against you for stealing a piece of code. 


The Simple Hidden CSS Trick

This first effective way to do this is to add the CSS style='visibility:hidden' code inside the tag that encapsulates the copyright texts. This could be inside a DIV or A most likely. 

Take the codes below for example:


<div class='container'>
<p> Template Created By :<a href='http://www.themexpose.com/' id='mycontent' title='Blogger'>ThemeXpose</a> | 
Distributed By <a href='http://gooyaabitemplates.com/' rel='dofollow' target='_blank'>Gooyaabi Templates</a>.
All Rights Reserved.</p><a class='to-top' href='#'>Back to top <i class='fa fa-angle-double-up'/></a>
</div> 


You may just add the CSS stuff so it would look something like this:

<div class='container' style='visibility:hidden'>
<p> Template Created By :<a href='http://www.themexpose.com/' id='mycontent' title='Blogger'>ThemeXpose</a> | 
Distributed By <a href='http://gooyaabitemplates.com/' rel='dofollow' target='_blank'>Gooyaabi Templates</a>.
All Rights Reserved.</p><a class='to-top' href='#'>Back to top <i class='fa fa-angle-double-up'/></a>
</div> 


The Throw the Copyright Off Viewable Screen Trick

If the CSS trick above does not work for you, another suggestion would be to teleport the copyright texts to the parts of the screen beyond the sights of your viewers by using the absolute positioning capabilities of style

Take the codes below for example:

<div class='aisa-copyright'>
<div class='container'>
<div class='row'>
<div class='col-lg-6 col-md-6 col-sm-6 col-xs-12 aisa-left'>Copyright &#169; 2017 <data:blog.title/>. Designed By <a href='http://www.themeswear.com/' id='themeswear' ref='dofollow' title='Portfolio Blogger Templates'>Portfolio Blogger Template</a> | Distributed By <a href='https://gooyaabitemplates.com/' rel='dofollow' target='_blank' >Gooyaabi Templates</a></div>
<div class='col-lg-6 col-md-6 col-sm-6 col-xs-12 aisa-right'>
<div class='goto-top goto-top-5847b997a6ce8'>Made With <i aria-hidden='true' class='fa fa-heart' style='color:#d55'/></div>
</div>
</div>
</div>
</div> 


What was done was:

<div class='aisa-copyright'>
<div class='container'>
<div class='row'>
<div class='col-lg-6 col-md-6 col-sm-6 col-xs-12 aisa-left'>Copyright &#169; 2017 <data:blog.title/>.</div>
<div class='col-lg-6 col-md-6 col-sm-6 col-xs-12 aisa-right'>
<div class='goto-top goto-top-5847b997a6ce8'>Made With <i aria-hidden='true' class='fa fa-heart' style='color:#d55'/></div>
</div>
</div>
</div>
</div>


<div style="position: absolute; top:-99px; left:-99px; width:-99px; height:-99px">
<a href='http://www.themeswear.com/' id='themeswear' ref='dofollow' style='visibility:hidden'></a>
</div> 


The Hardcore Java Decrypt Unescape Shit Trick

There will be times when you will encounter copy protections using JavaScript. If the above 2 solutions doesn't work for you, and you see some codes that goes like var _0xca15=["\x73\x63\x72\x6F\x6c..........."];. These are what they call the UnEscape / Escape shits. Take note that you need to have at least a minimal experience in interpreting programming language codes to use this trick. You will need to decrypt them through some decoder like http://ddecode.com/hexdecoder/ (not associated with TNTSS).

You'll be amazed - the decrypter will convert those gibberish codes into readable JavaScript codes. From here, you'll be able to analyze then do the necessary edits to stop the template from redirecting when copyright texts are removed. Then replace the original encrypted codes with the decrypted equivalent through EDIT HTML

Sunday, November 5, 2017

Google Blogger: How to Customize Post Footer


When you are new to blogger you want to customize your blog according to your choice such as add a stylish menu bar for your blog,Customize your post footer options and much more.You can customize in four different ways.we are going to explain all of them


Add/Remove Basic Post Footer Options 
This facility is already provided by the blogger you have to some simple steps to do so

Steps
1.Go to Blogger Dashboard>Layout.
2.Now in Blog Posts click on Edit option

There you find all the options related to Post page and Post footer
some basic customizations are

- Add/remove share buttons
- Customize number of posts displayed on homepage
- Enable/disable reactions
- Showing off location
- Displaying number of comments on footer
- Showing author name
- Customize date and time displayed on footer

After customizations Now click on Save.

Remove Post Footer from Homepage/Index Page 
If you want to remove post footer options from your homepage you have to add a CSS code to your templet.

Steps
1.Go to Blogger Dashboard>Templet>Edit HTML.
2.Now press Ctrl+F and find  ]]></b:skin>
3.Now paste the below given code after ]]></b:skin>

<style type='text/css'>
<b:if cond='data:blog.pageType == "index"'>
.post-footer {display:none !important;}
</b:if>
</style>

Preview your blog to confirm changes and Save template.

Remove Post Footer from Post and Static Pages 
If you are like to disable your post footer from other pages while keeping it on homepage, you can try below method.

1.Go to Blogger Dashboard>Templet>Edit HTML.
2.Now press Ctrl+F and find  ]]></b:skin>
3.Now paste the below given code after ]]></b:skin>

<style type='text/css'> 
<b:if cond='data:blog.pageType != "index"'>
 .post-footer {display:none !important;}
 </b:if>
 </style>


Preview your blog to confirm changes and Save template. 

Remove Page Footer Completely from your Blog 
you can also remove your post footer completely from your blog.
you can also put post footer below post title with different style

1.Go to Blogger Dashboard>Templet>Edit HTML. 
2.Tick on, Expand Widget Templates.
3.Now press Ctrl+F and find  .post-footer
4.Now paste the below given after after .post-footer


display:none !important;
 

i.e:  .post-footer { 
   
        display:none !important;
        ........................................
      }


5. Now Save your template.


Resource http://way2bloggerz.blogspot.gr/2012/04/how-to-customize-post-footer.html

how to resize a embedes video in your blog

Today i show you how to resize a embedes video in your blog , all we know that the embeded youtube video in bloger is extreamly small size and the user who wach the video cant enjoy the video, but no more , here is the solution :


Luis Fonsi - Despacito ft. Daddy Yankee


STEP 1:
First of all ue use HTML mode


STEP 2:
Press CTRL+F and searc for Youtube 

Now set:   width="640" height="430" or your NEW video size !!!

Done !!!

STEP 3: IMPOTRANT !!! Press play on this post to enjoy despacito !!!

Wednesday, September 20, 2017

How to Embed Google Map Add Google Maps to your Website

Embed a map or directions
To embed a map or directions in a website or blog, follow the steps below.
  1. Open Google Maps.
  2. Make sure the map, Street View image, or directions you'd like to embed shows up on the map. Type your organization's address into the search box, and then hit [Enter]. Google Maps will display a pin on a map indicating the location
  3. In the top left corner, click the Menu .
  4. Click Share or Embed map.
  5. At the top of the box that appears, choose Embed map.
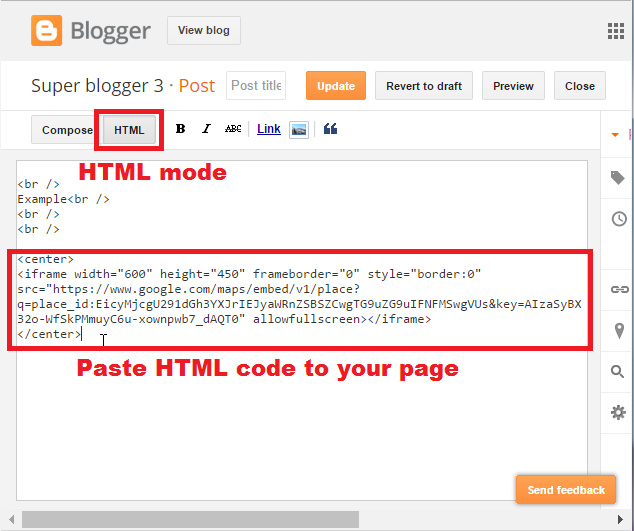
  6. Choose the size you want, then copy the HTML embed code and paste it into the source code of your website or blog.


Notes:
  • If you're using Maps in Lite mode, you won't be able to embed a map.
  • Traffic information and other Maps info might not be available in the embedded map.

Share a map or location

To share a link to your map with others, follow the steps below.
  1. Open Google Maps.
  2. Make sure the map, Street View image, or directions you'd like to embed shows up on the map.Type your organization's address into the search box, and then hit [Enter]. Google Maps will display a pin on a map indicating the location
  3. When you're ready to share, click the Menu .
  4. Select Share or Embed map. If you don't see this option, click Link to this map.
  5. Optional: To create a shorter web page link, check the box next to "Short URL."
  6. Copy and paste the link wherever you want to share the map, like an email or Google+ post.
Tip: You can also copy the web address from your browser's address bar in all browsers except Internet Explorer 8 or 9.

What you can and can't share

Things you can share:
  • A place, business, or address
  • A directions search
  • A Street View image
Things you can't share:
  • A map with your saved locations, which are private
  • A map with a distance measurement
  • A screenshot or image of the map itself
Examble:

<center>
<iframe src =
"https://www.google.com/maps/embed?pb=********"
width = "600"
height = "450"
frameborder = "0"
style = "border:0"
allowfullscreen >
 </iframe>
</center>


Resource https://support.google.com/maps/

Creating a Store Locator using Google Maps


To help your customers to access your store using mobile devices you need some important tools : Click to call button to help your customers to call you fast and Store map location to help your customer to find your store using GPS navigation , You see how to add a click to call button to yor site to the older post Click to call button
And now you see 6 Easy steps how to add a map with your store location to a simple page :

Step 1 
Go to https://developers.google.com/maps/documentation/embed/
Click GUIDES


STEP 2
2.1) Add your Store address
2.2) Save
2.3) Press Looks good! button


This is NOT your code - Never use this code !!!


STEP 3 Press Register

This is NOT your code - Never use this code !!!


STEP 4 Get a API Key


STEP 4b COPY API KEY


STEP 5: PASTE API KEY - DONE

This is NOT your code - Never use this code !!!


STEP 6: ALL DONE COPY YOUR HTML CODE FOR YOUR WEBSITE
This is YOUR CODE - Use this code !!!


Using the HTML code: Example for google Bloger ( this page )


EXAMBLE RESAULT:


How To Backup Images of Your Blogger Blog Hosted at Google Photos


Images are considered as one of the core elements of a website. Without relevant images, a website looks like an old novel that has clusters of text all around. The peoples of this generation are more interested in images than content. Since, Blogger is a Google property, so all the images that you upload on your site are hosted at Google Photos Web Album.  What would happen if Google suddenly removes your all images due to some violating in their policies?  It would be a nightmare and without having an image backup even worse. Therefore, today in this article, we will show you How to Backup All Images of Your Blogger Blog from Google Photos.

To back up the images which are uploaded on your blog, first go to Google.com/takeout/?pli=1#custom and select Google Photos web albums from the list of Google services.


Now it will take you to a new page from where you can download all of your Google Photos albums or can even select a single album. From the configuration tab, you can select a specific blog or can even download your all albums. Once everything is finalized press “Next” button and proceed to the next step.


Now a new wizard will take place which would calculate all images hosted at your particular blogger site. Once the progress bar reaches to complete, press the “Create archive” button to start downloading the backup of your images.

After downloading the database successfully, you can unpack the files which would reveal the backups of your all images which you uploaded on you blogs arranged in an alphabetical order. Seems like, mission accomplished! 

By using the same way, you can back up the database of your all Blogs at once. Moreover, Google Takeout is a remarkable free-to-use service. If you liked this article then feel free to share it with your friends through Facebook, Twitter or any other platform.

Wednesday, September 13, 2017

How to upload and embed Flash SWF file into Google Blogger


This tutorial will show you how to upload and post Flash SWF file to Google Blogger.

Step 1: Make Flash SWF file.
Firstly, please make your Flash file (.swf) with Adobe Flash Studio or Flash Banner Maker software, for example Aleo Flash Intro Banner Maker at http://www.aleosoft.com.
Step 2: Upload Flash SWF file to Internet.
Upload the Flash SWF file to any web hosting, and get the URL address of the Flash SWF file. If you don't have a web host, you can upload your flash file to Google pages for FREE.
  • Open http://pages.google.com , sign in with your Gmail account. Check the option "I agree to the terms", click the button "I am ready to create my pages" below, and login.
  • Click the link "Back to Site Manager" on the top left corner, and go to the Site Manager Home.
  • Click "Upload" button on the right side, then browse and select the Flash SWf file on your local hard disk, upload it.
  • Now, the uploaded file will be listed in the "Uploaded stuff".
Now you have uploaded the Flash SWF file to Google Page, you should get the URL address of the SWF file and note it. In Internet Explorer, you can simply click the file, open it with IE, and copy the link address in the address bar. If you are using Firefox, you may right click on the file, in the popup menu, click "Copy Link Location", and get the link address. The link address should look similar to: http://kevinleo2008.googlepages.com/myflash.swf
Step 3: Embed Flash banner to your Blogger post.
The final step is to embed the Flash banner to your Blogger post.
Open your blogger editor, switch to the "Edit Html" mode, then add the following code to any of the sections in your post.
<embed src="http://kevinleo2008.googlepages.com/myflash.swf" quality="high" allowscriptaccess="always" type="application/x-shockwave-flash" pluginspage="http://www.macromedia.com/go/getflashplayer" align="middle" height="150" width="150"></embed>
Please replace the URL in the code to your own URL and set your own dimensions of Flash SWF file. In this case, the URL address is http://kevinleo2008.googlepages.com/myflash.swf , the width and height sizes are 150.
Online examples:
Embed Flash banner in Google Blogger:
http://flashbannermaker.blogspot.com/2008/03/how-to-post-flash-banner-on-google.html
Embed Flash MP3 Player in Google Blogger:
http://flashbannermaker.blogspot.com/2008/03/how-to-add-flash-mp3-player-to-google.html


How to embed Flash SWF file to Google Sites ?
This tutorial will show you how to insert Flash SWF file to Google Sites.
Step 1: Make Flash SWF file.
Firstly, please make your Flash file (.swf) with Adobe Flash Studio or Flash Banner Maker software, for example Aleo Flash Intro Banner Maker at http://www.aleosoft.com .
Step 2: Upload Flash SWF file to Google Sites as attachment
1. Login to your Google Sites, navigate to your site, then click "More Actions" on the top right corner and click the "Manage Site" menu item.
2. Click "Attachments" on the left navigation bar, then upload your Flash .swf file.
Step 3: Insert Flash SWF file to Google Sites page
1. Return to your site, create a page or edit your page.
2. Click the "HTML" button on the main toolbar.
3. In the Popup dialog, where you want to display the Flash movie, insert HTML codes as following:
<embed src="http://sites.google.com/site/aleoflash/mumsday.swf" width="540" height="140" pluginspage="http://www.macromedia.com/go/getflashplayer"></embed>
Please be sure to change the text "aleoflash" to your own sitename, "mumsday.swf" to your own Flash SWF filename, and the width and height to that of your Flash movie.
You may view the example at:
https://sites.google.com/site/aleoflash/

 Embed / Upload Flash or swf files on Blogger or Website
Resource
http://www.aleosoft.com/flashtutorial_blogger.html
https://www.youtube.com/watch?v=xccbiM2ID4s

Friday, September 16, 2016

Google Bloger: How to Customize the Post Footer

The Post Footer contains many elements like the Posted by line, the timestamp, the labels, comments, backlinks and others which you can customize to your blog.
The primary customization can be made by going to Template >> Page Elements >> Click the Edit link in Blog Posts section >> In popup window choose which items you would like to appear in the post footer by putting a check on their names. See picture below (Click on picture to enlarge it)


CHANGE NAME OF AUTHOR

To change the name of the author you can go to Dashboard >> Edit Profile >> dentity  >> Display Name >> Change Name and Save. However if you want to show different names under the posts you can change it in the template. To do this go to Template >> Edit Html >> First backup template using Download Full Template link given on this page.>>Then put a check in Expand Widgets Template text box and scroll down to locate this code in the Blog Posts widget :

<p class='post-footer-line post-footer-line-1'>
<span class='post-author'>
<b:if cond='data:top.showAuthor'>
<data:top.authorLabel/> <data:post.author/>
</b:if>
</span> 

Delete <data:post.author/> in the fourth line and substitute your nickname. Preview and Save Template.


INSERT AUTHOR PICTURE IN POSTED BY LINE

Delete the same piece of code in the above example and insert this line :

<a href="URL OF BLOG"><img src="URL OF YOUR PICTURE" /></a> 

Preview and save template.


APPEARANCE OF LABELS

To change the appearance of your labels go to Template >> Edit Html  >> First backup template >> Add this code between <b:skin>![CDATA[ and </b:skin> tags in your template :

.Label {
color:#b4h6td;
background:#afafaf;
xxxxxxxxxxxxxx
}

Add other properties instead of line xxxxxxxxxx just as you do in normal CSS. The CSS in old blogger and the new blogger is the same except that it is enclosed in b:skin tags in case of the latter. Preview and save template.


CHANGE THE NAME "LABELS" BELOW YOUR POST

The Labels are indicated below your posts starting with the term "LABELS". If you wish to change this name to something else like "CATEGORIES" locate this piece of code by going to Template >> Edit Html >> Put Checkin Expand Widget Templates check box and >> Scroll down in Edit Template text box till you come to :

<p class='post-footer-line post-footer-line-2'>
<span class='post-labels'>
<b:if cond='data:post.labels'>
<data:postLabelsLabel/>
<b:loop values='data:post.labels' var='label'>
<a expr:href='data:label.url' rel='tag'><data:label.name/></a><b:if cond='data:label.isLast != "true"'>,</b:if>
</b:loop>
</b:if> 

Delete the line in red in above code and replace with whatever name you want like CATEGORIES for instance.


REPLACE THE NAME "LABELS" BELOW YOUR POST WITH AN IMAGE

First upload your image to a free host like Googlepages and obtain its URL/link. Then locate the code line in red in above code where it was replaced with the word CATEGORIES. Replace that line with this code:

<img src="URL OF IMAGE AT FREE HOST" alt="BLOG TITLE" />

Preview and Save.


CHANGE OLDER POSTS AND NEWER POSTS TEXT

To change the wording of these links go to Template >> Edit Html >> Backup your Template >> Put check in Expand Widgets Template box >> Scroll down in Edit Template text box till you come to this code :

<b:includable id='nextprev'>
<div class='blog-pager' id='blog-pager'>
<b:if cond='data:newerPageUrl'>
<span id='blog-pager-newer-link'>
<a class='blog-pager-newer-link' expr:href='data:newerPageUrl'
expr:id='data:widget.instanceId + "_blog-pager-newer-link"'
expr:title='data:newerPageTitle'><data:newerPageTitle/></a>
</span>
</b:if>
<b:if cond='data:olderPageUrl'>
<span id='blog-pager-older-link'>
<a class='blog-pager-older-link' expr:href='data:olderPageUrl'
expr:id='data:widget.instanceId + "_blog-pager-older-link"'
expr:title='data:olderPageTitle'><data:olderPageTitle/></a>
</span>
</b:if>
<b:if cond='data:blog.homepageUrl != data:blog.url'>
<a class='home-link'
expr:href='data:blog.homepageUrl'><data:homeMsg/></a>
<b:else/>
<b:if cond='data:newerPageUrl'>
<a class='home-link'
expr:href='data:blog.homepageUrl'><data:homeMsg/></a>
</b:if>
</b:if>
</div>
<div class='clear'/>
</b:includable>

CHANGE THIS CODE TO :

<b:includable id='nextprev'>
<div class='blog-pager' id='blog-pager'>
<b:if cond='data:newerPageUrl'>
<span id='blog-pager-newer-link'>
<a class='blog-pager-newer-link' expr:href='data:newerPageUrl'
expr:id='data: widget.instanceId + "_blog-pager-newer-link"'
expr:title='data:newerPageTitle'>OPEN NEXT POST</a>
</span>
</b:if>
<b:if cond='data:olderPageUrl'>
<span id='blog-pager-older-link'>
<a class='blog-pager-older-link' expr:href='data:olderPageUrl'
expr:id='data:widget.instanceId + "_blog-pager-older-link"'
expr:title='data:olderPageTitle'>OPEN PREVIOUS POST</a>
</span>
</b:if>
<b:if cond='data:blog.homepageUrl != data:blog.url'>
<a class='home-link'
expr:href='data:blog.homepageUrl'><data:homeMsg/></a>
<b:else/>
<b:if cond='data:newerPageUrl'>
<a class='home-link'
expr:href='data: blog.homepageUrl'><data:homeMsg/></a>
</b:if>
</b:if>
</div>
<div class='clear'/>
</b:includable>

Preview and save


You can also add a forward arrow image and a backward arrow image by adding this code in the same place above

<a href="URL OF BLOG"><img src="URL OF YOUR ARROW PICTURE" /></a> 

For full details see http://betabloggerfordummies.blogspot.com Making Image Links.

DELETE THE OLDER POSTS AND NEWER POSTS LINK

To completely delete the Older Posts and Newer Posts links locate this line of code in the Blog Posts widget after putting a check in the Expand Widgets Template check-box :

<!-- navigation -->
<b:include name='nextprev'/>

Delete this code. Preview and Save.


ADD SUBSCRIBE TO COMMENTS (ATOM)

Below your posts is the link to subscribe to posts Atom feed. You can add a
Subscribe to: Post Comments (Atom) link. To do this go to Template >> Edit Html >> Put a check in box for Expand Widgets Templates and scroll down till you come to this code in the Blog widgets section :

<!--Post feed links -->
<div class='post-feeds'>
<b:loop values='data:posts' var='post'>
<b:if cond='data:post.allowComments'>
<b:if cond='data:post.feedLinks'>
<b:include data='post.feedLinks' name='feedLinksBody'/>
</b:if>
</b:if>
</b:loop>
xxxxxxxxxxxxxxxxxx
</div> 

Add below code at line xxxxxxxxxxxx in above :

<a href='http://YOURBLOGNAME.blogspot.com/feeds/comments/TYPE'>Subscribe to: Post Comments (Atom)</a> 

Change TYPE to summary or full and put actual blogname instead of YOURBLOGNAME. Save Template and you will see the link on individual post pages at the bottom.


CHANGE SUBSCRIBE TO POSTS (ATOM)

To change the line Subscribe to Posts (Atom) locate this code in the Blog Posts widget after putting a check in the Expand Widgets Template check-box :

<b:includable id='feedLinksBody' var='links'>
<div class='feed-links'>
<data:feedLinksMsg/>
<b:loop values='data:links' var='f'>
<a class='feed-link' expr:href='data:f.url' expr:type='data:f.mimeType' target='_blank'><data:f.name/>(<data:f.feedType/>)</a>
</b:loop>
</div>
</b:includable>

CHANGE THIS TO :

<b:includable id='feedLinksBody' var='links'>
<div class='feed-links'>
<data:feedLinksMsg/>
<b:loop values='data:links' var='f'>
<a class='feed-link' expr:href='data:f.url' expr:type='data:f.mimeType' target='_blank'><data:f.name/> MY FEED LINKS</a>
</b:loop>
</div>
</b:includable>

Change MY FEED LINKS to whatever you want. Preview and save.

POSTED BY LINE BELOW POST TITLE

A blog reader wants to put the posted by line, usually found at the bottom of the post, above just under the Title of the post. To do this go to Template >> Edit Html  >> First Backup Template. Then put a check in Expand Widgets Template check box and scroll down till you see this code in the post footer :

<span class='post-author'>
<b:if cond='data:top.showAuthor'>
<data:top.authorLabel/> <data:post.author/>
</b:if>
</span> 

CUT the code and paste it in the same blog widget below this line :
<div class='post-body'>
Save and view blog.
Read more: http://www.blogdoctor.me/2007/01/customize-post-footer.html#ixzz4xXeozxF5
Resource: http://www.blogdoctor.me/2007/01/customize-post-footer.html

Navigate» Become author for this Blog