Showing posts with label Tutorials. Show all posts

Friday, January 5, 2018

Video tutorial on how to upload the javascript files to blogger

Video tutorial on how to upload the javascript files to blogger itself instead of relying on some third party servers.... by BloggerTricks.com

the code :

<script type='text/javascript'>
//<![CDATA[

Warning paste here all the java sourve code
Put your java script code here

///]]>
</script>

Adding CSS to your blogger/blogspot blog:

Tuesday, September 26, 2017

How to display a RSS feed as simple post or widget

Adding an RSS feed to your website let’s you display things like a feed of the latest headlines. To add an RSS feed to your site follow these instructions. 


Step 1. Locate the feed source you’d like to display. For example, if you want to display the latest Google News headlines you’ll go to Google News and find the RSS button at the bottom of the site. This will take you to their feed URL.

Step 2. Copy the RSS feed URL to your clipboard.

Step 3. Go to http://www.surfing-waves.com/feed.htm. This guy was nice enough to make a free RSS widget you can add to your site. Donate to him if you appreciate it.

Step 4. Add the RSS feed URL to the field provided at the above mentioned website http://www.surfing-waves.com/feed.htm

Step 5. Customize the way you want your feed to be displayed.

Step 6. Copy the widget code to your clipboard.

Step 7. You can insert the feed as simple <HTML/Javascript> widger or you can paste the code In a static page or post page using the editor: click on Insert > HTML and paste the widget code in the field provided. Once that’s entered the widget will appear on the page. You’ll have to remove the promotional box from the widget before you can resize and drag it.

The Code 
-----------------
<!-- start sw-rss-feed code --> 
<script type="text/javascript">
<!--
rssfeed_url = new Array();
rssfeed_url[0]="http://www.surfing-waves.com/newsrss.xml";
rssfeed_frame_width="640";
rssfeed_frame_height="260";
rssfeed_scroll="on";
rssfeed_scroll_step="6";
rssfeed_scroll_bar="off";
rssfeed_target="_blank";
rssfeed_font_size="12";
rssfeed_font_face="";
rssfeed_border="on";
rssfeed_css_url="https://feed.surfing-waves.com/css/style6.css";
rssfeed_title="on";
rssfeed_title_name="";
rssfeed_title_bgcolor="#3366ff";
rssfeed_title_color="#fff";
rssfeed_title_bgimage="";
rssfeed_footer="off";
rssfeed_footer_name="rss feed";
rssfeed_footer_bgcolor="#fff";
rssfeed_footer_color="#333";
rssfeed_footer_bgimage="";
rssfeed_item_title_length="50";
rssfeed_item_title_color="#666";
rssfeed_item_bgcolor="#fff";
rssfeed_item_bgimage="";
rssfeed_item_border_bottom="on";
rssfeed_item_source_icon="off";
rssfeed_item_date="off";
rssfeed_item_description="on";
rssfeed_item_description_length="120";
rssfeed_item_description_color="#666";
rssfeed_item_description_link_color="#333";
rssfeed_item_description_tag="off";
rssfeed_no_items="0";
rssfeed_cache = "13b7854086db25948ad5cfff9f8f5da6";
//-->
</script>
<script type="text/javascript" src="//feed.surfing-waves.com/js/rss-feed.js"></script>
<!-- The link below helps keep this service FREE, and helps other people find the SW widget.
 Please be cool and keep it! Thanks. --> 
<div style="text-align:right; width:640px;">
<a href="http://www.surfing-waves.com/feed.htm" target="_blank" style="color:#ccc;font-size:10px">feedwidget @</a> 
<a href="http://www.surfing-waves.com" target="_blank" style="color:#ccc;font-size:10px">Surfing Waves</a>
</div> 
<!-- end sw-rss-feed code -->
-----------------
Resource 

Wednesday, September 20, 2017

Creating a Store Locator using Google Maps


To help your customers to access your store using mobile devices you need some important tools : Click to call button to help your customers to call you fast and Store map location to help your customer to find your store using GPS navigation , You see how to add a click to call button to yor site to the older post Click to call button
And now you see 6 Easy steps how to add a map with your store location to a simple page :

Step 1 
Go to https://developers.google.com/maps/documentation/embed/
Click GUIDES


STEP 2
2.1) Add your Store address
2.2) Save
2.3) Press Looks good! button


This is NOT your code - Never use this code !!!


STEP 3 Press Register

This is NOT your code - Never use this code !!!


STEP 4 Get a API Key


STEP 4b COPY API KEY


STEP 5: PASTE API KEY - DONE

This is NOT your code - Never use this code !!!


STEP 6: ALL DONE COPY YOUR HTML CODE FOR YOUR WEBSITE
This is YOUR CODE - Use this code !!!


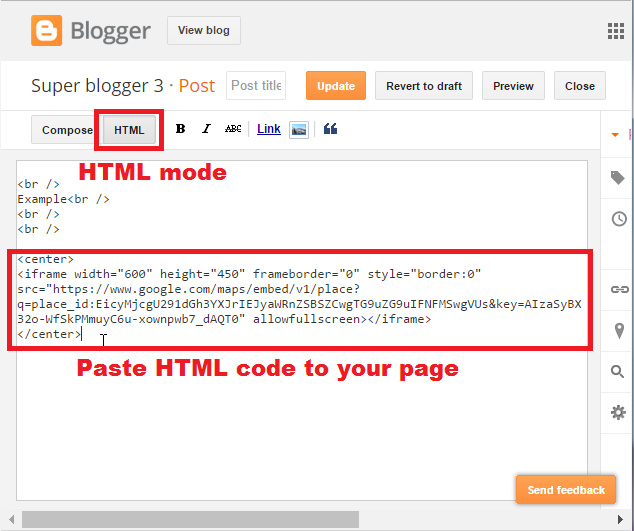
Using the HTML code: Example for google Bloger ( this page )


EXAMBLE RESAULT:


Wednesday, September 13, 2017

How to Add Images in Blogger Widget Sidebar

How to Add Images in Blogger Widget Sidebar


Most of us already know adding images to Blogger posts or creating an image gallery in blogger is as simple as you like. However, have you ever thought about adding an image in the sidebar widget of your Blogger site? Recently, we were asked by one of our reader at our Facebook fan page that how to add images to Blogger Sidebar Widgets? You can use the same technique to display affiliate image advertisements on the sidebar of your site. In this article,f we will show you how to add images in blogger widget sidebar.

Fortunately, Blogger does provide a built-in image gallery widget that can easily be added to your blogger enabled site, to do so follow the following instructions.


The very first thing you’ll be doing is to go to Blogger.com >> Layout >> Add a Gadget. Now you’ll notice a list of widgets providedfac by Blogger that can be added to your site. Since, we are adding image widget so scroll down to “Image” Widget as it can be seen below:


Now you will notice a couple of options that you can fill according to your desire needs. Input the title of the image in the “Title” text field, “Caption” or “Hyperlink” of the image. Once you are done filling text fields, try uploading the image either from your hard drive by browsing the image or upload it form URL of the image as it can be seen in the below screenshot.


Once everything is done, Press the “Save” button and that’s it. You can arrange the widget in the sidebar by selecting and dragging to the location you like and after that “Save Arrangement”.

We hope this tutorial may have helped you in learning something that you didn’t knew before. Do share your thoughts by letting us know what your opinions about this simple but efficient tutorial.

If you like this tutorial, then do share it with your friends on Facebook, Google+ or  even twitter. If you want to get updates directly in your inbox then subscribe to our newsletter.

Resource http://3.bp.blogspot.com/

How To Setup Blogger Custom Domain With Namecheap

Many users of Blogger.com want to use TLD (Top Level Domain) or Custom Domain to replace their blog address (yourblog.blogspot.com). Many of them have difficulty in configuring custom domain in Blogger, especially for those who register their domain in Namecheap.com. Besides the absence of clear guidance from Blogger for Namecheap registrar, there are also a lot of tutorials on the internet that are not applicable anymore because there are some changes from Blogger in the configuration of the Custom Domain. Here is the latest guide in how to setup a custom domain for your blog at Blogger.com with Namecheap as the domain registrar (updated on July/24/2014):

Register domain that you want in Namecheap. You are free to use .com .net .org .info or whatever you want. This time I use domain .info


register your domain with namecheap

Log in to your Blogger account, then click Settings > Basic > +Setup a 3rd party URL for your blog

Blogger custom domain

Setup a 3rd party URL for your blog

Type the domain address that is previously registered in Namecheap, and then click Save. Make sure you use "www" part

type the third party URL and click save

It would appear an error "We have not been able to verify your authority to this domain. Error 12. " Do not worry. Notice that there are two CNAME records below. Go on to step 6

We have not been able to verify your authority to this domain. Error 12

Open a new tab in your browser and log in to Namecheap account > My Account > Manage Domains > yourdomain > then on the left menu bar, click "All Host Records"

All host records Namecheap

Enter data CNAMEs as it is presented below and then click Save For @ field you put http://www.yourdomainname.tld/ (make sure you put your domain name and do not forget about the http://www.)


Back to blogger settings page and then click Save

click save

Now you have TLD (Top Level Domain) in your blog. Old domain (*.blogspot.com) will be redirected automatically to the new domain.

During the making of this tutorial, custom domain www.simpleblogger.info can be directly accessed shortly after I click the save button. The redirecting process from the regular blogspot address to www.simpleblogger.info also works instantly. This is due to this blog is a new blog that I have just made. But if your blog is quite old, this new changes of domain will just have an effect after 3 hours or more. If there are steps that are not clear enough, you can ask in the comments field.

Read more: http://www.komku.org/2014/07/blogspot-blogger-custom-domain-with-namecheap.html#ixzz3HGLZphgR

How to upload and embed Flash SWF file into Google Blogger


This tutorial will show you how to upload and post Flash SWF file to Google Blogger.

Step 1: Make Flash SWF file.
Firstly, please make your Flash file (.swf) with Adobe Flash Studio or Flash Banner Maker software, for example Aleo Flash Intro Banner Maker at http://www.aleosoft.com.
Step 2: Upload Flash SWF file to Internet.
Upload the Flash SWF file to any web hosting, and get the URL address of the Flash SWF file. If you don't have a web host, you can upload your flash file to Google pages for FREE.
  • Open http://pages.google.com , sign in with your Gmail account. Check the option "I agree to the terms", click the button "I am ready to create my pages" below, and login.
  • Click the link "Back to Site Manager" on the top left corner, and go to the Site Manager Home.
  • Click "Upload" button on the right side, then browse and select the Flash SWf file on your local hard disk, upload it.
  • Now, the uploaded file will be listed in the "Uploaded stuff".
Now you have uploaded the Flash SWF file to Google Page, you should get the URL address of the SWF file and note it. In Internet Explorer, you can simply click the file, open it with IE, and copy the link address in the address bar. If you are using Firefox, you may right click on the file, in the popup menu, click "Copy Link Location", and get the link address. The link address should look similar to: http://kevinleo2008.googlepages.com/myflash.swf
Step 3: Embed Flash banner to your Blogger post.
The final step is to embed the Flash banner to your Blogger post.
Open your blogger editor, switch to the "Edit Html" mode, then add the following code to any of the sections in your post.
<embed src="http://kevinleo2008.googlepages.com/myflash.swf" quality="high" allowscriptaccess="always" type="application/x-shockwave-flash" pluginspage="http://www.macromedia.com/go/getflashplayer" align="middle" height="150" width="150"></embed>
Please replace the URL in the code to your own URL and set your own dimensions of Flash SWF file. In this case, the URL address is http://kevinleo2008.googlepages.com/myflash.swf , the width and height sizes are 150.
Online examples:
Embed Flash banner in Google Blogger:
http://flashbannermaker.blogspot.com/2008/03/how-to-post-flash-banner-on-google.html
Embed Flash MP3 Player in Google Blogger:
http://flashbannermaker.blogspot.com/2008/03/how-to-add-flash-mp3-player-to-google.html


How to embed Flash SWF file to Google Sites ?
This tutorial will show you how to insert Flash SWF file to Google Sites.
Step 1: Make Flash SWF file.
Firstly, please make your Flash file (.swf) with Adobe Flash Studio or Flash Banner Maker software, for example Aleo Flash Intro Banner Maker at http://www.aleosoft.com .
Step 2: Upload Flash SWF file to Google Sites as attachment
1. Login to your Google Sites, navigate to your site, then click "More Actions" on the top right corner and click the "Manage Site" menu item.
2. Click "Attachments" on the left navigation bar, then upload your Flash .swf file.
Step 3: Insert Flash SWF file to Google Sites page
1. Return to your site, create a page or edit your page.
2. Click the "HTML" button on the main toolbar.
3. In the Popup dialog, where you want to display the Flash movie, insert HTML codes as following:
<embed src="http://sites.google.com/site/aleoflash/mumsday.swf" width="540" height="140" pluginspage="http://www.macromedia.com/go/getflashplayer"></embed>
Please be sure to change the text "aleoflash" to your own sitename, "mumsday.swf" to your own Flash SWF filename, and the width and height to that of your Flash movie.
You may view the example at:
https://sites.google.com/site/aleoflash/

 Embed / Upload Flash or swf files on Blogger or Website
Resource
http://www.aleosoft.com/flashtutorial_blogger.html
https://www.youtube.com/watch?v=xccbiM2ID4s

Monday, September 19, 2016

How to add a Chat Bot for your webside

Bot Libre's goal is to foster an open, safe community of artificial intelligent chat bots and their developers.
Bot Libre allows you to create your own artificial intelligent chat bot, train them, and share them with others. You are free to use this website, and create your own bots for personal, commercial, or educational usages.
You can connect your bot to email, Twitter, Facebook, live chat, chat rooms, forums, or IRC chat.
You can give your bot its own avatar, using video, images and sound.
You can train your bot through interacting with it, or using chat logs, or importing AIML.
You can program your bot using standard AIML, or Self.
You can import data from the web into your bot's memory, such as words from Wiktionary, or information from Freebase.
You can create a bot as a virtual agent to act as your own website avatar.
You can create a bot to provide customer service or technical support for your products or services.
You can create a bot to give advice.
You can create a bot to act as a stand-in for yourself.
You can create a bot to be your friend.

The Bot Libre platform is an open source project developed by BotLibre.org.
BotLibre.com is a website produced and hosted by Paphus Solutions Inc.
Easy steps to add a chat bot
1) Create account and login to https://www.botlibre.com/ 
2) Click Create
2b) Name your Cat bot , add description , category and tags

2) Click Create

4) Copy Code
5) Paste Code it to a HTML/Javascript Gadget and Save

Live test the Superblogger3  Help Chat bot  >>> to the Right buttom of this page.
The bot response to simple keywords: css , info , help , java , css , html , also response and to the most impotant HTML5 tags: <HEAD> , <FRAME> , <CENTER> <FORM> e,c,t

INFO: this is a demo cat bot but guess !!! need  hard !!! work to program the bot for your website !!!


The Bot Libre SDK is a software development kit that makes it easy for developers to create their own website, mobile app, or server that accesses Bot Libre services.
The SDK includes an JavaScript API and SDK that makes it simple to develop your own bot or chat website.
The SDK includes an Java API and Android activities that makes it simple to develop your own bot or chat Android app.
The SDK includes an iOS API and user interface classes that makes it simple to develop your own bot or chat iOS app.
The SDK also includes examples and support for other programming languages.
The Bot Libre AI engine and SDK are open source under the Eclipse Public License. They are hosted on GitHub under the project Bot Libre.

Docs

See also:

Monday, November 10, 2014

Starting Your First Blog? 29 Tips, Tutorials and Resources for New Bloggers

I just received a tweet from @MillerMosaicLLC asking for some links to posts about starting a blog so I thought instead of just replying to her I’d compile the list here as a post for new bloggers. There are literally thousands of posts in the ProBlogger archives for bloggers starting out – but these would be a good place to start.

Posts on Starting a Blog

There is a lot to think about before and during the process of starting your first blog. These tips and tutorials attempt to give you some questions to think about and some advice on how to practically move forward:
  1. 3 Factors to Consider Before Starting a Blog – Maintaining Blogging Momentum
  2. 9 Tips to Start Blogging Successfully
  3. Starting a New Blog? Start With a Mind Map (will help in choosing topics and categories for your blog)
  4. Crawl before you walk: 6 Step-by-step Instructions for Starting your First Blog
  5. 23 Questions for Prospective Bloggers – Is a Blog Right for You?
  6. How to Choose a Niche Topic for Your Blog
  7. Choosing a Blog Platform
  8. Choosing a Domain Name for your Blog

Writing Blog Content

At the core of every successful blog is great content – without it starting a new blog is almost pointless. How you define ‘great’ content will vary from person to person but I generally put it down to content that is unique and useful. Here are a few other tutorials and tips on creating this type of content on your first blog.
  1. Discover Hundreds of Post Ideas for Your Blog with Mind Mapping
  2. 21 Ways to Write Posts that Are Guaranteed to Grow Your Blog
  3. How to Launch a Blog and Have Fresh Content for Weeks
  4. How to Craft a Blog Post

Blog Promotion/Finding Readers

When starting a your first blog one of the most challenging things is that it is hard to find readers. We all want to be read – here are a few tips on how to make this happen and then how to keep those new readers:
  1. 13 Ways to Promote Your Next Blog Post
  2. How I’d Promote My Blog if I Were Starting Out Again
  3. How to Market Your Blog in 2007 (still very relevant)
  4. 19 Strategies for Finding Readers for your Blog
  5. 11 Ways to Find New RSS Subscribers for Your Blog
  6. A Secret to Finding New Subscribers for Your Blog
  7. 21 Ways to Make Your Blog Sticky

Making Money from Blogs

Not all bloggers choose to try to make money from their blogs (I think this is a good thing). But if you’re one that does want to make money from your new blog then here are a few tips and articles for you to start with:
  1. How I Make Money Blogging
  2. How Bloggers Make Money
  3. Make Money Online Blogs – Should You Start One and How to Choose a Profitable Topic
  4. How quickly after starting a blog should I put ads on it?
  5. How Much Should I Charge for my Advertising Space?
  6. A Reality Check about Blogging for Money

Further Reading and Resources on Starting a New Blog

If what I’ve listed above isn’t enough – here are a few other resources for those wanting to invest into starting out with a blog.
  1. ProBlogger the Book – This book (in which I am a co-author) was written for the beginner blogger. It contains up to date and logically ordered advice on starting new and profitable blogs.
  2. Training Programs – Two great courses/coaching programs for new bloggers are Blog Mastermind and Become a BloggerBlog Mastermind  is a paid coaching program that is one of the more comprehensive training resources going around. Become a Blogger is series of free videos and a great free report/roadmap. It also has a paid program which is ideal for those just starting out. Both of these courses are by Yaro Starak – a great blogger.
  3. Archives – there are a lot more posts that are relevant for bloggers starting their first blogs in the archives of ProBlogger. Another good place to find some of them is my Blogging for Beginners Series helpful. I’ve mentioned some of the posts in this series above but there are a lot more ‘beginner’ type tips and articles listed in it.
  4. Recommended Blogging Resources – lastly I’ve put together a page of tools and resources for bloggers. It covers blogging platforms, designs/templates, tools, training and monetization. I hope you find them useful.
I hope you find these articles and resources helpful!

Sunday, November 9, 2014

How to Start a Blog – Step by Step Guide

I know, I know… starting a blog can be confusing. Four years ago, when I started my first blog, I knew absolutely nothing about blogs or blogging. I kept searching for information and “how-to” guides on Google, but they all required technical skills and I found them extremely difficult to follow.

By now, I’ve built and managed more than 20 different blogs, and during that time, I’ve learned a TON about blogging.
All I can say is that creating blogs is extremely easy and it does not require any coding skills (HTML). In fact, the whole process is somewhat automatic. So whether you are 20 or 70 years old, doesn’t really matter – you can still make it. Here’s my sample blog, which I made in less than 20 minutes. You can do that too; simply follow the steps below.
If you are still hesitating, I suggest you read my article titled “Reasons why you should start your own blog.”
P.S.: If you EVER get stuck while setting up your blog, get in touch with me and I’ll help you out.

Shall we start? 


1) DECIDE WHAT YOU ARE GOING TO BLOG ABOUT

The first thing you need to do is pick a blog topic. Is there anything you enjoy or are really passionate about? If there is, then start a blog about it. When I started my first blog, I was really interested in smartphones and new tech gadgets, so I picked that topic. It makes no sense to start a blog about something you have no interest in, while it’s much easier to write articles and posts about topics that you’re passionate about.
It’s even better when you have been interested in a specific field or an industry for a long time, because you are already an expert. However, if you don’t have any idea which topic or niche you want to write about, think about your hobbies or just start blogging about your daily activities, memorable moments or simply about everything.
P.S. If you already know your blog niche or topic, you can skip this step and move onto Step 2.
2) DECIDE WHICH BLOGGING PLATFORM TO USE, FREE OR SELF-HOSTED?
First of all, most of the blogs on the internet are made using the WordPress blogging platform. In fact, WordPress has been downloaded over 72 million times and is used by many popular blogs and websites.
Here’s why I think using WordPress is the best way to start your blog:
  • You can choose from many different layouts and free themes
  • You can easily write blog posts and add pictures/images to your blog
  • You are able to categorize your blog posts and create a custom menu
  • People can comment and share your blog
  • etc…

Free is not FREE…

Yes, you can create a free blog on a blogger.com or tumblr.com, but they are not actually free. And let me tell you why…
You are not able to get your OWN domain – Instead, you will get a sub-domain. My blog (startbloggingonline.com) has its own domain, but if I had decided to start a blog on blogger.com (for example), then it would look like startbloggingonline.blogger.com – a bit clumsy, isn’t it?
They are lacking of different themes/layouts and plugins – In other words, your blog will look really blank and boring. If you want additional themes or plugins to customise your blog, you have to pay… a lot.
You have NO control over your blog – Your blog is hosted on another site, thus you are not the “owner” of this property. If moderators decide that your blog does not fit with their policies (which can happen quite often), they can actually delete your blog without any warnings. In short, all your hard work and time spent on the blog will be vanished within seconds.
You are not able to earn money via blogging – If you make a blog, you CAN earn money with it, lots of people are. However, If you ever decide to earn money with your blog, you are unable to do it on a free blog. They simply don’t allow you to do that. Even if they do, they want their own cut, which is usually 50%.
However, if you are on a budget and don’t plan to blog more than few months then definitely start with a free blog. A self-hosted blog on your own domain (yourblog.com) is by far the better option. It gives you full control over your blog and you’ll look more professional. It’s also a great choice for people who want to blog long-term, share their knowledge, become a blogger and earn some money from it.

WHAT IS THE COST OF STARTING A SELF-HOSTED BLOG ON YOUR OWN DOMAIN?

Not much. You will need a domain that will cost approximately $10 a year and a hosting (service that connects your blog to the internet) is around $4 – $7 a month (less than a movie ticket). To sum this up, it’ll be around $50 a year. The good thing about self-hosted blog is that you don’t have to be committed. If you feel that blogging is actually not your cup of tea, you can cancel anytime and many services have 90 days money back guaranteed as well.

3) CHOOSING A DOMAIN & HOSTING, AND SETTING UP A WORDPRESS BLOG ON YOUR OWN DOMAIN

If you decided to go with a self-hosted blog on your own domain, smart choice. Finding a great domain name can take a while, but it’s worth it. I suggest you pick something brandable and easy to remember. Let’s say you are planning to start a fashion blog. www.fashionblog2013.orgor www.all-about-latest-fashion-trends.com is not a great idea. But why?
People simply cannot remember long domains and when they want to return to your blog they are likely to forget your domain name. It’s much better to choose something memorable, such aswww.fashionologie.com, www.vivalafashion.com or something similar. As an alternative, you can just use your name, for example: www.MikeWallagher.com
In short, your domain name should be:
  • Catchy
  • Easy to remember
  • Unique

WHERE CAN I GET A DOMAIN NAME AND BLOG HOSTING?

I usually suggest people to get a domain and hosting from the same place, in that way you’ll save some money and time. In the past few years while I have been creating and managing blogs, I have discovered that there are very few reliable hosting companies.
To be more clear, I’ve used several hosting companies in the past. Just to mention some of them: Bluehost, Hostgator, Dreamhost etc. BUT… I wasn’t really satisfied with them. Their customer support wasn’t really professional and it took a lot of time to get in touch. Quite often my blog’s speed (page loading time) was ridiculously slow. The reason was quite simple (they aren’t that bad, actually): THEY WERE OVERSELLING their services. They focused on getting more and more new clients rather than improving their services, support and valuing their current customers.
One of the most reliable ones (also the one that I’m currently using) is Web Hosting Hub. Their service is quite cheap compared with others and they are well-known for their great customer support via email and phone (24/7). Web Hosting Hub is also good for beginners too, as they have a “1-Click-Blog-Installation” feature that is focused on WordPress blogs and websites. You simply click few buttons and your self-hosted blog on your own domain is ready.
Of course, you can use any other hosting company and I have included a tutorial on how to install your blog manually as well. If you decide to go with a different hosting company then make sure they offer unlimited bandwidth and unlimited disk space. That will help you to avoid problems later on.
You have two options to install your blog to your own domain:
  • A) With “One-Click-Installation” using WebHostingHub (You’ll get a domain from there as well).
  • B) Manually.
The One-Click-Installation is better for beginners or those who are trying to set up their first blog. If you are internet/computer savvy then have a look at the manual tutorial. Either way, you’ll get your blog online very quickly.

A) How to Set Up WordPress Blog Using Web Hosting Hub (TUTORIAL FOR BEGINNERS)

B) How to Set Up a WordPress Blog Manually to Any Host (ADVANCED)


…. and once you have completed the installation:

WRITING YOUR FIRST POST, CHOOSING NEW THEME AND PROMOTING YOUR BLOG

P.S. Two things:
1) If you found this tutorial helpful, feel free to share it below. It really means a lot to me!
2) If you started a blog, you might want to join to my blogging course. Simply click on the “FREE updates” at the top of my page.
- Mike Wallagher
Resource http://startbloggingonline.com/


*** In Review please post your comments and your experience *****

Go back to home page 

Navigate» Become author for this Blog