Showing posts with label Drive. Show all posts

Wednesday, September 13, 2017

Storing Javascript/CSS Files With Google Drive


Storing Javascript/CSS Files With Google Drive
Storing Blogger CSS and JavaScript files with Google Drive will help to eliminate any of the problems mentioned above and reduce the clutter among your services. Taking this method can increase your site speed, increase the opportunities for a successful SEO campaign, and make your life so much easier.


Google Drive provides ample amount of space to store large files, and offers collaboration services so that you can work among different team members on the same project. Some of the files that you upload into the cloud services can remain unpublished and stay within the private site, whereas other files like blog posts can be published or stored to the public site.

Another beneficial feature of storing all your Blogger files on Google Drive is that it is highly secure. Google comes with the backing of one of the leading companies in the technical world so that you can be sure your content is safe from hackers and those looking to compromise your site.

This guide will provide you with step-by-step instructions on how to setup your Blogger site using Google Drive. It's completely free to take advantage of this strategy, and will provide you with a solid platform from which to build your blog.


Step 1. Prepare the CSS/JavaScript Files

·         First, we need to create the file that we need to host. To host a CSS file, open the Notepad and paste the CSS code (if it is enclosed within the <style> and </style> tags, remove them). 

·         In the Notepad menu, select 'File' > 'Save as' and type the file name with the .css extension just like I did with mycssfile.css - see the screenshot below.


·         In the same window, choose "All files" in the "Save as type" option and set the Character Encoding to UTF-8. 

·         If you want to host a JavaScript file, add the .js extension (instead of .css) at the end of your file name (remove the <script>...</script> tags if you see them). Click "Save" and navigate to the location where you want to save the file. 

Step 2. Upload Your File on Google Drive

·         Access https://drive.google.com and log in with your Gmail account. After you logged in, click on the 'Create' button and add a new separate folder to upload your JavaScript and CSS files.


·         Open the newly created folder, and click on the Upload button with the upward arrow to choose the files that you need to upload.


·         Now, navigate to the location where you saved the files, select them (to select multiple files, press and hold down the Ctrl key on your keyboard and then click on them) and press the Open button.
·         After the files have been successfully uploaded, right click on the file names (to select all your files in the folder, click on the checkbox) and select 'Share':

·         In the 'Sharing settings' window, click on the 'Change' link and choose the 'Public on the web' option. Press 'Save' and copy the link(s) of your uploaded file(s) from the 'Links to share' box highlighted in blue, then paste it into a Notepad to use it later.

Step 3. How to Add an External CSS/JavaScript file to Blogger

Before you can use the links, you must replace 'https://drive.google.com/file/d' to 'https://googledrive.com/host' and remove '/edit?usp=sharing' in the link.

For example, the link to mycssfile.css that I copied looks like this:
https://drive.google.com/file/d/0B4n9GL3eVuV-TkphMkc3SFR2Slk/edit?usp=sharing
Notice the part in blue after the "/file/d/" part. That is the file ID which is used to access it via the new hosting service. It should start with the following URL:
https://googledrive.com/host/
Add the file ID like this (remove the '/edit?usp=sharing' part):
https://googledrive.com/host/0B4n9GL3eVuV-TkphMkc3SFR2Slk
Now log into your Blogger account, select your blog and go to Template > Edit HTML. Click anywhere inside the code area and press the CTRL + F keys to open the search box:


If you want to add a CSS file, type the following tag inside the search box and hit Enter to find it:
<head>
Just BELOW the <head> tag, add this line:
<link rel="stylesheet" type="text/css" href="https://googledrive.com/host/0B4n9GL3eVuV-TkphMkc3SFR2Slk" />
And replace https://googledrive.com/host/0B4n9GL3eVuV-TkphMkc3SFR2Slk with the link of your CSS file:


If you want to add a Javascript file, search for the following tag:
</body>
And add this line just ABOVE it:
<script src='https://googledrive.com/host/0B4n9GL3eVuV-eVYwLXBrTlZrVDg' type='text/javascript'></script>
Replace the line in blue with your URL:


Finally, press the 'Save template' button to save the changes. And you're done!
In Conclusion
Once you have successfully saved all your file folders and closed out of the drive. Open your site in a browser and make sure that all the changes have completed successfully.

Next time you want to edit any of the information or move internal files, all you have to do is open up the Google Drive folder on your account and make the modifications from that location. Those files will then automatically sync to the online folder and make updates to your site. This works the same if you want to change the appearance by modifying the CSS code to extend the header, footer, or make customizations.

As you can see, changing your file storage out so that is CSS and JavaScript is stored on your Google Drive account is easy to do and only takes a few minutes. After you make the change, you can begin benefiting from faster loading speeds, higher SEO rankings, and overall a more convenient platform to work from to increase the efficiency of your work.


How to Host JavaScript or CSS Files on Google Drive

Many bloggers use a custom template for their blog and a custom template sometimes requires an external JavaScript file, but sadly we can't host the JavaScript or CSS file on Blogger because Blogger only allows us to upload images and videos.

Previously, most bloggers would use Google Code (http://code.google.com/hosting) to host these files because Google Code's project hosting feature is very simple to use and free. But since Google announced that they are deprecating almost all download options for Project hosting on Google Code, we have to switch to Google Drive as recommended by Google itself.


Starting today, existing projects that do not have any downloads and all new projects will not have the ability to create downloads. Existing projects with downloads will see no visible changes until January 14, 2014 and will no longer have the ability to create new downloads starting on January 15, 2014. All existing downloads in these projects will continue to be accessible for the foreseeable future.

If your project is using downloads to host and distribute files and has a need to periodically create new downloads, we recommend you move your downloads to an alternate service like Google Drive before January 15, 2014. Google

Actually it is not so hard to use Google Drive, just create a folder, upload the JavaScript file (or any other file like images, videos, documents including PDFs and Microsoft Office files) and then change the file's sharing settings from "private" to "public on the web", or simply change the folder's sharing settings from "private" to "public on the web" and all files inside that folder will have the same sharing permissions, but the tricky part is getting the proper direct link for the JavaScript or CSS files, so we can use it on the blogger template. Please follow the steps below to host your JavaScript or CSS file using Google Drive:


Method 1

With this method you can get the proper link with the file name:
https://googledrive.com/host/folder-id/filename

Example:
https://googledrive.com/host/0B47Pdqj--olfUENkNGhtX3lSN0U/example.js
https://googledrive.com/host/0B47Pdqj--olfUENkNGhtX3lSN0U/example.css

How to add an external JavaScript to a web page (blogger template)?
<script type='text/javascript' src='https://googledrive.com/host/folder-id/filename.js'></script>

How to add an external CSS to a web page (blogger template)?
<link href='https://googledrive.com/host/folder-id/filename.css' rel='stylesheet' type='text/css'>

Step 1:
Login to your Google Drive account > Click Create > Select Folder


Create a folder

Step 2:
Type a name for the folder and click Create button


folder name google drive

Step 3:
Select the folder and then click the Share button


click share button

Step 4:
Click Change...


click change

Step 5:
Change the sharing settings from "Private" to "Public on the web" > Click Save > Click Done


change the sharing settings

Step 6:
Now click on the folder's name to go into it


click on the folder name

Step 7:
Click the Upload button > Select Files...


upload files

Step 8:
Select file > Click Open


select the files

Step 9:
The item will have the same sharing permissions as the selected folder.... Click Upload and share


upload and share
Step 10:
Copy the string characters after #folders/


google drive folder id

Step 11:
Open a new browser tab > paste that string (folder id) into the address bar after
https://googledrive.com/host/ 
Example: https://googledrive.com/host/0B47Pdqj--olfUENkNGhtX3lSN0U

Step 12:
To get the direct link to the file, right click on example.js > Select Copy Link Location (Firefox)

copy link location


Method 2

With this method you can get the proper link without the file name:
https://googledrive.com/host/file-id

Example:
https://googledrive.com/host/0B47Pdqj--olfcUNkV3o3SjdoVGM
https://googledrive.com/host/0B47Pdqj--olfVVg3MFgxVlpqd0k

How to add an external JavaScript to a web page (blogger template)?
<script type='text/javascript' src='https://googledrive.com/host/file-id'></script>

How to add an external CSS to a web page (blogger template)?
<link href='https://googledrive.com/host/file-id' rel='stylesheet' type='text/css'>

Step 1:
Login to your Google Drive account > Click Create > Select Folder


create a folder - google drive

Step 2:
Type a name for the folder and click the Create button


private folder name

Step 3:
Click on the folder's name to go into it


go to the folder

Step 4:
Click the Upload button > Select Files...


click upload button

Step 5:
Select file > Click Open


select the files

Step 6:
Select the checkbox to select the file > Click the Share button


click share button

Step 7:
Click Change...

click change

Step 8:
Change the sharing settings from "Private" to "Public on the web" > Click Save


change the sharing settings

Step 9:
Copy the link > paste in Notepad

Example:  
https://docs.google.com/file/d/0B47Pdqj--olfVVg3MFgxVlpqd0k/edit?usp=sharing
File ID: 0B47Pdqj--olfVVg3MFgxVlpqd0k

Paste the file id after: https://googledrive.com/host/

Direct link to the file:
https://googledrive.com/host/0B47Pdqj--olfcUNkV3o3SjdoVGM


copy the file id - google drive

Another article you might be interested in: How to Host a Website on Google Drive
If you found this article helpful, then please share it with someone else by using the buttons below. Thank you!

Read more: http://www.komku.org


Host CSS, HTML or JavaScript Files in Blogger Using Google Drive 

Host CSS, HTML or JavaScript Files in Blogger
Number of websites available which you can use to upload your CSS, HTML or JavaScript files. Bloggers and webmasters prefers to add their entire StyleSheet coding in single file. But, blogger has not this kind of feature to upload CSS and JavaScript files. Recently one of our readers asked us how he can host files on blogger? Good news, Google Drive has ability to host your CSS, JavaScript and HTML Files for FREE. In this short tutorial, we will show you How to Host CSS Files with Google Drive in Blogger?

Advantages Of Google Drive

  • Google Drive Service is Free, Secured and Safe.
  • Google Drive Provides 5 GB Storage With Unlimited Bandwidth.
  • Create and Host Many Kinds Of Spreadsheets and Presentations.

How to Host CSS Files with Google Drive in Blogger.

Step#1: Copy CSS Code From Blogger Template

Go to Blogger Dashboard » Template » Edit HTML and search for the <b:skin><![CDATA[ tag. Now, you will see a full CSS coding, copy this coding till the ]]></b:skin> tag. See screenshot below:

Step#2: Make a style.css File

Remove the entire CSS code from your blogger template after copying it and paste the coding in a new notepad. Now save the document and name the file to style.css (the extension of the file should be in .css).

Step#3: Host Your CSS File On Google Drive:

Go to Google Drive and login into your Gmail Account. Create a new folder. Click on “Create” button and from the drop down list select “Folder”. Now name the folder to anything that you like such as HostingFiles, my files and etc. In the end, press "Create" to conclude.  
Click on the new folder. Now, choose the upload icon present on the left side of create button. Select “File”.
In this step select the style.css file that you created few moments ago. Press the open button.
When you will click on open button then you will see a small upload wizard on the right side of your screen. It will take some time.
Press the “Share” button. Make this file public. Press change, and select “public on the web”. Now, click on Save button.

Step#4: Getting a Proper Hosting Link

Right click on the uploaded file and select “Share”. Copy the whole URL present in the text area under “Link to share”. See screenshots:


Now, we will modify hosting link. In link to share section it would somewhat looks like this https://docs.google.com/file/d/your-upload-file-code/.
Replace that link to this format https://googledrive.com/host/your-upload-file-code.

Note:
Make sure “your-upload-file-code” remains the same before and after the changes are made. For Example, if the link of my file is 


https://docs.google.com/file/d/0B66hLK2d2x4VVl9SaXNvb2dPRVU/ so I will change it to 
https://googledrive.com/host/0B66hLK2d2x4VVl9SaXNvb2dPRVU.

Step#5: Adding Google Drive Hosted CSS file in Blogger
Again, go to Blogger » Template » Edit HTML. Now search for the starting <head> tag and just above it paste the following code.


<link href='https://googledrive.com/host/your-uploaded-file-code' rel='stylesheet'/>

Please replace https://googledrive.com/host/your-uploaded-file-code with your own Google drive hosting link

If you want to give your suggestion or you want to ask anything related to this tutorial then please leave a comment below.


How To Create Contact Page via e-mail form Using Google Drive and Googge forms

How many of you know all the features of Google Drive? Have you ever used all features of Google Drive? I think very less people use all the features of Google Drive. Google Drive has lots of incredible features including documents, spreadsheets, presentation, forms & drawing. Any one can create online documents, spreadsheets, presentation, forms & drawing using Google Drive. Contact Form becomes more popular widget for bloggers.Did you ever created a contact form page for your blog using Google Drive? If your blog don't have tried then try now.

Today, I will show you how to create a simple contact form using Google Drive. You must have a rough idea of contact page. A contact page contains Name, Email address & Message box. You have to create these input field in your contact form page using Google Drive. So, let's start now.


Steps to create first input field "Name"

Step 1. First, login to Google Drive with your email address & password.
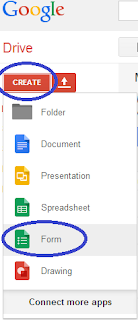
Step 2. Click Create
Step 3. After that click Form
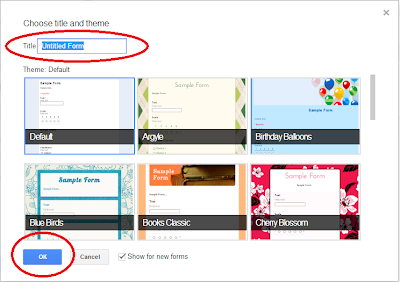
Step 4. Type Title  of contact page (e.g, Contact Us) and select the desired theme.
Step 5. Click O.K.
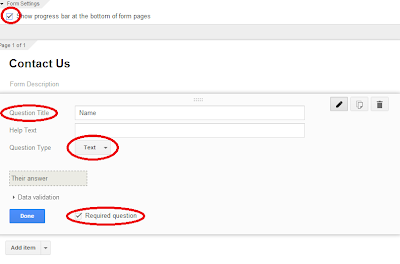
If you want to show the progress bar at the bottom of form page then select the checkbox against "Show progress bar at the bottom of form pages".


Step 6. Type Name or Enter your Name against Question Title
Step 7. Click Multiple Choice against Question Type and select Text. Why you select Text? Because a name contains only text. If you want to make this field is mandatory then select checkbox against Required question.
Step 8. Now click Done.
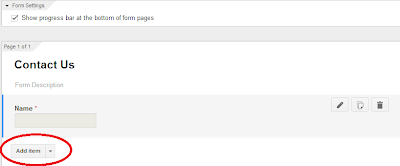
You have successfully created the first input field.
Steps to create second input filed "Email"
Step 1. After completion of the first input filed, click Add item to create the second input field
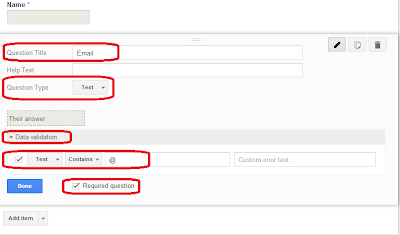
Step 2. Type Email or Enter your Email against Question Title
Step 3. Like Name input filed, Question Type should be Text in case of Email address
Step 4. Click Data Validation 
Step 5. Select checkbox against Number
Step 6. Click Number and then select Text. In the Text box, right after Contains, enter @
Step 7. If you want to make this field is mandatory then select checkbox against Required question
Step 8. After that click Done.
You have successfully created the second input field.
Steps to create third input filed "Message Box"
Step 1. After completion of the second input filed, click Add item to create the third input field
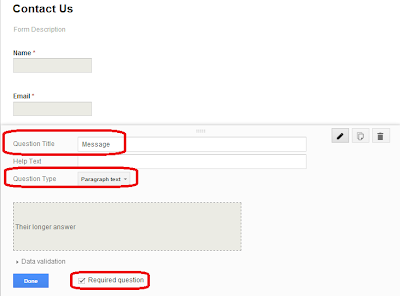
Step 2. Type Message against Question Title
Step 3. Instead of Text, select Paragraph Text against Question Type in case of Message box
Step 4. To make this field is mandatory, select checkbox against Required question
Step 5. After that click Done.


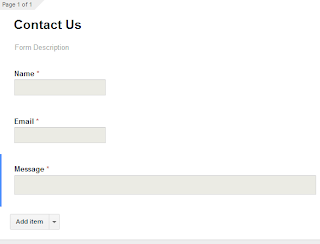
You have successfully created the third & final input field. Your contact form page is ready now and it looks like below image. If you wish to see your contact page live then click View live form located above below the menu bar of contact form.
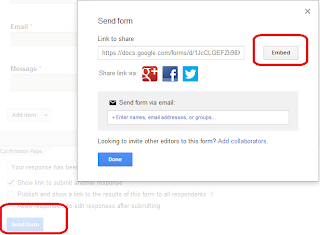
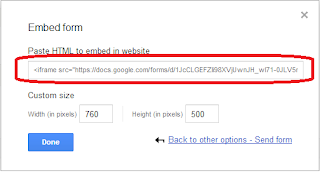
Now you need to embade your contact form page to your blog. To do this scroll down and click Send form and then click Embed. Here you can customize the width and height of your contact form page according to you. If you don not wish to change the width and height then copy the html code.
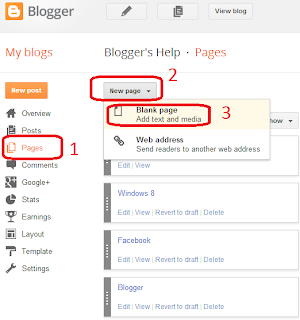
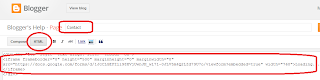
Now login to your blogger account and click Pages located right side. After that click New Page and then click Blank Page. Type your page title (e.g Contact) and then click HTML and paste the html code and click Publish button to publish the page. 
Cheers! Now its your turn. Watch This Video


Posted  by 
Resource http://www.manidin.com/2013/12/HowToCreateContactPageUsingGoogleDrive.html


How to create a Contact Form Using Google Drive. 
Learn How to Create a Contact Form Using Google Drive - Easiest way to make contact form for your Blogger or WordPress Site Published on 9 Apr 2014 Click Prefect is Digital Marketing Training Institute based in New Delhi. Enroll Digital to learn 20 modules in 100 hours. Weekday and Weekend batch available.. http://goo.gl/gkXXCS


Navigate» Become author for this Blog