Showing posts with label Forms. Show all posts

Wednesday, September 13, 2017

How To Create Contact Page via e-mail form Using Google Drive and Googge forms

How many of you know all the features of Google Drive? Have you ever used all features of Google Drive? I think very less people use all the features of Google Drive. Google Drive has lots of incredible features including documents, spreadsheets, presentation, forms & drawing. Any one can create online documents, spreadsheets, presentation, forms & drawing using Google Drive. Contact Form becomes more popular widget for bloggers.Did you ever created a contact form page for your blog using Google Drive? If your blog don't have tried then try now.

Today, I will show you how to create a simple contact form using Google Drive. You must have a rough idea of contact page. A contact page contains Name, Email address & Message box. You have to create these input field in your contact form page using Google Drive. So, let's start now.


Steps to create first input field "Name"

Step 1. First, login to Google Drive with your email address & password.
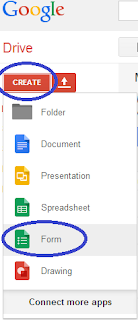
Step 2. Click Create
Step 3. After that click Form
Step 4. Type Title  of contact page (e.g, Contact Us) and select the desired theme.
Step 5. Click O.K.
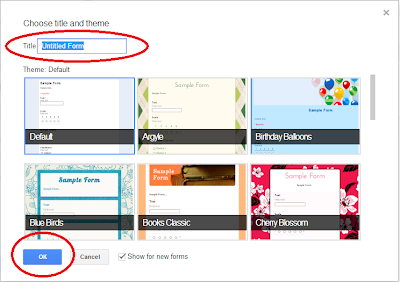
If you want to show the progress bar at the bottom of form page then select the checkbox against "Show progress bar at the bottom of form pages".


Step 6. Type Name or Enter your Name against Question Title
Step 7. Click Multiple Choice against Question Type and select Text. Why you select Text? Because a name contains only text. If you want to make this field is mandatory then select checkbox against Required question.
Step 8. Now click Done.
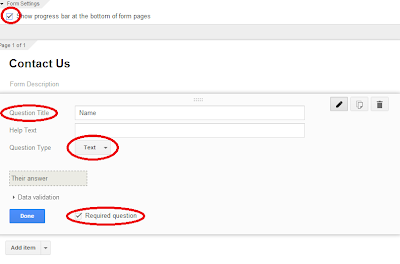
You have successfully created the first input field.
Steps to create second input filed "Email"
Step 1. After completion of the first input filed, click Add item to create the second input field
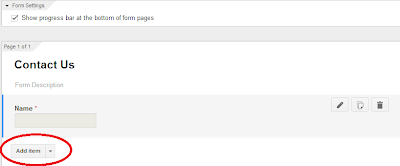
Step 2. Type Email or Enter your Email against Question Title
Step 3. Like Name input filed, Question Type should be Text in case of Email address
Step 4. Click Data Validation 
Step 5. Select checkbox against Number
Step 6. Click Number and then select Text. In the Text box, right after Contains, enter @
Step 7. If you want to make this field is mandatory then select checkbox against Required question
Step 8. After that click Done.
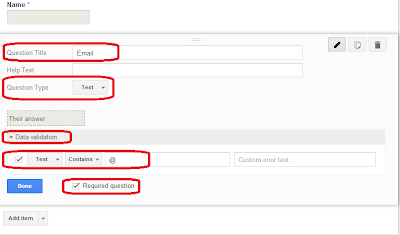
You have successfully created the second input field.
Steps to create third input filed "Message Box"
Step 1. After completion of the second input filed, click Add item to create the third input field
Step 2. Type Message against Question Title
Step 3. Instead of Text, select Paragraph Text against Question Type in case of Message box
Step 4. To make this field is mandatory, select checkbox against Required question
Step 5. After that click Done.
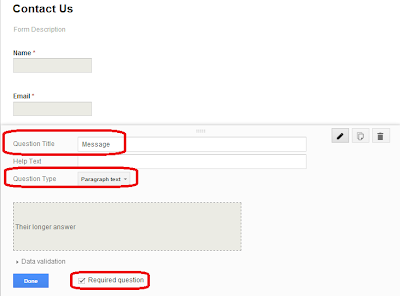

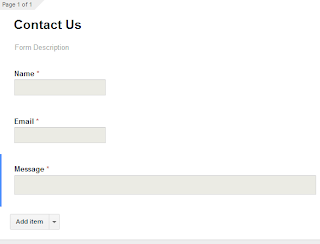
You have successfully created the third & final input field. Your contact form page is ready now and it looks like below image. If you wish to see your contact page live then click View live form located above below the menu bar of contact form.
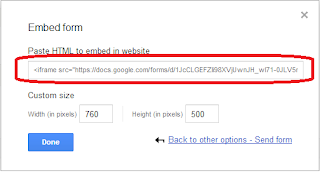
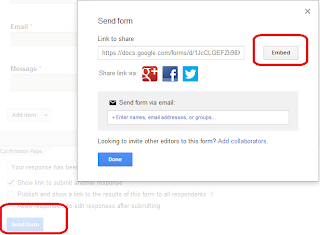
Now you need to embade your contact form page to your blog. To do this scroll down and click Send form and then click Embed. Here you can customize the width and height of your contact form page according to you. If you don not wish to change the width and height then copy the html code.
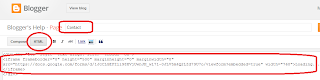
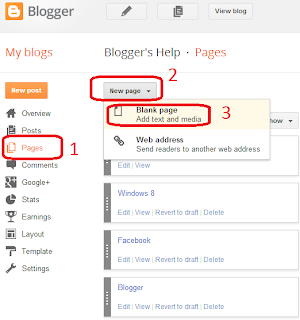
Now login to your blogger account and click Pages located right side. After that click New Page and then click Blank Page. Type your page title (e.g Contact) and then click HTML and paste the html code and click Publish button to publish the page. 
Cheers! Now its your turn. Watch This Video


Posted  by 
Resource http://www.manidin.com/2013/12/HowToCreateContactPageUsingGoogleDrive.html


How to create a Contact Form Using Google Drive. 
Learn How to Create a Contact Form Using Google Drive - Easiest way to make contact form for your Blogger or WordPress Site Published on 9 Apr 2014 Click Prefect is Digital Marketing Training Institute based in New Delhi. Enroll Digital to learn 20 modules in 100 hours. Weekday and Weekend batch available.. http://goo.gl/gkXXCS


Thursday, November 6, 2014

How To Create A Contact Page Using The Official Blogger Contact Form

Previously I wrote about creating a simple contact form for Blogger using Google Drive. The contact form is quite powerful because you can change the required data, the blog owner's email and the email display format. But, there is a disadvantage, you cannot modify the form design using your own CSS because the contact form is in an iframe and the domain is different.

On May 16 2013, Blogger introduced its new official contact form gadget (widget). However, contact form on the sidebar is very unusual, because many professional blogs put their contact form on a specific page, but with a little more effort you can actually create a contact page for your Blogger blog using the official contact form gadget and the most important is you can styling the contact form using your own CSS. Please follow these detailed steps below:


Step 1:

Click Layout Add a Gadget, a pop-up window will open 


Step 2:
On the pop-up window click More Gadget > Click Contact Form > Click Save

More Gadget

Step 3:
Now create a blank page. Click Pages > New Page Blank page

Add a new Blank Page

Step 4:
Enter title Contact Us > Click HTML > Copy & Paste the HTML contact form code below > Don't allow reader comments > Click Done > Click Publish

Copy Paste the Contact Form HTML code

<form name="contact-form">
<p></p>
Name
<br>
<input class="contact-form-name" id="ContactForm1_contact-form-name" name="name" size="30" value="" type="text">
<p></p>
Email
<span style="font-weight: bolder;">*</span>
<br>
<input class="contact-form-email" id="ContactForm1_contact-form-email" name="email" size="30" value="" type="text">
<p></p>
Message
<span style="font-weight: bolder;">*</span>
<br>
<textarea class="contact-form-email-message" cols="25" id="ContactForm1_contact-form-email-message" name="email-message" rows="5"></textarea>
<p></p>
<input class="contact-form-button contact-form-button-submit" id="ContactForm1_contact-form-submit" value="Send" type="button">
<p></p>
<div style="text-align: center; max-width: 222px; width: 100%">
<p class="contact-form-error-message" id="ContactForm1_contact-form-error-message"></p>
<p class="contact-form-success-message" id="ContactForm1_contact-form-success-message"></p>
</div>
</form>

*When you copy and paste HTML code above you might get this line automatically:
Read more: http://www.komku.org/2013/05/how-to-create-contact-page-using-the-official-blogger-contact-form-widget.html#ixzz2n5HAW8gr
You can delete that line :)

Step 5:
Now Click Template Edit HTML

Blogger Template Edit HTML

Step 6:
Click Jump to widget > Select ContactForm1

Blogger Template Edit HTML - Jump to ContactForm1

Step 7:
Click the small black arrow to expand ContactForm1 code

Blogger Template Edit HTML - Click the arrow to Expand ContactForm1
Step 8:
Click small black arrow again to expand codes between <b:includable id='main'> and </b:includable>

Blogger Template Edit HTML - Click the arrow to Expand ContactForm1

Step 9:
Delete the highlighted codes (all things between <b:includable id='main'> and </b:includable>)
  
Blogger Template Edit HTML - Delete ContactForm1 Widget Code

After deleting, the ContactForm1 widget code will look like this:

Blogger Template Edit HTML - ContactForm1 Gadget Code deleted

Step 10:
Add this CSS code above ]]></b:skin> and then click Save Template. You can use this CSS to styling the contact form.

.contact-form-name, .contact-form-email {
max-width: 200px;
width: 100%;
}
.contact-form-email-message {
max-width: 400px;
width: 100%;
height: 150px;
}

*When you copy and paste CSS code above you might get this line automatically:
Read more: http://www.komku.org/2013/05/how-to-create-contact-page-using-the-official-blogger-contact-form-widget.html#ixzz2n5HAW8gr
Please delete that line :)

Blogger Template Edit HTML

Now your blog has a contact page (e.g. http://www.komku.org/p/contact-us.html). Please make sure you don't remove the Contact Form gadget from your layout. All messages will be sent to your Gmail email associated with the Blogger account, but you can use Gmail's filter to automatically forward all messages to another email address. If you found this article helpful, then please share it with someone else by using the buttons below. Thank you!
(Thanks to Nhan Dao)

Read more: http://www.komku.org/2013/05/how-to-create-contact-page-using-the-official-blogger-contact-form-widget.html#ixzz3IIv6rsii

Sunday, October 26, 2014

How To Create A Contact Form for Google Drive Hosted Website

Every website needs a contact page. Typically a contact page contains email, phone numbers and your address. A lot of people prefer to contact the website owner via email, they will click the email address link (mailto:admin@example.com) and it will automatically open an email client installed on their computer.


Webmail users will just copy and paste the email address from the contact page to their webmail. But what if for some reason they think that open and login to a webmail is a little bit troublesome, then we need to include a contact form because the contact form allowed visitor to give the website owner message right then and there.

A contact form is basically a set of questions filled out on the contact page by your visitor. The message automatically sent to the admin email when the visitor click the submit button. There are several ways to create a contact form for Google Drive hosted website:

Gweb.io
If you're using gweb.io service for your Google Drive hosted website, you can set up a contact form easily, just paste the contact form code below to your contact page:

<form action="/contact" method="post">
  <p>Name
    <br />
    <input name="contact[name]" type="text" size="30" required="true"/>
  </p>
  <p>Email
    <br />
    <input type="email" name="contact[email]" size="30" required="true"/>
  </p>
  <p>Message
    <br />
    <textarea name="contact[message]" cols="35" rows="5" required="true"></textarea>
  </p>
<button type="submit">Send</button>
</form>


You don't need to edit the code. When user click the Send button, Gweb.io will automatically send an email to the Google account associated with the site.

FormEmailer Script
FormEmailer is a Google Apps Script developed by Henrique Abreu, with this script you are able to set up a flexible email merge in your spreadsheets and automatic emailing to your forms, and of course with this script you can create a simple contact form easily, follow this guide: Create a Simple Contact Form using Google Drive

Kontactr
Kontactr is a one-click contact form service which lets you create contact forms for your website easily. It implements CAPTCHA on your form to prevent spammers and bots from contacting you. All you need to do is go to kontactr.com > Sign up > Activate your Account > Login. And you will get a contact form code. Copy the code and paste it to your contact page to generate a contact form. You can customize the colors used for your contact form to match your site (http://kontactr.com/customize)

Contact Form code

Some other articles you might be interested in:
If you found this article helpful, then please share it with someone else by using the buttons below. Thank you!

Read more: http://www.komku.org/2013/07/how-to-create-contact-form-for-google-drive-hosted-website.html#ixzz3HGNo4Uyf

Navigate» Become author for this Blog